
TL;DR:
- Most residential roof leaks originate at flashing points rather than shingles, making flashing essential for preventing water damage. Properly installed flashing creates a waterproof barrier around vulnerable areas like chimneys, valleys, and vents, and must meet code standards to ensure warranty validity. Regular inspections and timely repairs of flashing components like pipe boots and sealants can prevent costly damage and extend roof lifespan.
Roof flashing is defined as thin metal sheeting, typically made from galvanized steel, aluminum, or copper, installed at roof junctions, penetrations, and transitions to create a waterproof seal. Approximately 95% of residential roof leaks originate at flashing points rather than the shingles themselves. That single statistic reframes how you should think about roof maintenance. Chimneys, roof valleys, pipe vents, and wall intersections are the real weak spots, and flashing is what stands between them and water damage. The 2021 International Residential Code (IRC) mandates flashing at all wall-to-roof intersections and penetrations, making it a legal requirement, not just a best practice.
What is the role of flashing in roofs?
The role of flashing in roofs is to redirect water away from vulnerable joints and penetrations before it can reach the roof deck or interior structure. Shingles shed water across flat surfaces well, but they cannot seal the gaps where a chimney meets the roof, where two roof planes form a valley, or where a plumbing vent punches through the deck. Flashing fills those gaps with a physical barrier that channels water downward and outward.
Seven primary types of flashing protect distinct areas of a roof. Each type addresses a specific water entry risk.
- Step flashing runs along the sides of chimneys and dormers, interlacing with shingles course by course to block sidewall water intrusion.
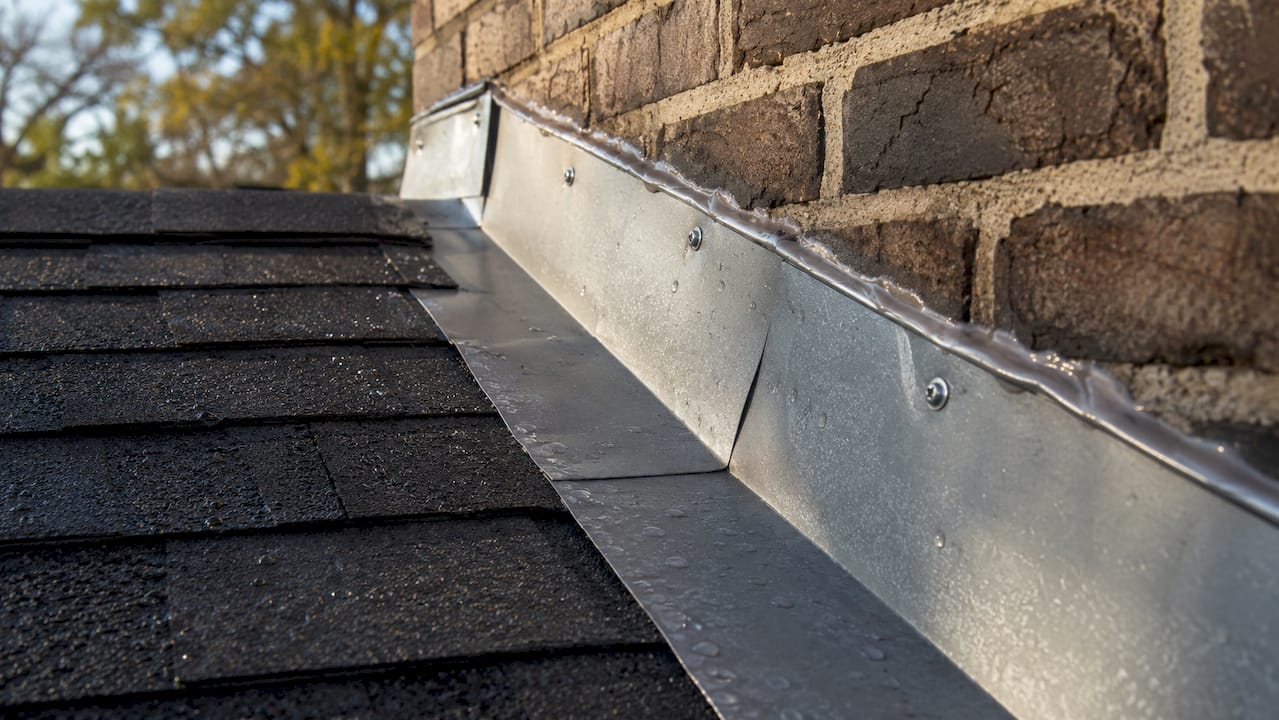
- Counter flashing overlaps step flashing and is embedded into the chimney mortar, creating a two-layer seal.
- Apron (headwall) flashing sits at the base of a vertical wall where it meets the roof slope, directing water over the shingles below.
- Valley flashing lines the V-shaped channel where two roof planes meet, one of the highest-volume water runoff zones on any roof.
- Drip edge flashing runs along eaves and rakes, guiding water off the roof edge and away from the fascia and soffit. Learn more about drip edge installation and why it matters for integrated flashing systems.
- Pipe boot flashing seals around plumbing vents with a rubber or metal collar that conforms to the pipe’s shape.
- Kick-out flashing diverts water from a roof edge into a gutter rather than letting it run down a wall, preventing rot and mold behind siding.
| Flashing type | Primary location | Common failure point |
|---|---|---|
| Step flashing | Chimney and dormer sidewalls | Corrosion, improper overlap |
| Counter flashing | Chimney cap and reglets | Sealant cracking at 8–12 years |
| Apron (headwall) | Base of vertical walls | Improper fastening |
| Valley flashing | Roof plane intersections | Debris buildup, punctures |
| Drip edge | Eaves and rake edges | Missing installation |
| Pipe boot | Plumbing vent penetrations | UV degradation at 10–15 years |
| Kick-out | Roof-to-wall terminations | Missing or improperly sized |
Pro Tip: If your roof is over 10 years old, schedule a flashing inspection specifically targeting pipe boots and counter flashing sealant. These two components fail on a predictable schedule and are the most commonly overlooked.
Counter flashing sealants degrade within 8–12 years, and rubber pipe boots typically fail around the 10–15 year mark due to UV exposure. Both timelines are predictable, which means you can address them before a leak ever appears.
How does roof flashing work to prevent leaks?
Flashing works as a waterproof bridge. It seals the joints and penetrations where shingles physically cannot provide a continuous barrier. Water follows the path of least resistance, and any gap, crack, or improperly lapped joint becomes an entry point. Properly installed flashing eliminates those paths by directing water onto the surface of the shingles below, where gravity carries it safely to the gutters.
The critical concept here is that flashing functions as an integrated system, not a collection of isolated metal pieces. A valley flashing that terminates without a kick-out piece at the wall will still allow water to migrate behind the siding. Step flashing without properly overlapping counter flashing leaves the chimney base exposed. Every component depends on the others to perform correctly.
Water leaks often appear far from the actual flashing failure point because water travels along roof decking and rafters before dripping into living spaces. A stain on your bedroom ceiling may trace back to a failed pipe boot two feet away or a cracked counter flashing sealant on the opposite side of the chimney. This is why visual inspection from inside the attic is as important as checking the roof surface.
Common installation errors that compromise how roof flashing works include:
- Face nailing: Nailing through the visible face of flashing instead of hiding fasteners under shingles creates direct leak paths at every nail hole.
- Sealant as the primary seal: Caulk is a supplement, not a substitute. Relying on sealant alone at major junctions violates the 2021 IRC and fails within a few years.
- Improper overlap: Step flashing pieces must overlap by a minimum amount to prevent water from wicking upward between courses.
- Wrong material pairing: Copper flashing in contact with aluminum causes galvanic corrosion, degrading both metals faster than normal wear.
“Slow, migration-based leaks from flashing failure often cause extensive hidden damage before visible symptoms appear.” Facility Executive
Pro Tip: After any heavy rain, check your attic with a flashlight within 24 hours. Fresh water stains on rafters or decking near penetrations almost always point to a flashing problem, not a shingle failure.
What are common signs of flashing failure?
Flashing failure rarely announces itself with an obvious stream of water. The signs are usually subtle at first, which is exactly why they cause so much damage before homeowners act. Knowing what to look for gives you the upper hand.
Warning signs you should not ignore
- Interior water stains on ceilings or walls near chimneys, skylights, or dormers
- Rust streaks or discoloration on metal flashing visible from the ground
- Deteriorated or cracked rubber around pipe boot collars
- Missing kick-out flashing at roof-to-wall junctions, often visible from the ground
- Peeling paint or rot on exterior siding directly below a roof edge
- Efflorescence (white mineral deposits) on chimney masonry near the roofline
Maintenance steps homeowners can follow
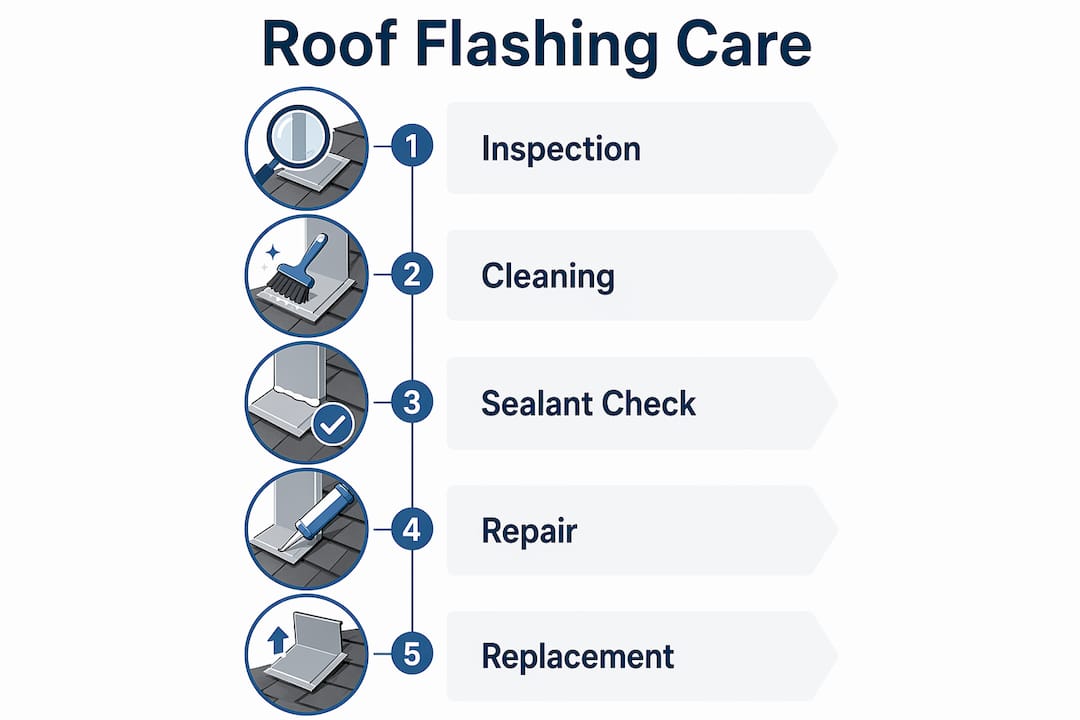
- Schedule annual inspections. A professional roof maintenance inspection should include a dedicated flashing check at every penetration and transition.
- Inspect after major storms. High winds and hail can displace step flashing or damage pipe boots. Check within 48 hours of any significant weather event.
- Check chimney flashing sealant. If the sealant at your counter flashing looks cracked or has pulled away from the masonry, it needs attention. Re-sealing buys time, but mechanical repair is the permanent fix.
- Replace pipe boots proactively. If your roof is 12 or more years old, replacing rubber pipe boots before they split is cheaper than repairing the water damage they cause when they fail.
- Clear debris from valleys. Leaves and debris trapped in valley flashing hold moisture and accelerate corrosion. Clean valleys every fall.
Failed flashing is the most common cause of warranty callbacks and costly roof repairs, exceeding shingle failures by a wide margin. Addressing a deteriorated pipe boot costs a fraction of what you will spend repairing rotted decking, damaged insulation, or mold remediation after a prolonged leak.
Pro Tip: Do not re-caulk over cracked counter flashing sealant and call it done. The sealant failed because the flashing moved or the reglet joint opened. Re-sealing without addressing the underlying movement will fail again within two to three years.
How do building codes shape flashing installation standards?
The 2021 International Residential Code sets the floor for flashing performance, and it is more specific than most homeowners realize. The IRC mandates flashing at all wall-to-roof intersections and penetrations and explicitly prohibits relying on caulk alone as the primary seal. This matters because sealant-only installations are common shortcuts that fail within a few years and void roofing warranties.
Code-compliant flashing installation requires mechanical fastening under shingles, proper material selection for the climate and substrate, and correct overlap dimensions at every joint. In Central Florida, where Thomasroofingandrepair operates across Brevard, Volusia, and Orange counties, the combination of intense UV exposure, heavy rain, and hurricane-force winds makes code compliance even more critical than in milder climates.
Flashings installed correctly can last the life of the roof. Incorrect installation, by contrast, voids warranties and compromises the entire roof assembly. That is not a minor distinction. A roofing warranty that covers 30 years of shingles provides no protection if the flashing underneath was installed improperly.
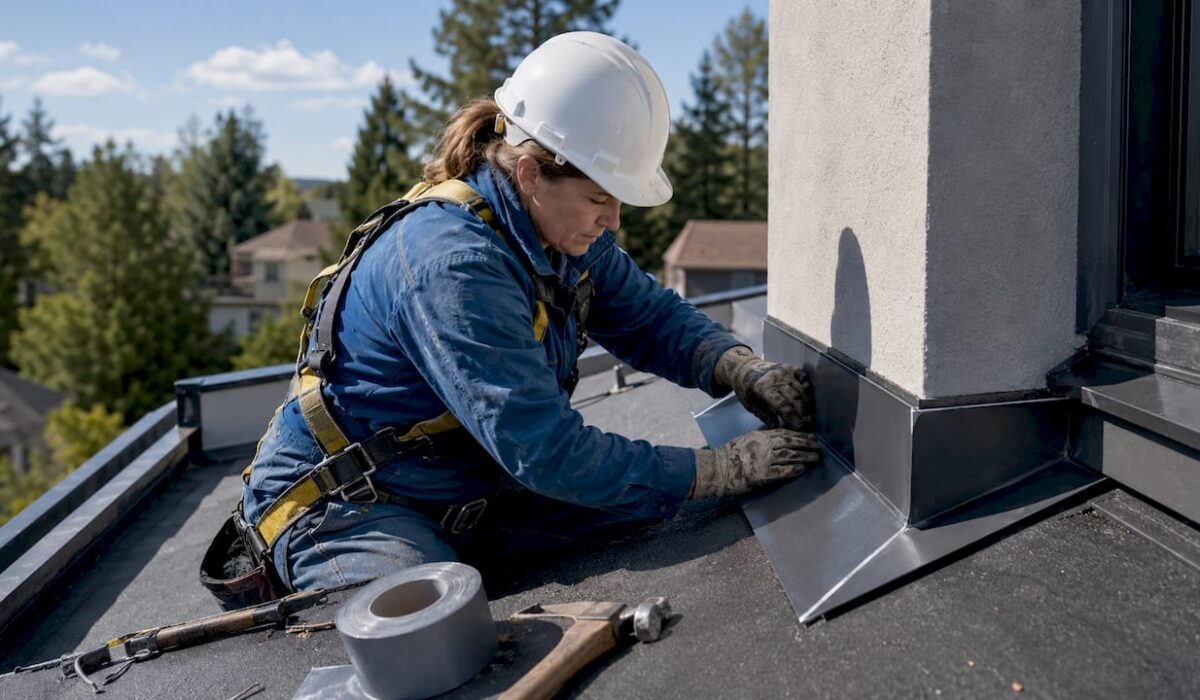
Hiring a licensed contractor who understands both the IRC requirements and local Florida building codes protects you in two ways. First, the installation is done right. Second, your warranty remains valid. Review chimney flashing guidelines for additional context on code-compliant practices at one of the most common flashing failure zones on residential roofs.
Pro Tip: Ask your roofing contractor to show you the flashing installation before shingles are laid over it. Reputable contractors welcome this. It is the only time you can verify the work visually without tearing the roof apart.
Key Takeaways
Roof flashing is the single most important factor in preventing leaks, and most failures are predictable, detectable, and preventable with the right maintenance approach.
| Point | Details |
|---|---|
| Flashing causes most leaks | Around 95% of residential roof leaks originate at flashing points, not shingles. |
| Seven types protect distinct zones | Step, counter, apron, valley, drip edge, pipe boot, and kick-out each address a specific water entry risk. |
| Failure follows a schedule | Counter flashing sealants fail at 8–12 years; rubber pipe boots degrade at 10–15 years. |
| Flashing is a system | Every component depends on the others; a gap anywhere in the system creates a leak path. |
| Code compliance protects warranties | The 2021 IRC prohibits sealant-only installations; improper flashing voids roofing warranties. |
Why flashing deserves more attention than it gets
After years of working on roofs across Central Florida, the pattern I see most often is this: a homeowner replaces their shingles after a storm, pays a significant amount of money, and then calls back six months later with a leak. Nine times out of ten, the new shingles are fine. The flashing was never touched.
Flashing is invisible once the roof is finished. That invisibility creates a false sense of security. Homeowners assume that if the shingles look good, the roof is sound. The reality is that the most vulnerable parts of your roof are the ones you cannot see from the driveway.
I have also seen the opposite mistake: homeowners who spot cracked sealant at a chimney and apply a tube of roofing caulk, thinking the problem is solved. Sealant is a temporary measure. When the underlying flashing has moved, corroded, or was never properly installed, re-sealing is like putting a bandage over a structural crack. It holds for a season and then fails again, usually during the worst possible storm.
The homeowners and property managers who avoid expensive water damage are the ones who treat flashing as a scheduled maintenance item, not an emergency response. They know their pipe boots have a lifespan. They get their counter flashing checked every few years. They hire contractors who pull permits and follow the IRC. That discipline is not complicated. It just requires knowing what to look for and acting before the ceiling stain appears.
— Thomasroofingandrepair
Protect your roof with professional flashing inspection and repair
Flashing problems rarely stay small. A cracked pipe boot or failed counter flashing sealant that costs a few hundred dollars to fix today can lead to rotted decking, mold, and structural repairs that cost many times more.

Thomasroofingandrepair provides professional flashing inspection, repair, and replacement for homeowners and property managers across Brevard, Volusia, and Orange counties. Our team identifies the exact failure point, not just the visible symptom, and repairs it to 2021 IRC standards. Whether you need a full roof repair assessment or a targeted flashing fix after storm damage, we deliver work that holds. Contact us for a free estimate and find out exactly where your roof stands before the next rain season hits.
FAQ
What is roof flashing used for?
Roof flashing is used to create waterproof seals at roof junctions, penetrations, and transitions where shingles alone cannot prevent water entry. Common locations include chimneys, valleys, pipe vents, skylights, and wall-to-roof intersections.
How long does roof flashing last?
Correctly installed metal flashing can last the life of the roof, often 25–50 years. However, rubber pipe boots typically degrade within 10–15 years, and counter flashing sealants fail within 8–12 years and require periodic replacement.
Can I repair flashing myself?
Minor sealant touch-ups are possible for experienced DIYers, but mechanical flashing repair and replacement require professional installation to meet 2021 IRC standards and preserve your roofing warranty. Improper repairs often create new leak paths.
How do I know if my leak is a flashing problem?
If the leak appears near a chimney, skylight, vent, or wall intersection rather than in the middle of a roof field, flashing failure is the most likely cause. Water stains may appear far from the actual failure point due to water migration along rafters and decking.
Does flashing affect my roofing warranty?
Improperly installed or missing flashing voids most manufacturer roofing warranties. The 2021 IRC prohibits sealant-only installations, and warranty terms typically require code-compliant flashing at all penetrations and transitions.