
TL;DR:
- Roof seams are the critical joints where roofing materials overlap and bond, providing a watertight barrier that prevents leaks. Proper installation and biannual inspections help identify early signs of failure, which can be caused by thermal stress, UV exposure, and wind uplift, especially in Florida’s harsh climate. Regular maintenance with correct sealants and professional assessments can extend roof lifespan and prevent costly water damage.
Roof seams are defined as the joints where two sections of roofing material overlap and bond together to form a continuous, watertight barrier. Every roof has them, and they are the most structurally critical points on any roofing system. Get them right, and your roof sheds water for decades. Get them wrong, and water finds its way in faster than you expect. This guide covers explaining roof seams from the ground up, including how they are built across different roofing materials, what stresses they endure, how to spot early failure, and what proper maintenance looks like. Thomasroofingandrepair works with these systems daily across Central Florida.
What are the common types of roof seams and their installation methods?
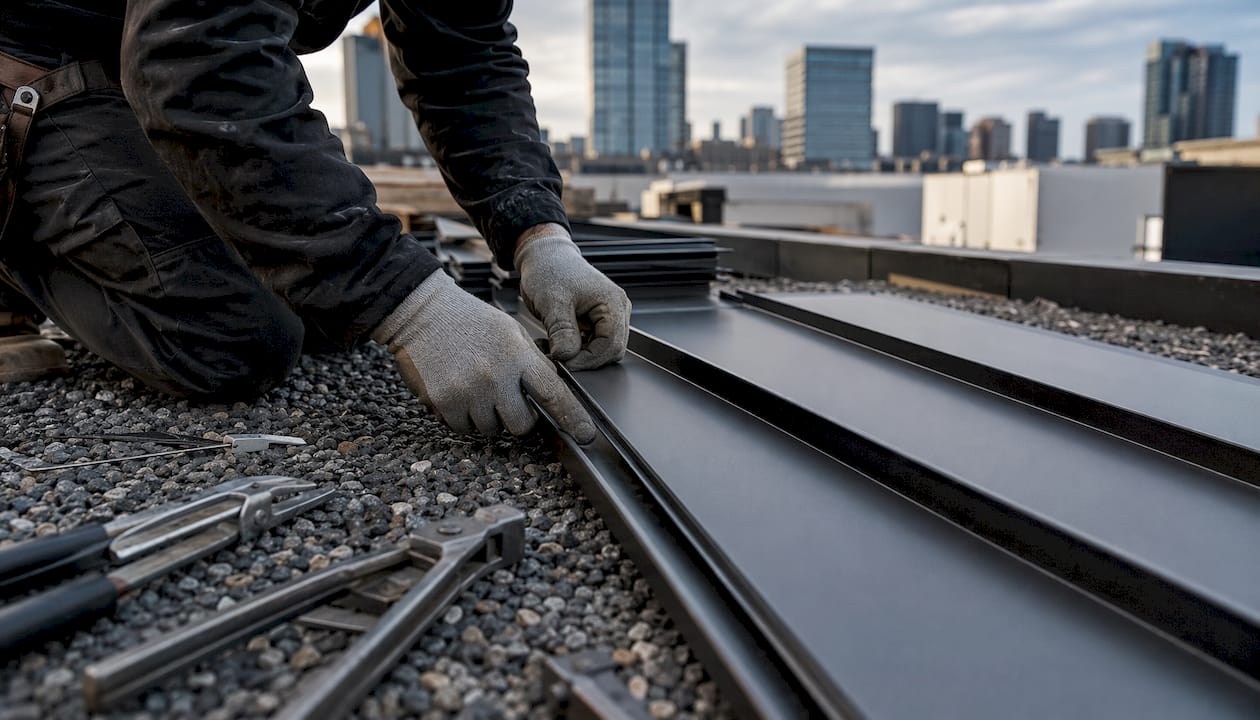
Roof seams vary significantly depending on the roofing material. The construction method, durability, and failure risk all differ by seam type. Understanding these differences helps you ask the right questions when hiring a contractor or evaluating your current roof.
Standing seam metal roofs
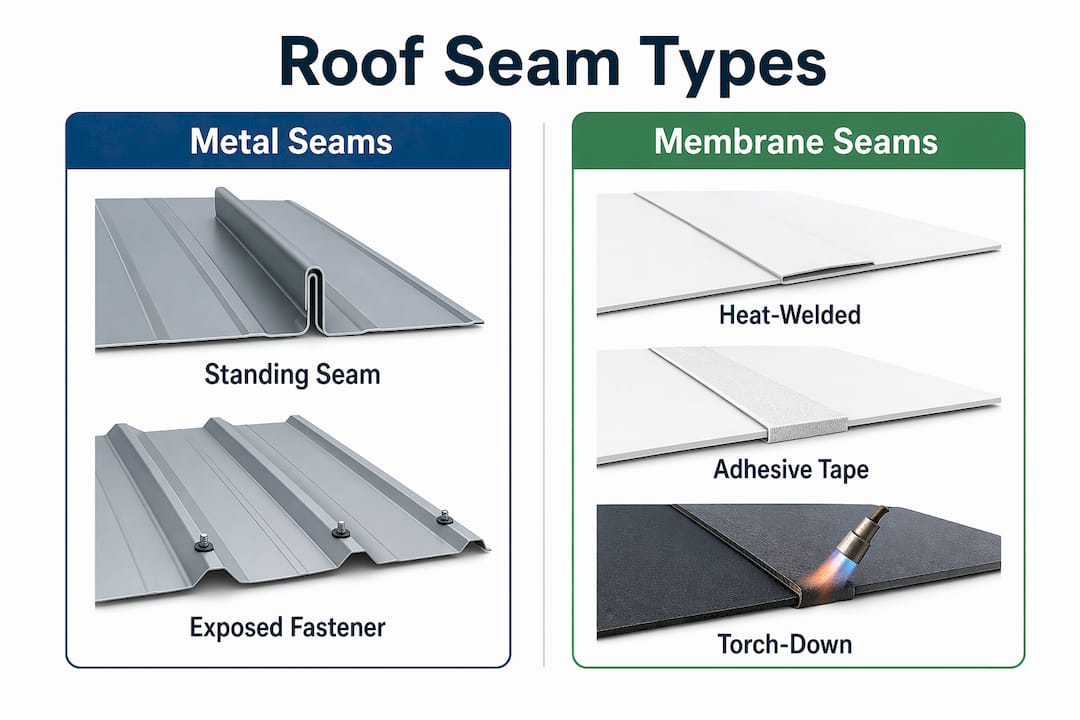
Standing seam metal roofs feature raised, interlocking seams that run vertically along the roof panels. The seam sits above the flat surface of the panel, which keeps water from pooling directly on the joint. Fasteners are concealed inside the seam, which eliminates exposed screw heads as a leak point. This design makes standing seam one of the most weather-resistant seam types available for residential and commercial buildings.
Exposed fastener metal roofs
Exposed fastener metal roofs use visible screws driven through the panel surface at the seam overlap. Each screw has a rubber washer that seals the hole. Over time, those washers compress, crack, and lose their seal. This seam type requires more frequent maintenance than standing seam and is more vulnerable to leak development at the fastener points.
TPO and PVC membrane roofs
TPO and PVC flat roofing systems use heat-welded seams. A hot-air welding tool fuses the overlapping membrane edges into a single continuous bond. TPO seams require a minimum weld width of 1.5 inches to resist wind uplift and thermal movement. That standard exists because narrower welds fail under stress without showing visible warning signs until a major weather event hits.
EPDM membrane roofs
EPDM rubber roofing does not use heat welding. Instead, EPDM relies on self-adhesive lap tape, with full bond strength developing 24–72 hours after installation under moderate conditions. That curing window matters. Walking on or stressing the seam before it fully bonds can compromise the joint permanently.
Modified bitumen roofs
Modified bitumen uses either heat-applied torch-down laps or cold-adhesive laps to seal seams. Torch-down seams create a strong bond when applied correctly but require skilled technicians to avoid overheating the membrane. Cold-adhesive laps are more forgiving but depend heavily on surface cleanliness for adhesion.
| Seam type | Bonding method | Key installation requirement |
|---|---|---|
| Standing seam metal | Mechanical interlock | Concealed fasteners, no exposed screws |
| Exposed fastener metal | Screws with rubber washers | Washer condition must be checked regularly |
| TPO / PVC membrane | Heat welding | Minimum 1.5-inch weld width |
| EPDM rubber | Self-adhesive lap tape | 24–72 hour cure before stress |
| Modified bitumen | Torch or cold adhesive | Clean, dry surface required |
How does thermal expansion affect roof seam integrity?
Thermal stress is the leading mechanical cause of seam deterioration. Roof surface temperatures in the U.S. regularly exceed 150°F during summer months. That level of heat causes membranes to expand significantly, and when temperatures drop at night, the material contracts. Every cycle of expansion and contraction pulls and pushes at the seam joint.
Seams are the weakest point in any membrane field. The field itself is a single continuous sheet, but a seam is two sheets bonded at an edge. That edge experiences more stress than the surrounding material because the two sheets can move slightly independently. Over years of thermal cycling, this movement causes seam edges to lift, separate, or crack.
UV exposure compounds the problem. Sunlight degrades sealants and adhesives, making them brittle. A sealant that was flexible at installation becomes rigid and prone to cracking after several years of UV exposure. Thermal cycling causes seam degradation especially at terminations and mechanical fastening points, which is why one-time repairs rarely hold without ongoing maintenance.
Wind uplift adds another layer of stress. Wind creates negative pressure on a roof surface, pulling the membrane upward. At a seam edge, that uplift force concentrates. A seam that is already weakened by heat cycling or UV damage is far more likely to peel back under wind load. Central Florida’s storm season makes this combination of heat and wind particularly damaging to roof seams.
What are the signs of roof seam problems and how do you inspect them?
Catching seam failure early saves significant money. A small seam gap that costs a few hundred dollars to repair can become a structural water damage claim if left unaddressed through one rainy season.
Visible signs to look for from the ground or roof surface:
- Lifted or curled seam edges, especially at the perimeter of the roof
- Visible gaps or separations between overlapping membrane sections
- Discoloration, staining, or rust streaks running from seam lines
- Bubbling or blistering near seam edges, which indicates trapped moisture
- Cracked or missing sealant at exposed fastener seams
Interior warning signs:
- Water stains on ceilings that align with seam locations on the roof above
- Soft or spongy areas underfoot if you have access to a flat roof surface
One critical fact: water entering at a failed seam can travel several feet laterally under the membrane before appearing inside the building. Interior stains are unreliable for pinpointing exactly where the seam failure is. A stain on your ceiling may be several feet away from the actual breach.
Pro Tip: Take dated photographs of your seams every six months. Side-by-side comparison photos reveal slow changes in seam condition that are invisible during a single inspection.
Professional inspectors use probe testing to physically check weld integrity on TPO and PVC seams. Seam welding quality is the defining factor for TPO and PVC membrane longevity, and probe testing is the only reliable way to confirm bond strength without destructive sampling. Infrared thermal scanning detects moisture trapped beneath the membrane, which shows up as temperature variation in the scan. Both tools are worth requesting when you schedule a professional assessment. You can review a full roof inspection checklist to prepare before your appointment.
Biannual inspections after seasonal weather transitions are the recommended standard. For Central Florida homeowners, that means inspecting after hurricane season ends in late fall and again before summer heat peaks.
How do you maintain and repair roof seams to extend roof life?
Proper seam maintenance follows a specific sequence. Skipping steps leads to repairs that fail within a season.
- Clean the seam area thoroughly. Remove dirt, debris, old sealant residue, and any rust. For metal roofs, rebonding to bright metal is the standard. That means wire brushing or grinding back to clean, bare metal before applying any new sealant. Applying new sealant over old residue or oxidized metal produces a bond that fails quickly.
- Select the correct sealant for your roof type. Standard household silicone is not suitable for metal roof seam repairs. High-solids polyurethanes or fabric-reinforced sealants handle thermal expansion stresses that silicone cannot. For concealed lap seams, butyl tape is the correct choice. Using the wrong product is one of the most common DIY repair mistakes.
- Apply the sealant or tape correctly. Follow manufacturer specifications for overlap width and application temperature. Cold weather slows adhesive curing and can prevent a proper bond from forming.
- For TPO and PVC seams, abrade before re-welding. Old TPO membrane seams must be abraded back to fresh material before re-welding. Oxidized TPO surfaces cannot be reliably bonded again, even with a heat welder.
- Use mechanical fastening for metal seam repairs when needed. Proper metal roof seam repairs combine mechanical fastening with butyl tape and UV-stable polyurethane sealants. Caulking alone is a short-term fix that typically fails within one to two seasons.
- Schedule repairs promptly after storm events. Wind and rain accelerate seam wear. A seam that was marginal before a storm may be actively leaking after it.
Pro Tip: Keep a simple log of every seam repair, including the date, location, product used, and a photo. That record helps a roofing professional assess repair history and identify recurring problem areas during future inspections.
Most seam failure results from installation quality issues and lack of routine maintenance, not from the membrane material itself failing. That means the majority of seam problems are preventable with the right contractor and a consistent maintenance schedule. A step-by-step leak repair guide can help you understand what a proper repair process looks like before you hire anyone.
Key Takeaways
Roof seam integrity is the single most important factor in preventing water intrusion, and it depends on correct installation, the right materials, and biannual inspection.
| Point | Details |
|---|---|
| Seam type determines method | TPO uses heat welding; EPDM uses adhesive tape; metal uses mechanical interlock or sealant. |
| Thermal stress is the top threat | Temperatures above 150°F cause expansion and contraction that separates seam bonds over time. |
| Interior stains mislead | Water can travel several feet under a membrane before appearing inside, so locate the seam, not just the stain. |
| Use the right sealant | Polyurethane or butyl tape for metal seams; silicone fails under thermal expansion. |
| Inspect twice yearly | Schedule seam checks after hurricane season and before peak summer heat for best results. |
Why roof seams deserve more attention than they get
Most homeowners think about their roof in terms of shingles, gutters, or flashing. Seams rarely come up until something is already leaking. That is a costly mistake. After years of working with roofs across Central Florida, the pattern is consistent: the properties with the most expensive water damage repairs almost always had seam problems that were visible months or years before the leak showed up inside.
The thermal environment in Florida is particularly brutal on seams. Roofs here cycle through extreme heat every single day for months at a time. A seam that would last 20 years in a cooler climate may show stress in 10 years here without proper maintenance. That is not a reason to panic. It is a reason to inspect.
The other thing I have seen repeatedly is homeowners using the wrong repair products. Silicone from a hardware store looks like a reasonable fix. It is not. It fails within a season on a metal roof, and then the homeowner is back to square one, often with more damage than before. Spending a little more on the correct polyurethane sealant, or calling a professional for a proper re-weld, saves real money over time.
My honest recommendation: treat seam inspection as a non-negotiable twice-yearly task, not an optional one. The cost of a professional seam assessment is a fraction of what interior water damage repair costs. Seams are where roofs fail first. Pay attention to them before they demand it.
— Thomasroofingandrepair
Thomasroofingandrepair’s approach to roof seam care
Seam problems rarely announce themselves loudly. They build quietly until a storm or a heavy rain turns a small gap into a serious leak.

Thomas Roofing and Repair provides professional roof seam inspections for homeowners and property managers across Brevard, Volusia, and Orange counties. Trained technicians use probe testing and visual assessment to identify seam issues before they escalate. Whether your roof is TPO, metal, EPDM, or modified bitumen, the team has the experience to assess seam condition accurately and recommend the right repair approach. For properties in need of expert roof repair or a full installation assessment, Thomasroofingandrepair offers free estimates and a track record built on honest, quality work. Catching a seam problem early is always less expensive than repairing the damage it causes.
FAQ
What are roof seams exactly?
Roof seams are the joints where two sections of roofing material overlap and bond together. They create the continuous waterproof barrier that protects the structure below.
How often should roof seams be inspected?
Biannual inspections are the recommended standard. Schedule checks after hurricane season and before peak summer heat to catch stress-related seam damage early.
Can I repair a roof seam myself?
Minor seam maintenance is possible for experienced homeowners, but using the wrong sealant or skipping surface preparation leads to repairs that fail quickly. Professional repair is recommended for welded membrane seams and standing seam metal roofs.
Why is silicone a bad choice for metal roof seam repairs?
Standard silicone cannot withstand the thermal expansion and contraction that metal roofs experience. High-solids polyurethanes or fabric-reinforced sealants are the correct materials for metal seam repairs.
How do I know if a seam is failing if there is no visible leak?
Look for lifted or curled seam edges, discoloration, blistering near seam lines, or soft spots on flat roof surfaces. A professional probe test or infrared scan can detect hidden moisture before it reaches the interior.