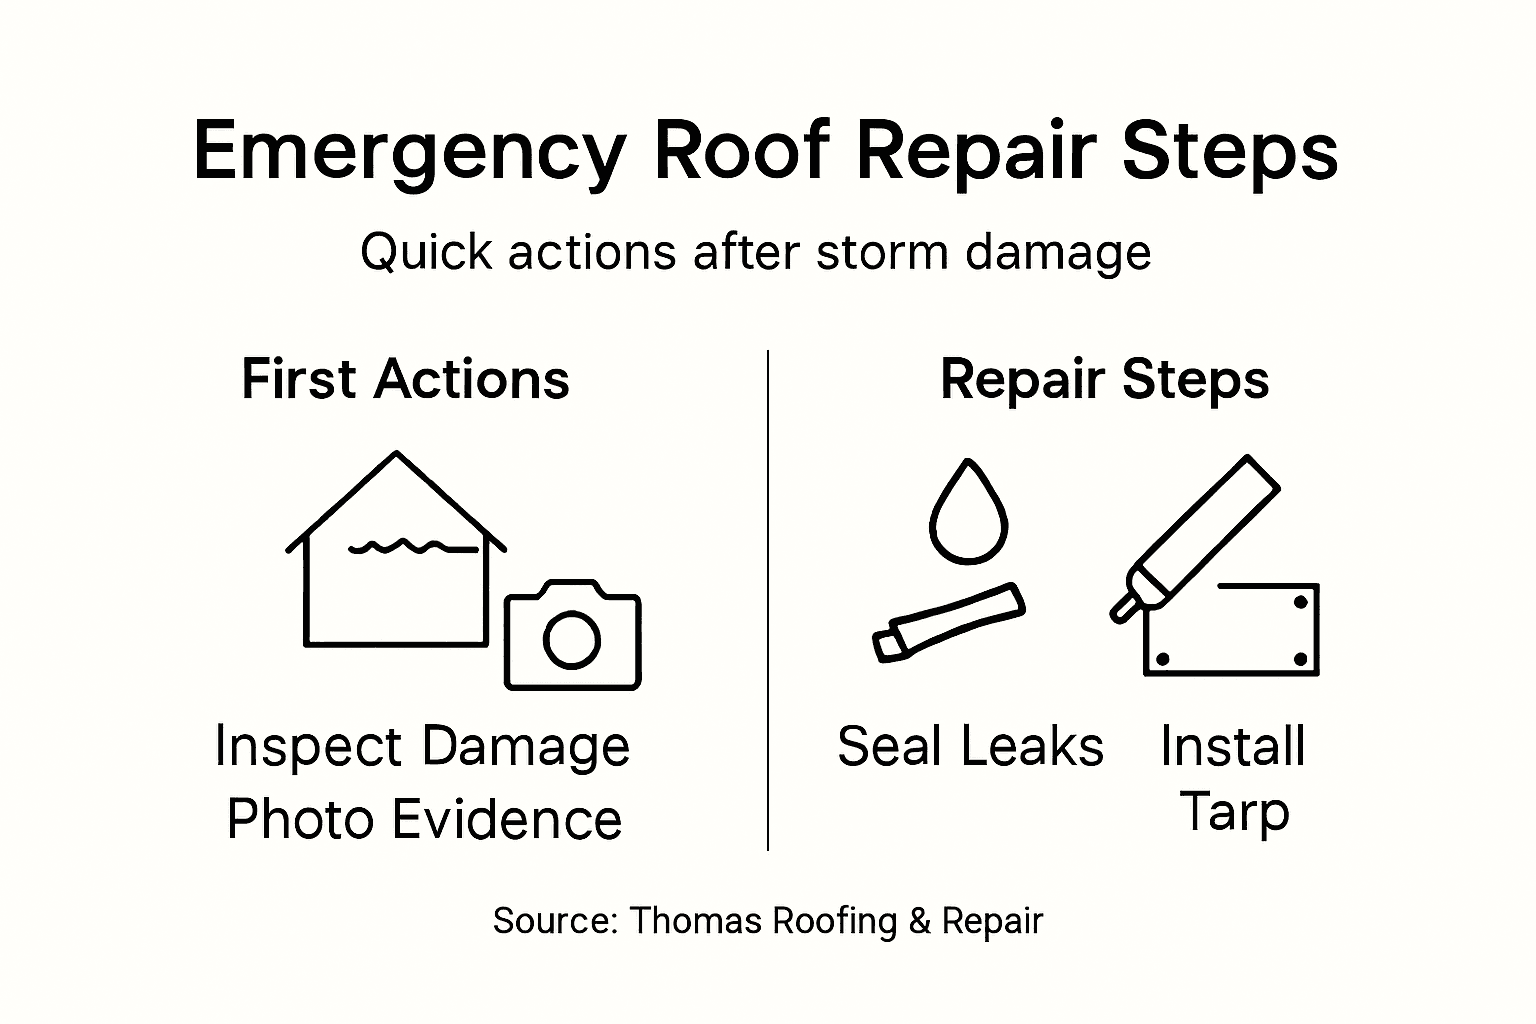
Sudden storms across Central Florida leave thousands of American homeowners scrambling for urgent roof repairs every year. Fast, thorough damage assessment can make the difference between a safe home and expensive disaster recovery. Understanding the step by step emergency workflow not only keeps your family secure but also protects your investment when hiring reliable contractors for storm damaged roof solutions.
Table of Contents
- Step 1: Assess Safety and Roof Damage
- Step 2: Secure the Area and Prevent Water Intrusion
- Step 3: Gather Necessary Materials and Tools
- Step 4: Perform Temporary or Permanent Repairs
- Step 5: Inspect Repairs and Ensure Leak Prevention
Quick Summary
| Key Takeaway | Explanation |
|---|---|
| 1. Assess roof damage thoroughly | Inspect your roof from the ground for apparent damage before climbing to ensure safety. |
| 2. Secure area against water intrusion | Use tarps and plywood to cover damage and redirect water, protecting interior spaces. |
| 3. Gather important repair materials | Assemble essential tools and protective gear for effective and safe emergency repairs. |
| 4. Carry out both temporary and permanent repairs | Use appropriate materials for temporary fixes and schedule a comprehensive inspection post-repair. |
| 5. Inspect repairs to prevent leaks | Conduct a thorough examination after repairs, simulating water exposure to check for vulnerabilities. |
Step 1: Assess Safety and Roof Damage
Before attempting any storm damage repair, you must thoroughly evaluate your roof’s structural integrity and potential safety risks. A comprehensive safety assessment prevents potential injuries and ensures effective emergency repairs. Roof damage inspection requires careful visual analysis and strategic planning.
Begin by scanning the roof from ground level for obvious signs of significant damage. Look for missing shingles, exposed roof decking, large debris, and structural deformations. If you notice sagging sections, extensive cracking, or compromised support structures, do not attempt personal inspection. These indicators suggest potential roof collapse risk and require professional evaluation. Fall protection strategies recommend maintaining a safe distance and avoiding direct contact with potentially unstable surfaces.
If safe ground level observation reveals moderate damage, consider using binoculars or a ladder with proper stabilization. Wear non slip shoes, have a spotter present, and avoid climbing during wet or windy conditions. Your primary goal is gathering visual information without risking personal safety.
Pro tip: Take clear photographs of roof damage from multiple angles to document the extent of storm impact for insurance purposes and future repair planning.
Here’s a quick comparison of common roof damage types and their risk levels:
| Damage Type | Visual Indicators | Immediate Risk Level | Recommended Action |
|---|---|---|---|
| Missing shingles | Patches of exposed roof | Moderate | Temporary covering advised |
| Structural deformation | Sagging, warped surfaces | High | Professional assessment |
| Exposed decking | Visible wood panels | High | Immediate protection needed |
| Large debris | Branches, objects on roof | Moderate | Safe removal if possible |
| Small cracks | Fine lines or splits | Low | Monitor for leaks |
Step 2: Secure the Area and Prevent Water Intrusion
After assessing roof damage, your next critical priority is minimizing interior water damage and preventing further structural compromise. Water intrusion protection requires immediate strategic intervention to safeguard your home and belongings.
Start by identifying and temporarily sealing potential water entry points. Use waterproof tarps, plastic sheeting, and plywood to cover exposed roof areas, gaps, and damaged sections. Ensure these temporary coverings extend several inches beyond the damaged region and are securely fastened using roofing nails or heavy duty clips. Pay special attention to wind driven rain entry points such as attic vents, wall penetrations, and window frames that can allow moisture infiltration.
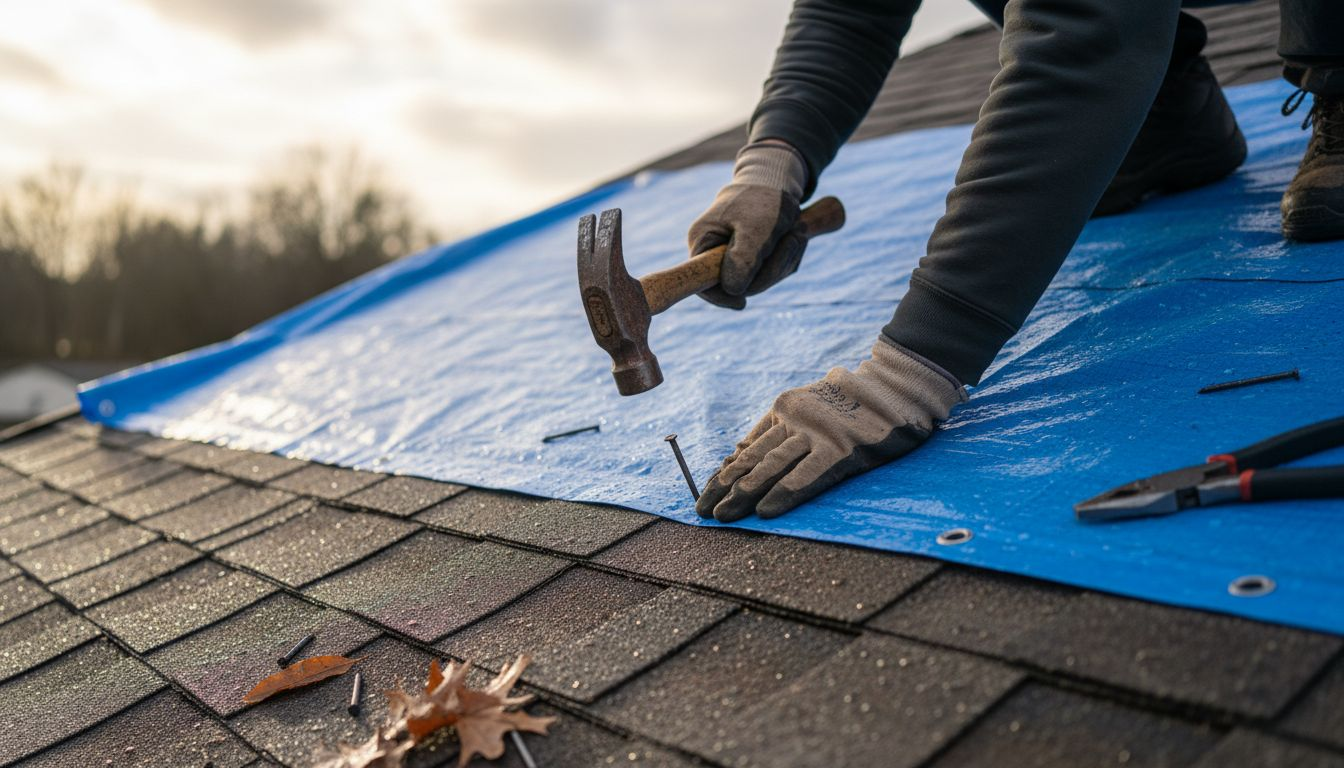
Move valuable furniture, electronics, and important documents away from compromised areas. Place buckets or large containers strategically to catch potential water leakage, and use towels or absorbent materials to manage immediate moisture. If water is actively dripping, create drainage paths that direct water away from critical household infrastructure.
Pro tip: Document all temporary repairs and water damage with photographs for insurance claims and future restoration planning.
Step 3: Gather Necessary Materials and Tools
Preparing for emergency roof repair requires assembling a comprehensive set of materials and tools that will help you quickly address storm damage. Emergency preparedness kit guidelines recommend collecting specific items designed to support urgent home repairs and protect your property.
Start by gathering essential protective gear including work gloves, safety glasses, non slip shoes, and a sturdy helmet. For repair materials, collect waterproof tarps, roofing nails, heavy duty plastic sheeting, duct tape, a utility knife, hammer, measuring tape, and emergency sealant. Personal protective equipment is crucial for ensuring your safety during repair work. Include a ladder with proper stabilization, a flashlight with extra batteries, and a communication device to stay connected in case of emergencies.
Organize these materials in a easily accessible container or tool bag, keeping everything compact and ready for immediate use. Consider creating a dedicated emergency repair kit that remains stocked and easily retrievable during storm season.
Pro tip: Store your emergency repair materials in a waterproof container elevated off the ground to prevent moisture damage and maintain tool readiness.
This table summarizes essential emergency roof repair materials and their primary use:
| Item | Purpose | Ideal Use Scenario |
|---|---|---|
| Waterproof tarp | Cover exposed areas | Rain or leak protection |
| Roofing nails | Secure temporary patches | Attaching tarps or plastic sheeting |
| Emergency sealant | Fill cracks and holes | Quick water-proofing |
| Heavy duty plastic sheet | Barrier against moisture | Temporary roof coverage |
| Utility knife | Cut materials to fit | Preparing patch materials |
Step 4: Perform Temporary or Permanent Repairs
Your emergency roof repair strategy requires a systematic approach to address storm damage using both temporary and permanent solutions. Emergency roof leak repair techniques focus on quickly minimizing water intrusion and preventing further structural deterioration.
For temporary repairs, use roofing tar or emergency sealant to cover small punctures and cracks. Apply waterproof patches extending several inches beyond the damaged area, ensuring a tight seal against potential water penetration. Temporary structural support might be necessary for larger damage areas, which could involve using plywood sheets or reinforced tarps to stabilize compromised roof sections.
Permanent repairs require more comprehensive assessment. Replace damaged shingles by carefully removing the compromised section, checking underlying roofing materials for additional damage, and installing new shingles with proper weatherproofing techniques. Inspect flashing around chimneys, vents, and roof edges to ensure complete water protection and structural integrity.
Pro tip: Take clear photographs of all repair work for insurance documentation and future reference.
Step 5: Inspect Repairs and Ensure Leak Prevention
After completing emergency roof repairs, a meticulous inspection is crucial to verify the effectiveness of your restoration work and prevent future water damage. Flashing and penetration inspection provides a systematic approach to identifying potential vulnerabilities in your roof’s water control system.
Begin by carefully examining all repaired areas, focusing on sealing around roof penetrations such as vents, chimneys, and skylights. Check that flashing is properly integrated with the roofing materials, ensuring complete overlap and tight seals. Roof inspection standards recommend looking for any signs of potential water entry points such as small gaps, loose materials, or incomplete sealant application.
Simulate water exposure by carefully observing the repaired sections during light water application or after a brief rain. Pay attention to any moisture seepage, discoloration, or soft spots that might indicate incomplete repair. Look for uniform surface tension across patched areas and verify that temporary repairs have been effectively transitioned to more permanent solutions.
Pro tip: Wait 24 to 48 hours after repairs before conducting a final water exposure test to allow sealants and materials to fully set.
Fast and Reliable Emergency Roof Repair When You Need It Most
When storm damage threatens your home, immediate and safe action is critical. This article highlights the urgent challenges you face such as assessing roof safety, preventing water intrusion, and performing temporary repairs to protect your property. We understand how stressful this can be when exposed decking, missing shingles, or structural deformation put your house at risk. Your goal is to stop leaks fast while ensuring lasting solutions that prevent further damage and costly repairs downstream.
At Thomas Roofing and Repair, we specialize in professional emergency roof repair services tailored for Central Florida’s unpredictable weather. Our team is equipped to handle everything from thorough damage inspections to secure temporary coverings and permanent repairs. We use trusted techniques for leak prevention and provide transparent communication backed by integrity and craftsmanship you can depend on. Do not wait until small cracks become large problems.
Get your free emergency roof repair estimate now and let our experts restore your roof’s safety and durability with efficient storm damage solutions. Protect your home today before the next rainfall arrives.
Visit Thomas Roofing and Repair to learn more about our dedicated roofing services and customer-first approach.
Emergency Roof Repair Services are just a call away to bring peace of mind back to your home.

Frequently Asked Questions
What is the first step in the emergency roof repair workflow?
Before starting any repairs, assess the safety and damage level of your roof. Begin by inspecting the roof from the ground for visible damage, such as missing shingles or sagging areas, to determine if professional help is needed.
How can I securely cover damaged areas of my roof after a storm?
To prevent water intrusion, use waterproof tarps or plastic sheeting to cover exposed sections. Ensure these coverings extend several inches beyond the damaged areas and secure them with nails or heavy-duty clips to keep them in place.
What materials should I gather for emergency roof repair?
Collect essential materials like waterproof tarps, emergency sealant, roofing nails, and a utility knife. Organize these supplies in a waterproof container for quick access during storm repair scenarios, ensuring you have everything ready for immediate use.
How do I perform temporary repairs to a damaged roof?
Apply roofing tar or emergency sealant to cover small punctures and cracks for temporary repairs. Ensure that the patches extend a few inches beyond the damaged areas for effective sealing against potential water penetration.
How can I inspect my roof repairs for leaks effectively?
After completing the repairs, inspect all patched areas and check the sealing around roof penetrations like vents and chimneys. Simulate water exposure by lightly spraying the repaired sections and watching for moisture seepage or discoloration.
When should I consider hiring a professional for roof repairs?
If your initial assessment shows high-risk damage such as significant structural deformation or sagging sections, it’s best to hire a professional. Prioritize safety and get a professional evaluation to avoid potential injuries or further damage.