The safest residential roofs combine inherently noncombustible coverings or verified Class A assemblies with ember-hardening work at vents, flashing, and eaves. Choosing the right fire-resistant roofing materials is only half the job. The other half is making sure every component around and beneath that covering is equally protected.
Three things you can do today:
- Clear gutters and roof valleys of all debris. Accumulated leaves and pine needles are a ready fuel source for wind-blown embers.
- Inspect every attic and soffit vent and screen them with 1/8-inch noncombustible metal mesh if they are not already protected.
- Pull out your roofing paperwork and confirm your covering and underlayment carry a documented Class A rating. No documentation means no verified protection.
Before you sign any contract for fire-resistance work, ask your contractor three questions: Can you show me the UL/ASTM-listed assembly documentation for this product? Which specific underlayment was used in that tested assembly? How will vents, soffits, and eaves be hardened as part of this job?
Pro Tip: The NFPA Firewise fact sheet on roofing materials is a free, one-page reference you can hand directly to a contractor to confirm they understand Class A requirements.
Key Takeaways
Class A fire protection requires a verified assembly, not just a rated surface material. Ember-hardening vents and sealing joints often delivers faster risk reduction than a full roof replacement.
| Point | Details |
|---|---|
| Class A requires the full assembly | Deck type, underlayment, and installation details all determine whether the Class A rating holds in the field. |
| Inherent vs. by-assembly materials | Clay tile, concrete tile, and slate are inherently noncombustible; metal and most asphalt shingles reach Class A only through a tested assembly. |
| Ember entry is the primary risk | Screen attic vents with 1/8-inch noncombustible mesh and seal roof-to-wall joints before focusing on surface material upgrades. |
| Verify documentation before signing | Require UL/ASTM assembly documentation, specific underlayment identification, and installer warranty from any contractor. |
| Thomasroofingandrepair | Provides full assembly documentation, UL-listed underlayment, and vent-hardening on fire-resistance and replacement work across Central Florida. |
Table of Contents
- How fire ratings actually work and why lab tests have limits
- 1. Clay and concrete tile: inherently noncombustible and long-lasting
- 2. Natural slate: the benchmark for fire resistance and longevity
- 3. Metal roofing: Class A by assembly, not by material alone
- 4. Fiberglass-mat asphalt shingles: the most common Class A option
- 5. Synthetic and composite tiles: lighter alternatives worth knowing
- 6. Treated wood shakes: the highest-risk option on any fire-resistant roofing list
- 7. Recycled rubber and plastic tiles: a growing by-assembly option
- Why the roof assembly usually decides real-world performance
- Where embers enter and what to fix first
- Priority upgrades for existing roofs: what to tackle in what order
- Typical installed costs and expected lifespans
- How to choose the right fire-resistant roofing solution for your home
- What a reputable roofing contractor will inspect and document
- A local contractor’s honest take on what actually gets skipped
- Thomasroofingandrepair handles fire-resistant roofing upgrades across Central Florida
- Sources
How fire ratings actually work and why lab tests have limits
Class A, B, and C are the three fire-resistance classifications for roof coverings in the United States, defined by ASTM E108 (also published as UL 790). Class A is the highest rating and indicates the best resistance to exterior fire exposure. Class B is moderate, and Class C is light. Any roof covering with no rating at all is the worst-case scenario.
The standard puts coverings through four test methods:
- Spread of flame: measures how far fire travels across the surface under a controlled gas flame
- Burning brand: drops a wood crib fire source onto the surface to simulate an ember landing on the roof
- Flying brand: tests whether the covering itself generates burning fragments that could ignite neighboring structures
- Intermittent flame and rain: checks whether weathering degrades performance
Here is the part most homeowners miss: the rating belongs to the entire assembly, not just the shingle or panel on top. The deck type, underlayment, and fastening method are all part of the tested configuration. Swap out the underlayment for a cheaper product and the Class A rating no longer applies, even if the surface material is identical.
The tests are also comparative, not predictive. Intertek’s summary of ASTM E108 notes that the burning-brand test simulates how heat transfers through coverings and underlayment to the deck, but real wildfire conditions, especially sustained ember showers driven by 60 mph winds, can exceed what the lab replicates. FEMA and building scientists consistently identify wind-blown embers as the primary ignition mechanism for homes in wildfire events, which is why vent and gap protection matters as much as the surface rating.
Authoritative guidance comes from ASTM, UL, FEMA, and NFPA. When a contractor or manufacturer references a Class A rating, those are the organizations whose standards should back it up.
1. Clay and concrete tile: inherently noncombustible and long-lasting
Clay and concrete tiles are noncombustible by material composition. They do not need a special underlayment to achieve Class A status, though the underlayment still matters for overall assembly performance. The Building America Solution Center confirms that concrete tile and clay tile are among the commonly listed Class A coverings, alongside slate and metal.
Concrete tile typically runs $10–$20 per square foot installed, and clay tile runs $15–$30 or more depending on profile and region. Both carry expected lifespans of 40–50 years for concrete and 50–100 years for clay. The trade-off is weight: both materials require stronger roof framing, and older homes may need structural reinforcement before installation. That adds cost and complexity, but for a homeowner in a wildfire-prone area who plans to stay long-term, the math often works out.
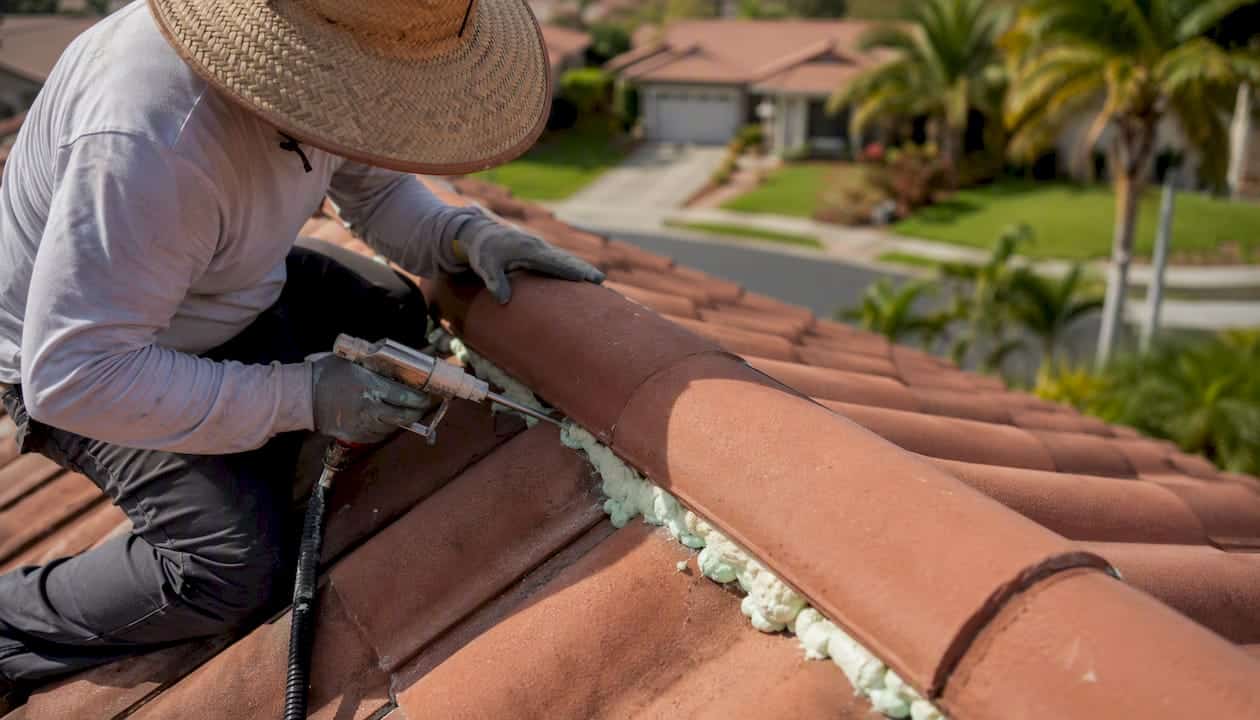
Pro Tip: Even with inherently noncombustible tile, embers still exploit the gaps at ridge caps, hip ends, and open eaves. Mortar-set or foam-fill those terminations and screen any open spaces beneath the tile field.
2. Natural slate: the benchmark for fire resistance and longevity
Natural slate is stone. It will not burn. It is as close to a fireproof roofing option as residential construction offers, and it carries an expected lifespan of 75–150 years when properly installed. Installed costs typically range from $20–$40 per square foot, making it one of the most expensive choices on any fire-resistant roofing list.
Weight is the limiting factor. Slate can run 800–1,500 pounds per square (100 sq ft), which means most homes need a structural assessment before installation. For property managers overseeing older buildings, that engineering cost is a real line item. For homeowners who can absorb the upfront investment, slate rarely needs replacement within a lifetime.
3. Metal roofing: Class A by assembly, not by material alone
Steel and aluminum panels are noncombustible, but metal roofing achieves its Class A rating through the tested assembly rather than the metal itself. The deck type, underlayment, and attachment method all factor into whether the system meets the standard. In high-wind regions, metal over thin decking may require a 5/8-inch Type X gypsum barrier board beneath the panels to reach Class A in certain tested configurations.
Installed costs for metal panels range from $8–$20 per square foot depending on profile (standing seam versus exposed fastener) and gauge. Expected lifespan is 40–70 years. Metal handles ember exposure well because the surface does not ignite, but the assembly gaps at ridges, eaves, and penetrations still need attention. A standing-seam system with concealed fasteners and a proper underlayment is a stronger assembly than an exposed-fastener panel over a basic felt underlayment.
4. Fiberglass-mat asphalt shingles: the most common Class A option
Modern fiberglass-mat asphalt shingles are the dominant residential roofing product in the United States and are widely available as Class A options when installed with an approved underlayment. The key word is “modern.” Older organic-mat shingles, common in installations before roughly 2008, may carry a lower rating. If your home has an older roof and you do not have documentation of the shingle type, assume it may not be Class A.
Installed costs run $4–$8 per square foot, and lifespan is typically 20–30 years for standard three-tab and 25–50 years for architectural/dimensional products. The NFPA Firewise guidance specifically lists asphalt fiberglass composition shingles among the common Class A products recommended for wildfire-prone properties.
5. Synthetic and composite tiles: lighter alternatives worth knowing
Synthetic tiles made from recycled rubber, plastic, or polymer composites can mimic the look of slate or clay tile at a fraction of the weight. Some product lines achieve Class A ratings in tested assemblies, making them a practical option for homes where structural load is a constraint. Installed costs for synthetic and composite tiles usually fall in the mid-range spectrum, with lifespans often several decades depending on the specific product.
The critical caveat: “synthetic tile” is not a single product category with a uniform rating. Each manufacturer’s product must be evaluated on its own tested assembly documentation. Ask for the ICC-ES report or UL listing for the specific product, not just a general claim of Class A.
6. Treated wood shakes: the highest-risk option on any fire-resistant roofing list
Untreated wood shake roofs are the most fire-vulnerable covering available. Fire Safe Marin advises that if a wood shake roof is not explicitly documented as fire-retardant treated, it should be assumed untreated and treated as the highest-risk option. Replacing untreated shakes is frequently the single most impactful safety upgrade a homeowner can make.
Even treated wood shakes carry a complication: fire-retardant treatments degrade with weathering over time. Manufacturer documentation should specify re-treatment intervals or long-term performance data. If that documentation does not exist, the treatment status is effectively unknown. For homeowners in wildfire-prone areas, this uncertainty alone is a strong argument for replacement with a rated material.
7. Recycled rubber and plastic tiles: a growing by-assembly option
Recycled rubber and plastic tiles have expanded significantly as a product category. They are lighter than concrete or clay, easier to install, and some lines achieve Class A ratings through tested assemblies that include specific underlayment products. They are worth considering for retrofit projects where weight or cost is a primary constraint.
Performance varies considerably by manufacturer, so the same documentation rule applies: request the tested assembly specification and confirm the underlayment listed in that test is what will actually be installed. A comparison of durable roofing options can help you weigh these materials against longer-lifespan alternatives before committing.
Why the roof assembly usually decides real-world performance
The surface material gets most of the attention, but the assembly beneath it is where fire resistance is won or lost in practice. ICC-ES confirms that a Class A rating is based on the tested assembly and explicitly lists deck type, underlayment, and installation details the product must follow to achieve that rating in the field.
Key assembly components:
- Deck type: OSB and plywood have different fire performance characteristics; some assemblies require a specific deck thickness or species.
- Underlayment: A mineral-surface cap sheet or UL-listed synthetic underlayment is often required to achieve Class A. Standard #15 felt may not meet the tested configuration.
- Barrier board: Gypsum board or a fire-rated barrier board beneath the covering adds meaningful protection, particularly for metal roofing over thin decking.
- Flashing: Noncombustible metal flashing at valleys, roof-to-wall joints, and penetrations prevents ember intrusion at the most vulnerable seams.
- Fasteners and attachment: Improper fastener spacing or type can compromise both wind resistance and assembly integrity.
Common mistakes that void test-equivalent performance include substituting a lower-cost underlayment, skipping the barrier board specified in the tested assembly, and using improper fastener patterns. Underlayment substitutions are a frequent way that low-cost bids fail to reproduce tested performance. Always require the UL/ASTM-listed underlayment referenced in the manufacturer’s assembly documentation, and verify it against the code-aware installation practices your contractor follows.
Where embers enter and what to fix first
FEMA’s guidance identifies ember entry through vents, soffits, and gaps as one of the most frequent ignition pathways in wildfire events. The FEMA Marshall Fire MAT homeowner guide recommends sealing roof-to-wall joints, using noncombustible flashing, and installing ember-resistant vents as concrete retrofit measures.
The most common failure points, in order of ignition frequency:
- Attic vents: standard louvered vents are open pathways for embers; replace or screen with 1/8-inch noncombustible mesh
- Soffits: open or unprotected soffits allow ember accumulation directly above the ceiling plane
- Gutters: debris-filled gutters ignite easily and transfer fire to the fascia and eave
- Valleys and roof-to-wall joints: debris collects here and flashing gaps allow ember entry
- Chimney chases: unprotected tops and gaps around the chase are direct ember entry points
- Skylight perimeters: the frame-to-roof joint is often unsealed or uses combustible caulk
Pro Tip: Screen vents with 1/8-inch noncombustible mesh, seal gaps with fire-resistant caulk, and enclose open soffits or add 5/8-inch Type X gypsum where local code or your risk level warrants it. These steps cost far less than a full roof replacement and address the most statistically likely ignition pathway.
Roof geometry also matters. Simpler rooflines with fewer valleys and dormers accumulate less debris and create fewer ember traps. That is an often-overlooked design consideration when planning a full replacement.
Priority upgrades for existing roofs: what to tackle in what order
If you already have a roof and want to improve fire resistance without an immediate full replacement, work through these steps in order:
- Clear all debris from gutters, valleys, and the roof surface. Do this now, before any other work. A clean roof is a less ignitable roof.
- Screen or replace attic vents and soffit vents with ember-resistant products or 1/8-inch noncombustible mesh. This is the highest-impact, lowest-cost retrofit available.
- Inspect and replace flashing at all roof-to-wall joints, valleys, and penetrations. Corroded or missing flashing is both a water and ember vulnerability.
- Seal all gaps around chimneys, skylights, and pipe penetrations with fire-resistant caulk or noncombustible flashing.
- Evaluate underlayment condition if your roof is being partially repaired. If the underlayment is original and aged, upgrading to a UL-listed mineral-surface product during repair work is a meaningful improvement.
- Plan a full roof covering replacement if your current covering is unrated, documented as organic-mat asphalt, untreated wood shake, or has exceeded its expected lifespan.
For most homeowners, steps 1 through 4 can be completed within a day or two of hiring a qualified contractor. Steps 5 and 6 require more planning and budget. Consult a certified roofing contractor for anything beyond debris clearing and basic vent screening.
Typical installed costs and expected lifespans
The table below reflects typical U.S. installed cost ranges and expected lifespans. Actual costs vary with roof complexity, structural reinforcement needs, removal of existing materials, and local labor rates.
| Material | Installed cost (per sq ft) | Expected lifespan | Class A status |
|---|---|---|---|
| Fiberglass-mat asphalt shingles | $4–$8 | 20–50 years | By assembly |
| Metal panels (steel/aluminum) | $8–$20 | 40–70 years | By assembly |
| Concrete tile | $10–$20 | 40–50 years | Inherent |
| Clay tile | $15–$30+ | 50–100 years | Inherent |
| Synthetic/composite tile | $7–$15 | 30–50 years | By assembly (varies) |
| Natural slate | $20–$40+ | 75–150 years | Inherent |
Heavy tile and slate often require structural reinforcement, which adds $2–$5 per square foot or more depending on the existing framing. Periodic maintenance costs include annual gutter cleaning, bi-annual professional inspections, and re-treatment intervals for any fire-retardant-treated wood products. Metal and tile roofs generally have lower ongoing maintenance costs than asphalt shingles over their full lifespan.
How to choose the right fire-resistant roofing solution for your home
Start with your wildfire risk zone. Homeowners in designated Wildland-Urban Interface (WUI) areas often face mandatory Class A requirements under local building codes. Check your county or municipality’s adopted code and any state-level WUI product lists before selecting a material.
Decision criteria to work through:
- Roof slope and geometry: steep slopes shed debris better; complex rooflines with many valleys need more maintenance and ember-hardening work
- Structural load capacity: tile and slate require engineering review on most homes built before the 1990s
- Required fire class: confirm whether local code mandates Class A or simply recommends it
- Assembly availability: verify that a local contractor can source and install the exact tested assembly for your chosen material
- Budget and lifecycle cost: a higher upfront cost for tile or metal often means lower replacement frequency over 30 years
- Insurance implications: many insurers offer premium discounts for Class A roofs; confirm with your carrier before finalizing material choice
Questions to ask any contractor before signing:
- Can you show me the UL/ASTM-tested assembly documentation for this specific product?
- Which underlayment and barrier board were used in that tested assembly, and will you install exactly those?
- How will vents, soffits, and eaves be hardened as part of this scope?
- Will this installation affect my manufacturer warranty or insurance coverage?
Red flags on any bid: vague language like “equivalent underlayment,” no UL or ASTM documentation attached, no line items for vent screening or flashing work, and no reference to the tested assembly configuration. A roofing materials comparison can help you cross-check material options before you meet with a contractor.
What a reputable roofing contractor will inspect and document
A professional contractor doing fire-resistance work should deliver more than a new surface. Before work begins, expect a documented inspection that covers:
- Confirmation of the existing roof covering’s Class rating and label
- Underlayment type, condition, and UL listing
- Deck condition (rot, delamination, fastener pull-through)
- Flashing and valley details at all roof-to-wall joints and penetrations
- Vent screening status and soffit protection
- Gutter condition and attachment
After the job, you should receive a written scope referencing the tested assembly, before-and-after photos, material labels and UL/ASTM documentation, and an installer warranty. These documents matter beyond peace of mind. They support insurance claims, permit sign-offs, and future property sales. If a contractor cannot or will not provide them, that is a disqualifying red flag.
Thomasroofingandrepair provides inspection documentation, tested-assembly references, and material labels as standard deliverables on fire-resistance and replacement work across Central Florida. Reviewing roof inspection terminology before your appointment helps you understand exactly what the inspector is checking and why.
A local contractor’s honest take on what actually gets skipped
The single most common mistake we see on Central Florida jobs is not the surface material. It is the underlayment and the vents.
Homeowners spend weeks researching tile versus metal, then accept a bid that substitutes a basic felt underlayment for the mineral-surface cap sheet specified in the tested assembly. The surface looks identical. The fire rating does not exist anymore. That substitution is invisible until something goes wrong, and by then the warranty is void and the documentation does not match what was installed.
The second pattern: vent screening gets treated as optional. It is not. Wind-blown embers enter through unscreened attic vents faster than through any gap in the surface material. On many Central Florida jobs, screening vents and clearing gutters reduces ember risk faster and cheaper than an immediate full roof replacement. If your roof is in reasonable condition but unscreened, start there.
The practical recommendation from a contractor’s perspective: get the assembly documentation first, then verify the vents, then evaluate the surface. In that order.
Thomasroofingandrepair handles fire-resistant roofing upgrades across Central Florida
Upgrading to a rated roof assembly is not a single-product decision. It requires the right surface material, the correct underlayment, properly detailed flashing, and hardened vents, all documented and installed to the tested configuration.
Thomasroofingandrepair installs and replaces roofing systems across Brevard, Volusia, and Orange counties with full assembly documentation, UL/ASTM-listed underlayment, and vent-hardening included in the scope. Services include roof inspection, replacement, underlayment upgrades, vent screening, permit assistance, and financing options for larger projects. Whether you need a full roof replacement in Central Florida or a targeted upgrade to bring an existing assembly up to Class A standards, the team provides written scope, material labels, and before-and-after documentation as standard. Request a code-aware inspection or free estimate at Thomasroofingandrepair.
Sources
These are the primary references for fire-resistant roofing standards and wildfire guidance in the United States:
- Roof Construction for Fire Resistance | Building America Solution Center
- Homeowners Guide to Reducing Risk of Structure Ignition from Wildfire (Marshall Fire MAT) – FEMA
- E108 Standard Test Methods for Fire Tests of Roof Coverings
- Firewise fact sheet — Roofing materials (NFPA)
- ASTM E108 testing overview — ICC-ES
When requesting product documentation, ask manufacturers or installers for the ICC-ES report number or UL file number for the specific assembly being installed. State Wildland-Urban Interface product lists, where applicable, provide additional jurisdiction-specific guidance on approved materials.