A durable roof is not a single material choice. It is a tested, documented assembly where the membrane, underlayment, cover board, insulation, deck, fasteners, edge metal, and flashings all perform together under the loads your site actually sees. The features that separate a 30-year roof from a 12-year failure are mostly invisible after installation, which is exactly why you need to know them before the crew shows up.
Here is the core checklist:
- System-tested assembly with FM, UL, or ICC-ES approval at the assembly level, not just the cap sheet
- Approved membrane or cap material with documented wind, impact, and fire ratings (UL 2218, ASTM D7158/D3161, Class A fire)
- Secure edge metal and perimeter blocking with fastener spacing matched to ASCE 7 design uplift loads
- Quality underlayment or cover board (peel-and-stick self-adhering underlayment in high-wind zones; polyisocyanurate or gypsum cover board under single-ply)
- Positive drainage and adequate slope to eliminate ponding within 48 hours on low-slope roofs
- Factory-fabricated or field-seamed membrane with documented seam weld QA testing
- UV, wind, hail, and fire ratings matched to your climate zone and verified in the product approval
- Corrosion and biological resistance appropriate for coastal, humid, or chemical-exposure environments
- Appropriate insulation and ventilation to manage thermal movement and substrate moisture
- Documented installation and manufacturer warranty covering the full system, not just the membrane material
Every section below unpacks one of these items with the technical depth you need to evaluate a bid, read a submittal, or question a contractor.
Key Takeaways
A durable roof is a tested, documented assembly where every component from the deck to the edge metal is specified, installed, and verified against the site’s actual design loads.
| Point | Details |
|---|---|
| Assembly approval over material claims | Require FM, UL, or ICC-ES approval at the assembly level, not just the cap sheet product. |
| Edge and transition details drive failures | Perimeter, corner, and flashing transitions are where the highest-severity losses occur. |
| Positive drainage is non-negotiable | Low-slope roofs must eliminate ponding within 48 hours; ponding adds roughly 5 psf per inch and accelerates membrane breakdown. |
| Documentation protects your investment | Require NOA/ESR, fastener schedules, seam QA results, and warranty language before final payment. |
| Thomasroofingandrepair | Provides code-aware installation with NOA submittal handling, verified fastener schedules, and QA documentation across Central Florida. |
Table of Contents
- What features of durable roofing systems actually control long-term performance?
- How do material choices affect long-term roof durability?
- Why attachment details and edge securement determine wind performance
- Which performance ratings and certifications actually matter?
- How should you design a roof for your specific climate and site?
- How do underlayments, cover boards, and insulation affect membrane life?
- Why workmanship and documentation determine real-world durability
- What inspection and maintenance schedule keeps a durable roof durable?
- How do you evaluate a roofing bid or specify a durable system?
- Why system-first thinking is the only approach that holds up
- Thomasroofingandrepair delivers documented, code-compliant roofs in Central Florida
- Sources
What features of durable roofing systems actually control long-term performance?
The roofing industry sells materials. Durability, though, is a property of the whole assembly. A premium TPO membrane installed over a wet deck with undersized edge metal and no cover board will fail faster than a mid-grade membrane installed correctly on a properly prepared substrate with documented fastener schedules and tested edge details.
Research from J.S. Held confirms this directly: the highest-severity commercial roofing losses occur at weak transitions, edge-securement failures, and ponding areas, not from cap-material defects. Positive drainage and properly detailed flashings are the two variables that most consistently separate premature failures from full-service-life roofs.
Where roofs actually fail
The failure zones are predictable:
- Penetration details (pipes, HVAC curbs, drains) where field-cut membrane meets a flashing collar
- Flashing transitions at parapet walls, roof-to-wall interfaces, and changes in substrate elevation
- Edge securement where perimeter uplift pressures are highest and edge metal anchoring is often undersized
- Ponding areas where water sits longer than 48 hours, adding roughly 5 pounds per square foot per inch of depth and accelerating membrane chemical breakdown
- Expansion joints and structural movement areas where membrane is asked to bridge differential movement without tearing
Pro Tip: Insist on factory-fabricated accessories, pre-formed corners, and shop-fabricated termination details wherever possible. Every seam made on the roof under field conditions is a potential leak point. Reducing the count of field seams is one of the highest-return durability investments you can make.
IBHS best-practice guidance reinforces this: assembly-level testing and correct installation are the foundation of hazard resistance, not product selection alone.
How do material choices affect long-term roof durability?
Each roofing material has a distinct failure profile. Knowing what to look for in a specification or bid keeps you from accepting a system that looks good on paper but underperforms in your climate.
Metal roofing
Metal roofs, when properly installed, are among the most durable roofing options available. Consumer Reports testing shows metal can last 50–100 years depending on type and installation method. The critical variable is fastener design. Exposed fasteners on through-fastened panels create thousands of penetration points that fatigue and leak over time. Concealed-clip standing seam eliminates that failure mode entirely and allows the panel to float with thermal expansion rather than buckle or pull fasteners loose.
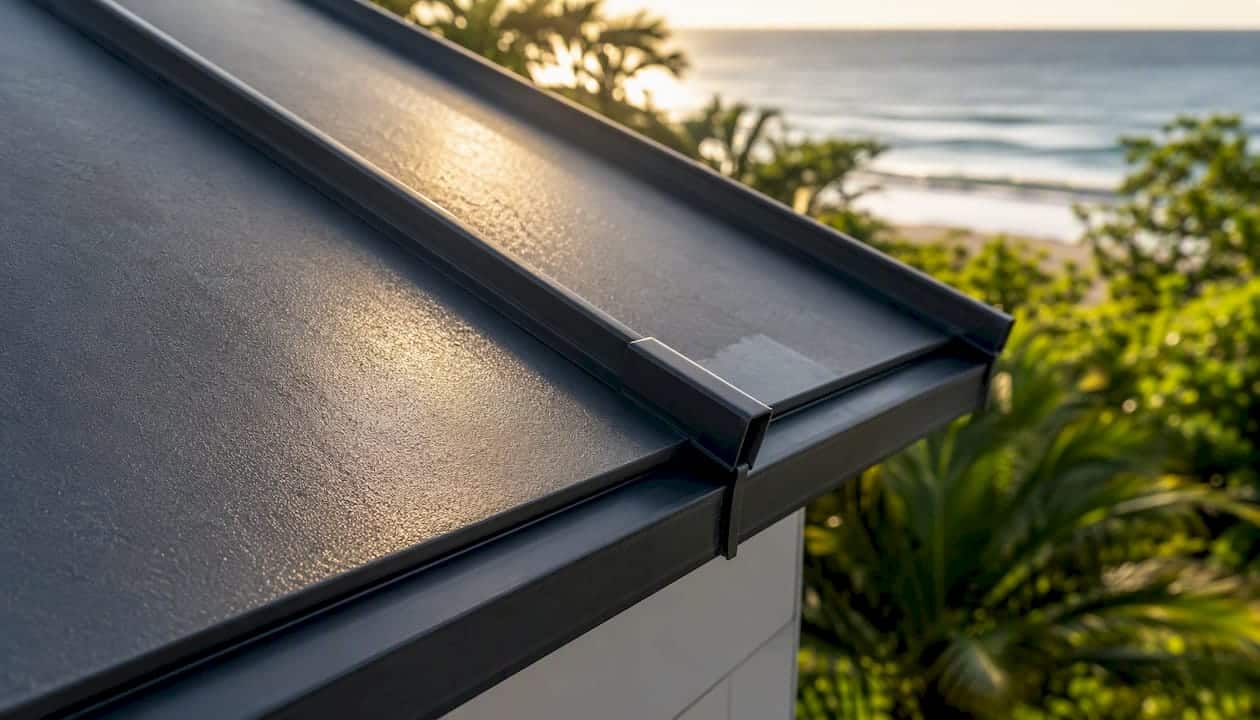
For coastal sites, aluminum standing seam outperforms steel because it does not rust. Galvalume steel is acceptable inland but degrades faster in salt-air environments. Coating spec matters too: Kynar 500 or Hylar 5000 PVDF coatings hold color and resist chalking far longer than standard polyester finishes.
Single-ply membranes (TPO, PVC, EPDM)
Single-ply is the dominant low-slope commercial system. The durability differences between a good and a poor single-ply installation come down to four things: membrane thickness, attachment method, seam quality, and cover board use.
- Membrane thickness: 60-mil is the practical minimum for commercial use; 80-mil or 90-mil adds meaningful puncture resistance, especially in high-traffic maintenance areas.
- Attachment: Fully adhered systems outperform mechanically fastened ones in wind uplift and eliminate the billowing that fatigues seams over time. Ballasted systems work on low-slope roofs with adequate structural capacity but are not appropriate for high-wind zones.
- Seam quality: Hot-air welded seams on TPO and PVC are stronger than the membrane itself when done correctly. Carlisle’s evaluation documentation lists allowable wind uplift pressures and installation conditions that owners should verify against their site’s ASCE 7 design pressures.
- Cover board: A half-inch gypsum or polyisocyanurate cover board under the membrane dramatically improves puncture resistance and provides a stable, flat substrate that prevents membrane stress concentrations.
Duro-Last’s custom-fabricated PVC membrane system takes the seam-quality issue seriously at the source: factory-welded seams and prefabricated corners reduce the number of field seams to a fraction of what a conventional installation requires, which directly reduces leak risk over the life of the roof.
Asphalt shingles
For steep-slope residential and light commercial applications, shingle durability depends on wind rating class, impact rating, and nailing pattern. ASTM D7158 Class H shingles are rated to 150 mph; ASTM D3161 Class F covers 110 mph. UL 2218 Class 4 impact rating is the highest available and is worth specifying in hail-prone areas. Consumer Reports testing has found that some mid-priced architectural shingles outperform premium lines on nail pull-through and wind resistance, which means the test report matters more than the marketing tier.
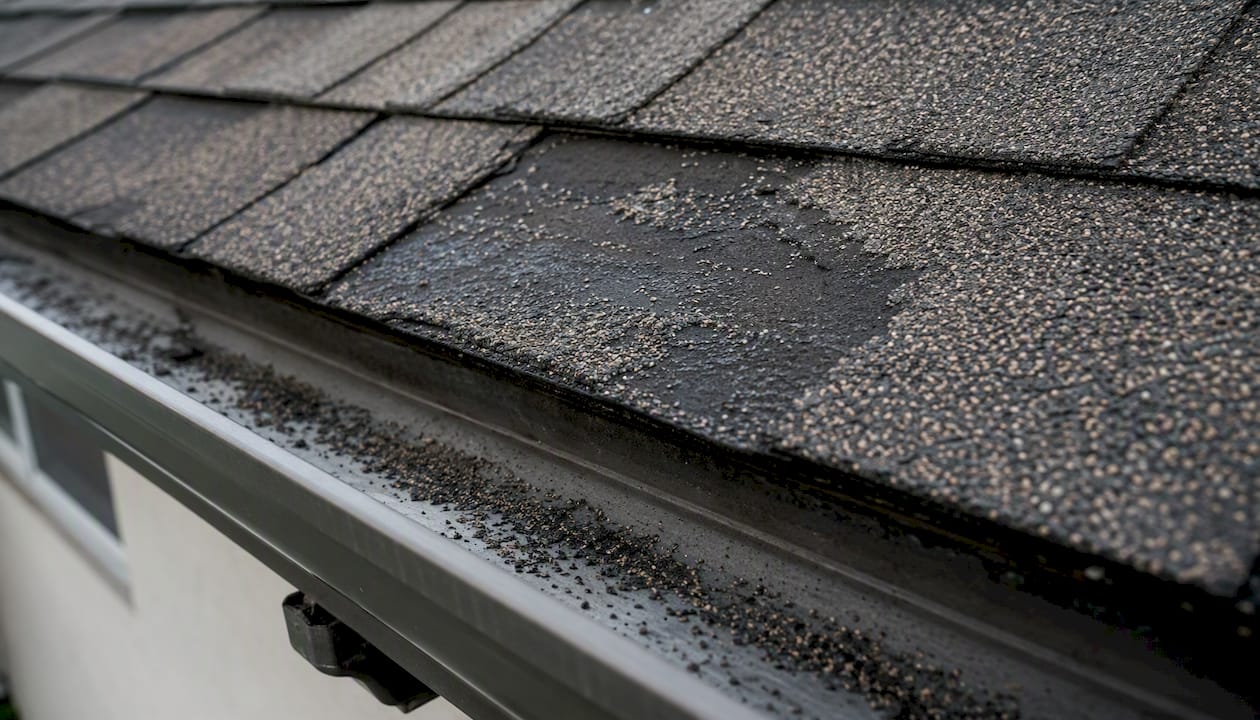
Granule loss is the primary aging indicator. Widespread granule loss in gutters or on the ground signals that the shingle’s UV-protective layer is depleted and replacement is approaching.
Tile and slate
Concrete and clay tile are among the longest-lasting materials available, with realistic lifespans of 40–80 years for concrete tile and 75–150 years for natural slate when properly installed. The failure mode is almost never the tile itself. It is the underlayment beneath it. Florida-specific data shows that attic ventilation and correct underlayment are the controlling factors for tile roof longevity in hot, humid climates. Tile is also heavy: concrete tile runs 9–12 pounds per square foot, and the structure must be verified to carry that load before re-roofing over an existing lighter system.
Liquid-applied coatings
Liquid-applied systems (acrylic, silicone, polyurethane) work best as restoration coatings over existing substrates in good condition. Silicone coatings handle ponding water better than acrylics, which chalk and degrade under sustained UV and moisture. Service life for a properly applied coating is typically 10–15 years before recoating is needed. They are not a substitute for a full membrane replacement on a structurally compromised or heavily deteriorated roof.
| Material | Realistic Service Life | Primary Failure Mode | Key Durability Check |
|---|---|---|---|
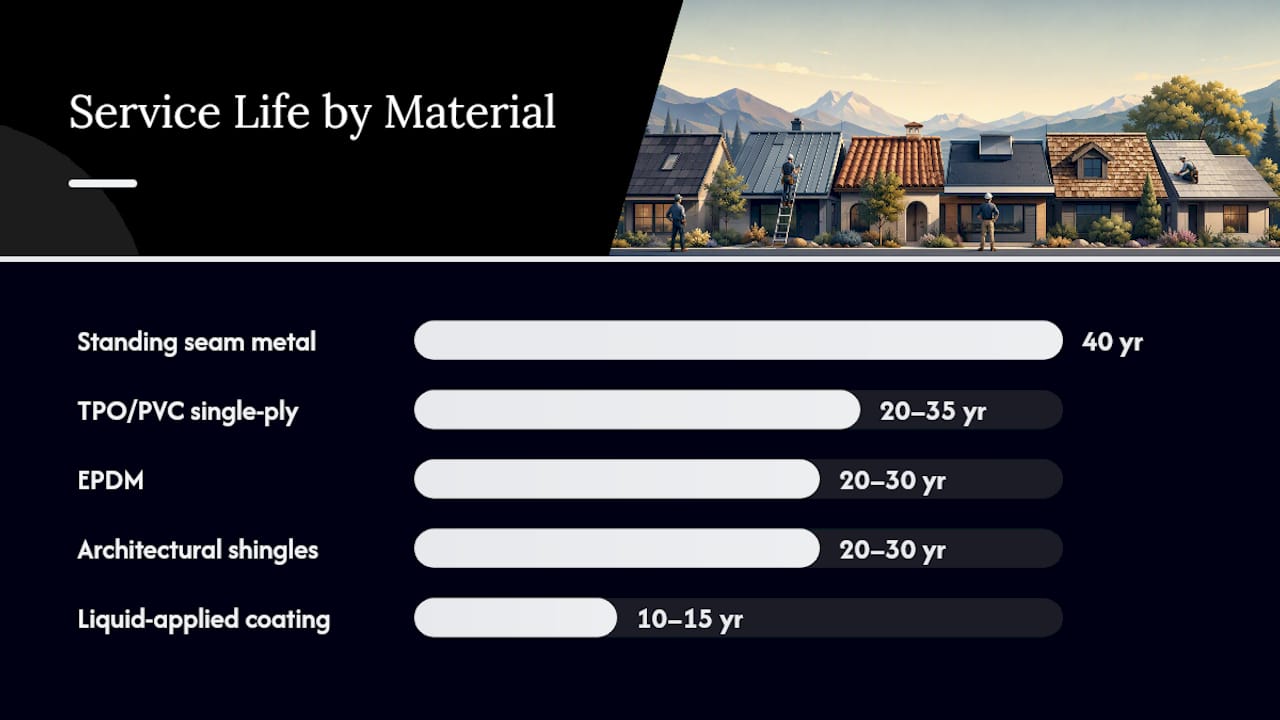
| Standing seam metal | 40 years | Fastener corrosion, sealant failure at penetrations | Concealed clips; PVDF coating; aluminum in coastal zones |
| TPO/PVC single-ply | 20–35 years | Seam failure, UV degradation, puncture | 60-mil minimum; cover board; FM/UL assembly approval |
| EPDM | 20–30 years | Lap seam adhesive failure, shrinkage | Fully adhered; 60-mil; bonded seams over taped |
| Architectural shingles | 20–30 years | Wind uplift, granule loss, improper nailing | Class H wind rating; Class 4 impact; 6-nail pattern in high-wind zones |
| Concrete/clay tile | 40–80 years | Underlayment failure, cracked tiles | Peel-and-stick underlayment; structural verification |
| Natural slate | 75–150 years | Flashing failure, fastener corrosion | Copper or stainless fasteners; copper flashings |
| Liquid-applied coating | 10–15 years | Delamination, ponding degradation | Silicone for ponding areas; substrate prep is critical |
Why attachment details and edge securement determine wind performance
Wind does not lift a roof from the center. It peels it from the edges. Perimeter and corner zones experience uplift pressures two to four times higher than field zones under the same wind event, which is why edge securement is where most wind failures begin.
Attachment strategies and their trade-offs
- Fully adhered single-ply: Highest wind resistance; eliminates the billowing that fatigues mechanically fastened systems. Requires a clean, dry, compatible substrate. More labor-intensive to install and to remove at end of life.
- Mechanically fastened single-ply: Faster installation; lower upfront cost. Fastener spacing must be tightened at perimeters and corners per the tested assembly. Fastener corrosion is a long-term failure risk in humid or coastal environments.
- Concealed-clip standing seam metal: Allows thermal movement without stress on fasteners or seams. Clips must be spaced per the manufacturer’s tested assembly for the design wind speed.
- Ballasted EPDM: Appropriate only for low-slope roofs with adequate structural capacity and sheltered exposures. Not suitable for high-wind zones.
Edge metal and perimeter blocking
Roof edge metal is not decorative. It anchors the membrane termination and transfers uplift loads to the structure. The ANSI/SPRI ES-1 standard governs edge metal design for wind resistance, and the edge metal must be specified to match the site’s ASCE 7 design wind speed. Perimeter blocking (typically pressure-treated lumber or rigid insulation at the correct height) provides the substrate for edge metal attachment and prevents the membrane from pulling away at the termination.
Pro Tip: Before approving a bid, ask the contractor to show you the product’s NOA or ESR and confirm that the proposed fastener schedule, clip spacing, and edge metal gauge match the tested assembly limits. Advertising claims and product brochures are not substitutes for the actual test report.
What to require in contract documents
- Fastener schedule specifying type, diameter, embedment depth, and spacing by zone (field, perimeter, corner)
- Purlin or deck spacing assumptions used in the uplift calculation
- Seam weld procedure and QA testing protocol (probe testing, peel tests, or electronic leak detection)
- Edge metal specification referencing ANSI/SPRI ES-1 or the product’s tested assembly
- Flashing details at all penetrations, walls, and transitions drawn to scale
Flashing details at penetrations and wall interfaces deserve their own drawing set. A generic “flash per manufacturer’s instructions” note in the spec is not sufficient for a high-wind or hurricane-exposure site.
Which performance ratings and certifications actually matter?
Test marks on a product data sheet tell you what a single material can do in a lab. Assembly-level approvals tell you what the whole system can do on your building. The second category is what you need.
The key marks and what they measure
- FM Global approvals: Assembly-level wind uplift and fire ratings tested on the actual system configuration. FM-approved assemblies are the gold standard for commercial low-slope roofs. The FM Approval Guide lists approved assemblies by component combination.
- UL 2218: Impact resistance for roofing materials. Class 4 is the highest rating and is required or incentivized by many insurers in hail-prone states.
- ASTM D7158 / D3161: Wind resistance for asphalt shingles. D7158 Class H (150 mph) is the appropriate specification for high-wind zones. UL evaluation reports list the required fasteners, nailing patterns, and test standards used to qualify specific shingle products.
- ICC-ES Evaluation Reports (ESRs): Document physical properties, installation requirements, and code compliance for a wide range of products. ESRs list the specific conditions under which a product is approved, including fastener type, deck type, and slope.
- Florida Product Approval / NOA: The Notice of Acceptance validates the tested capacity of an entire assembly to resist uplift under Florida Building Code requirements. Matching a product’s NOA to your site’s ASCE 7 design pressures is a code requirement in Florida, not optional documentation.
- ASCE 7: The structural engineering standard that defines design wind pressures by location, exposure category, and building height. Every roofing assembly must be specified to meet or exceed the ASCE 7 loads for the site.
- IBHS Fortified: A voluntary above-code standard that specifies enhanced edge metal, sealed decks, and impact-rated materials. Fortified certification can reduce insurance premiums and is increasingly recognized by Florida insurers.
Minimum approvals to require for high-wind or hail-prone sites
- FM-approved or UL-listed assembly (not just the membrane product)
- UL 2218 Class 4 impact rating in hail-prone regions
- ASTM D7158 Class H for asphalt shingles in wind zones above 110 mph
- Florida Product Approval / NOA for any roof in Florida, with design pressures verified against ASCE 7 site loads
- ICC-ES ESR for any product where code compliance documentation is required by the building department
Understanding wind ratings and the documentation behind them is the single most practical skill a Florida property owner can develop before signing a roofing contract.
How should you design a roof for your specific climate and site?
A roof that performs well in Phoenix will fail prematurely in Miami, and vice versa. Climate-specific design is not a luxury. It is the difference between reaching the material’s rated service life and replacing the roof a decade early.
Climate-specific design checks
- High-wind zones (ASCE 7 Exposure C/D, hurricane-prone areas): Require fully adhered or mechanically fastened systems with fastener spacing verified against design uplift pressures. Florida Building Code mandates full sealed decks (peel-and-stick underlayment) in many high-wind areas and prescribes specific nail counts and fastener types for HVHZ compliance.
- Coastal salt-air environments: Specify aluminum or hot-dipped galvanized fasteners; aluminum or Kynar-coated steel for metal roofing; stainless steel for flashings and clips. Standard carbon steel fasteners corrode within a few years in salt-air exposure.
- Hail-prone regions: Specify UL 2218 Class 4 impact-rated materials. Some insurers offer premium discounts for Class 4 roofs. Hail guards over skylights and HVAC equipment are worth adding.
- Wildfire-exposure zones: Require Class A fire-rated assemblies. Class A is the highest fire resistance rating and covers the assembly, not just the cap material. Ember-resistant vents and non-combustible fascia and soffit materials complete the assembly.
- Low-slope roofs in any climate: Positive drainage is non-negotiable. Roofs should be designed to eliminate ponding within 48 hours. Tapered insulation systems or crickets at drains are the standard solution. Commercial roof drainage design is a separate engineering task that should appear in the construction documents.
- Freeze-thaw climates: Ice-and-water shield underlayment at eaves and valleys; self-adhering underlayment at all penetrations; copper or stainless flashings that do not corrode when exposed to freeze-thaw cycling.
Pro Tip: Request a roof-scoped wind zone map for your specific address and require the contractor to submit design uplift calculations tied to ASCE 7 loads before the contract is signed. A contractor who cannot produce these calculations is not designing the attachment system to your actual site loads.
Central Florida’s 130 mph wind standard means that most residential and commercial roofs in Brevard, Volusia, and Orange counties must meet significantly higher attachment requirements than the national minimum.
How do underlayments, cover boards, and insulation affect membrane life?
The layers beneath the cap sheet are where many owners underinvest, and where the difference between a 20-year and a 35-year roof is often made.
What each layer does
Cover boards (typically half-inch gypsum board, DensDeck, or polyisocyanurate) sit directly under the membrane and serve three functions: they provide a smooth, stable substrate that prevents membrane stress concentrations over fastener heads; they add puncture resistance against foot traffic and falling debris; and they improve fire resistance of the assembly. IBHS recommends cover boards specifically for commercial single-ply systems.
Self-adhering underlayment (peel-and-stick) creates a secondary water barrier that protects the deck if the cap material is breached. In Florida’s high-wind zones, a full-deck application of self-adhering underlayment is either required by code or strongly advisable. Felt underlayment is a significantly weaker secondary barrier and tears under wind-driven rain conditions that peel-and-stick handles without failure.
Insulation choices affect both thermal performance and membrane durability. Polyisocyanurate (polyiso) is the most common commercial insulation, with high R-value per inch, but it loses effective R-value at low temperatures. Compressive strength matters for rooftop traffic: specify a minimum 20 psi compressive strength for areas with regular maintenance access. Wet or compressed insulation loses R-value and can trap moisture against the deck, accelerating deck deterioration.
| Layer | With proper spec | Without or undersized |
|---|---|---|
| Cover board (half-inch gypsum/DensDeck) | Puncture resistance, stable substrate, fire rating improvement | Membrane stress at fastener heads, higher puncture risk, potential fire rating gap |
| Peel-and-stick underlayment (full deck) | Secondary water barrier survives cap breach; code-compliant in HVHZ | Felt tears under wind-driven rain; no effective secondary barrier |
| Polyiso insulation (20 psi min.) | Stable walking surface; full R-value maintained | Compression under traffic; moisture trapping if wet; R-value loss |
| Tapered insulation system | Positive drainage to drains; eliminates ponding | Ponding adds load and accelerates membrane breakdown |
What to require in specifications
- Underlayment type specified by product name and ASTM standard, not just “felt” or “synthetic”
- Full-deck peel-and-stick application in high-wind or hurricane-exposure areas
- Cover board specified by product, thickness, and compressive strength
- Insulation specified by R-value, compressive strength, and moisture resistance class
- Tapered insulation plan or drain locations shown on construction drawings
Why workmanship and documentation determine real-world durability
You can specify the best materials available and still get a 10-year roof if the installation is wrong. Documentation is how you verify that the installation matched the tested assembly.
Documents to require before work begins
- Product approval / NOA / ESR for every major component, confirming the tested assembly matches your design conditions
- Manufacturer’s installation instructions (the specific version for the product being installed, not a generic guide)
- Shop drawings for any prefabricated components, showing dimensions, seam locations, and attachment details
- Factory-weld evidence for prefabricated membranes (Duro-Last and similar systems provide documentation of factory seam quality)
- Seam test protocol specifying how field seams will be tested (probe testing, peel tests, or electronic leak detection) and what constitutes a passing result
- Contractor QA/inspection log to be completed during installation and submitted at project closeout
Installer credentials to verify
- State roofing contractor license (required in Florida; verify at the Florida DBPR)
- Manufacturer’s certified installer program enrollment (GAF Master Elite, Carlisle Authorized Applicator, Duro-Last Certified Contractor, and similar programs require training and ongoing performance standards)
- Current certificate of liability insurance and workers’ compensation coverage
- References from projects of similar scope and system type completed within the past three years
Pro Tip: Specify factory-fabricated deck sheets or pre-welded seam panels wherever the geometry allows. Every field seam eliminated is a potential leak point removed from the system’s lifetime risk profile.
Numbered checklist for contract submittals
- Product approval / NOA / ESR for membrane, underlayment, fasteners, and edge metal
- Manufacturer’s current installation instructions for the specific product version
- Fastener schedule by zone (field, perimeter, corner) with uplift calculations
- Shop drawings for prefabricated components
- Seam weld QA protocol and acceptance criteria
- Contractor license number and manufacturer certification documentation
- Certificate of insurance (liability and workers’ comp)
- Warranty language reviewed and signed before work begins
What inspection and maintenance schedule keeps a durable roof durable?
A well-built roof still needs a maintenance program. The materials that reach their rated service life almost always have documented inspection and maintenance histories. The ones that fail early usually do not.
Recommended inspection cadence
- Biannual inspections (spring and fall) covering drains, flashings, seams, penetrations, and edge metal
- Pre-storm season inspection (May in Florida, before hurricane season) to identify and repair any conditions that could worsen under wind or rain
- Post-event inspection after any hurricane, tropical storm, or hail event, regardless of visible interior damage
- After any rooftop work (HVAC service, solar installation, antenna work) that involves foot traffic or penetrations
Maintenance tasks that materially extend service life
- Clear drains and scuppers of debris at every inspection. Blocked drains are the fastest path to ponding and the membrane degradation that follows.
- Reseal flashings at penetrations and wall interfaces where sealant has cracked or pulled away. Sealant typically needs attention every 5–7 years even on a well-installed roof.
- Replace failed or backing-out fasteners before they create membrane stress points or allow water infiltration.
- Control vegetation on and around the roof. Roots from moss, algae, and plants accelerate membrane degradation and block drains.
- Document every inspection with photos and a written condition report. This record is essential for warranty claims and insurance documentation.
Service life by material and maintenance dependency
Conditions that require immediate evaluation or repair
- Ponding water remaining more than 48 hours after rainfall
- Fatigued, cracked, or separated flashings at any penetration or wall interface
- Missing, backing-out, or corroded fasteners visible at perimeter or field areas
- Widespread granule loss on asphalt shingles (more than localized wear)
- Interior water stains or active leaks following any rain event
- Visible membrane shrinkage, tenting, or seam separation on single-ply systems
Roof maintenance tips and a consistent inspection schedule are the lowest-cost durability investment available to any property owner.
How do you evaluate a roofing bid or specify a durable system?
Most roofing bids look similar on the surface. The differences that determine whether you get a 30-year roof or a 15-year roof are buried in the submittals, the fastener schedule, and the warranty language.
Contractor-specification checklist
- Confirm the proposed assembly has FM, UL, or ICC-ES approval at the assembly level (not just the cap material)
- Require the product’s NOA or ESR and verify that the tested design pressures meet or exceed your ASCE 7 site loads
- Specify fastener type, diameter, and spacing by zone in the contract documents
- Require a seam weld QA protocol with defined acceptance criteria
- Specify underlayment type and application method (full-deck peel-and-stick in high-wind areas)
- Require shop drawings for any prefabricated components before fabrication begins
- Confirm manufacturer warranty terms: system vs. material-only coverage, duration, and certified-installer requirement
- Tie final payment to passing an agreed QA checklist, not just to project completion
Key questions to ask every contractor
- “Show me the NOA or ESR for this assembly and confirm the design pressures match our ASCE 7 loads.”
- “What is your seam testing protocol, and can I see the results from a recent comparable project?”
- “Are you a certified installer for this manufacturer’s warranty program?”
- “Walk me through the fastener schedule for the field, perimeter, and corner zones.”
- “What does the warranty cover: material only, or the full system including labor and consequential damage?”
Pro Tip: Require that the product approval / NOA / ESR and the manufacturer’s installation instructions are listed by document number in the contract. Final payment should be contingent on the contractor submitting a completed QA checklist and seam test results. This one clause eliminates most installation shortcuts.
Code-aware installation practices and documented submittals are the two things that separate a contractor who builds durable roofs from one who builds roofs that look durable on day one.
Why system-first thinking is the only approach that holds up
The roofing industry’s marketing focuses on materials because materials are visible and easy to sell. But after 15 years of seeing what actually fails, the pattern is consistent: it is almost never the membrane in the middle of the field. It is the transition at the parapet, the edge metal that was one gauge too light, the penetration flashing that was field-cut instead of factory-formed, or the drain that was never cleared after the first hurricane season.
The specification checklist in this article is not theoretical. It reflects the failure modes that show up repeatedly on roofs that were sold as premium systems but installed without the documentation to prove it. A 60-mil TPO membrane with a factory-fabricated corner and a verified fastener schedule will outlast an 80-mil membrane with a generic spec and no seam testing. The material is a starting point. The assembly, the documentation, and the installer’s certification are what determine whether the roof reaches its rated life.
Property owners who treat the submittal review as a formality are the ones who end up with a 12-year roof on a 25-year budget. The ones who require NOA/ESR documentation, verified fastener schedules, and QA seam testing before final payment tend to get the service life they paid for.
Thomasroofingandrepair delivers documented, code-compliant roofs in Central Florida
Central Florida’s combination of hurricane-force winds, intense UV exposure, and high humidity means that a roof built to minimum standards is a roof that will need early replacement. Thomasroofingandrepair serves property owners and managers across Brevard, Volusia, and Orange counties with installation, repair, inspection, and storm damage services built around the system-first checklist this article describes.
Every project includes product approval and NOA submittal handling, fastener schedules verified against ASCE 7 design pressures, and QA documentation at project closeout. For storm damage situations, the team manages the insurance claim process alongside the repair, reducing the administrative burden on property owners. Financing options are available for replacement projects where upfront cost is a constraint.
The next step is straightforward: request a free estimate and ask Thomasroofingandrepair to walk you through the installation best practices and documentation they provide on every job. For storm damage, the Central Florida storm damage repair guide is a useful starting point before the inspection.
Sources
The sources below are the primary technical references behind this article. Each covers a distinct part of the durability picture.
- Commercial Roofing Systems, Materials Lifespan and Engineering Strategies for Low-Slope Roof Performance (J.S. Held, 2026-04-13)
- Commercial roofs best practices (IBHS)
- Roofing buying guide (Consumer Reports, 2022-08-10)