TL;DR:
- Homeowners in Central Florida must act quickly and correctly after storm damage to prevent costly losses and structural issues. Prioritizing safety, controlling water intrusion, and thoroughly evaluating roof damage are essential steps before making repair or replacement decisions. Following a professional restoration workflow ensures proper documentation, insurance approval, and code-compliant repairs to protect homes effectively.
A storm tears through Central Florida and within hours, what started as a few missing shingles turns into soaked drywall, ruined insulation, and a repair bill that doubles every week you wait. In Brevard, Volusia, and Orange counties, homeowners face this reality after every major storm season, and the difference between a manageable repair and a catastrophic loss often comes down to how fast and how correctly you respond. This guide walks you through every critical step, from securing the scene to choosing between repair and replacement, so you can protect your property and your wallet.
Table of Contents
- Prioritize safety and prepare for assessment
- Emergency water control: tarping and securing leaks
- Identify the full scope of roof damage
- Understand your repair or replace options
- Navigate the professional roof restoration workflow
- Our experience: What most guides miss about Central Florida storm roof recovery
- Get trusted help for storm-damaged roofs in Central Florida
- Frequently asked questions
Key Takeaways
| Point | Details |
|---|---|
| Safety first | Never walk on or enter a storm-damaged roof area until it’s professionally assessed for structural risks. |
| Act fast on water intrusion | Emergency tarping and leak control can prevent significant further damage and escalation of repair costs. |
| Hidden problems are common | Not all damage is visible—look for subtle signs and get professional inspections to avoid future leaks. |
| Repair or replace wisely | Consider roof age, type, and damage pattern to decide between a targeted repair and a full replacement. |
| Follow proven workflows | Successful restoration relies on thorough inspections, insurance alignment, and certified repairs. |
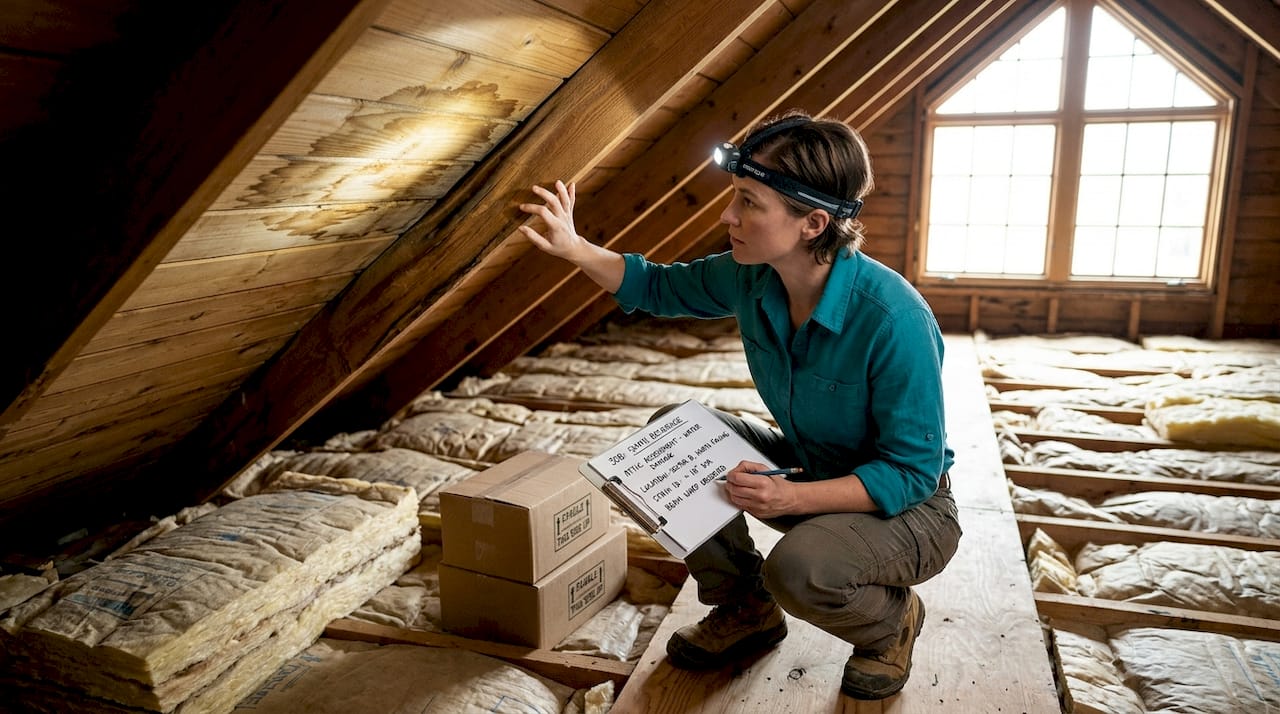
Prioritize safety and prepare for assessment
Once you recognize that storm damage can escalate quickly, your first responsibility is safety before any inspection or repairs begin.
Walking onto a roof after a storm sounds like the obvious first move, but it is one of the most dangerous decisions you can make. Storm-compromised roofs can have hidden soft spots, cracked decking, or weakened fasteners that give way without any warning. You could fall through a section that looks perfectly solid from above.
The hazards go beyond the roof surface itself. Here are the specific risks to watch for before you get anywhere near your home’s exterior:
- Downed or sagging power lines near the roofline
- Standing water that may be electrified
- Hanging tree limbs or debris lodged against the roof
- Displaced chimney caps or loose flashing that can fall
- Structural wall damage that destabilizes the entire roof system
- Broken skylights or vents creating open fall hazards
Central Florida storms, particularly hurricanes and severe tropical systems, drive wind speeds that can pry up large sections of roofing material while leaving surrounding areas looking untouched. That contrast is deceptive.
“After a storm, homeowners should prioritize safety, avoid walking on potentially compromised roofs, and have a professional evaluate hidden and structural issues that may not be visible from the ground.”
What you can do safely is conduct a ground-level visual scan. From the ground, look for obvious missing shingles, sagging roof sections, debris piled on the roof, and damaged gutters. Take notes and photos from every angle. This initial observation helps you communicate effectively when you schedule your storm damage inspection with a licensed roofing professional.
If you see anything that looks structurally concerning, stay out of the house until a professional clears it. Your safety is worth more than any property.
Emergency water control: tarping and securing leaks
Once safety is ensured, halting water intrusion is the top priority before evaluating long-term repairs.
Water is patient. It finds every crack, travels along framing, and saturates materials that take weeks to fully dry, creating conditions ripe for mold growth and structural rot. Every hour of uncontrolled water intrusion multiplies your eventual repair cost.
Emergency tarping is the immediate priority when the interior is exposed or there is active water intrusion. It prevents further damage while permanent repairs are scheduled. Here is how to move through the emergency water control process correctly:
- Keep everyone away from actively leaking areas inside the home. Place buckets to catch drips, but do not attempt interior ceiling repairs until the roof source is controlled.
- Call a licensed roofing contractor immediately for emergency tarp installation. Many companies, including those serving Central Florida, offer 24/7 emergency response.
- Document everything before tarping begins. Photograph the damaged areas from the ground, from inside the attic, and from interior rooms showing water entry. This documentation is critical for your insurance claim.
- Let the contractor secure heavy-duty tarps over exposed decking, missing shingles, and any roof penetrations that were damaged. A properly secured tarp runs from the peak down and is anchored so wind cannot lift it.
- Record the tarping process as well. Photos of the tarp installation provide a before-and-after record that strengthens your claim and establishes a clear timeline.
Pro Tip: Take timestamped photos on your phone immediately after the storm and again after tarping is complete. Insurance adjusters look for this sequence to verify that you took reasonable steps to prevent additional damage.
Water damage that goes unaddressed for even 48 to 72 hours can push remediation costs significantly higher. According to industry estimates, mold remediation costs alone can run into thousands of dollars once organic materials become saturated and spores begin to spread. The emergency roof repair workflow matters enormously here, and so does documenting roof damage at every stage.
Identify the full scope of roof damage
With water entry controlled, a systematic evaluation is vital to spot all damage, even the kind that is easy to overlook.
Storm damage roof evaluation should look for both visible and easy-to-miss indicators such as lifted or cracked shingles, exposed underlayment, bent or detached gutters, and structural roof-line deformation. Not all damage shows up immediately. Some issues take days or weeks to reveal themselves as sun and rain cycles stress already weakened materials.
Common visible damage indicators include:
- Missing, curled, or lifted shingles
- Exposed felt underlayment or bare wood decking
- Dented, bent, or detached gutters and downspouts
- Debris embedded in the roof surface
- Visible gaps or openings around chimneys and vents
Hidden issues are equally important. Warped or cracked roof framing, water stains in the attic or on upper-floor ceilings, and subtle sagging along the ridge line all indicate damage that goes beyond the surface. These problems do not fix themselves and tend to worsen rapidly in Florida’s heat and humidity.
Here is a quick-reference table to help you categorize what you find:
| Damage type | Visible sign | Recommended action |
|---|---|---|
| Missing shingles | Bare patches on roof surface | Professional repair or replacement |
| Lifted shingles | Edges curled or raised | Immediate re-securing or replacement |
| Exposed underlayment | Dark felt paper showing | Emergency tarping, then repair |
| Gutter damage | Bent, sagging, or missing gutters | Repair or replace gutters |
| Roof-line deformation | Sagging or uneven ridgeline | Structural inspection required |
| Attic water stains | Wet insulation, discolored wood | Full professional assessment |
| Flashing gaps | Separations around chimneys, vents | Targeted flashing repair |
Look at real storm damage examples to calibrate your own observations, and schedule a professional roof assessment as soon as possible. The sooner hidden damage is found, the lower your total repair cost.
Understand your repair or replace options
Once the damage is scoped, it is time to decide: is spot repair enough, or will a replacement deliver better long-term protection?
This is where many homeowners make costly mistakes. They focus only on what is obviously damaged and underestimate how much the rest of the roof has been weakened. The decision between repair and full replacement depends on several factors working together, not just the size of the visible damaged area.
Key factors that influence the repair versus replacement decision:
- Roof age. Asphalt shingle roofs older than 15 to 20 years have diminished resilience. Even if only 25% of the surface is visibly damaged, aging materials on the rest of the roof may already be at or near failure.
- Roofing material. IBHS findings from Hurricane Ian show that asphalt shingles and aging roofs are disproportionately affected in hurricane performance, while metal roofs tend to perform better. Tile systems can perform well but are strongly influenced by roof age and installation quality.
- Extent and pattern of damage. Localized damage from a single impact point is a candidate for targeted repair. Widespread damage across multiple roof sections, or damage following a pattern that suggests the entire system was stressed, typically points toward replacement.
- Previous repairs. A roof with multiple prior repair patches is more vulnerable. Each patch is a transition zone where water can infiltrate, and storm stress often reveals these weak spots first.
| Scenario | Likely recommendation |
|---|---|
| Under 10 years old, limited damage | Targeted repair |
| 10 to 15 years old, moderate damage | Repair with full inspection |
| Over 15 years old, widespread damage | Replacement strongly advised |
| Metal roof, any age, isolated damage | Targeted repair |
| Tile roof, older with multiple cracks | Section repair or full replacement |
| Structural deformation present | Replacement with structural work |
Pro Tip: Even if insurance covers only a repair, get a written professional opinion on whether replacement is more appropriate for your roof’s age and condition. That opinion becomes part of your claim documentation and may change the outcome. Explore your repair vs replacement steps carefully before signing any contract.
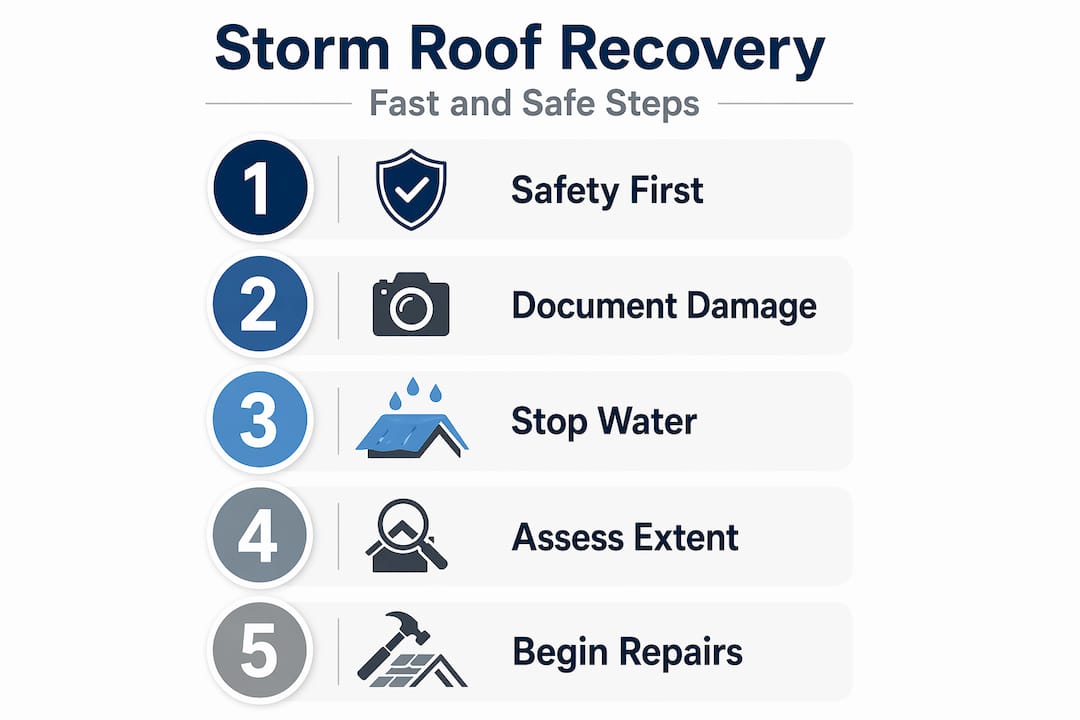
Navigate the professional roof restoration workflow
Having determined your roof’s needs, here is how the professional restoration process typically unfolds so you are ready at every stage.
A reliable restoration workflow in Florida typically includes a professional inspection, a written estimate that aligns with industry pricing conventions, insurance approval, and then permanent code-compliant repairs ranging from targeted fixes to full replacement. Knowing this sequence helps you stay organized and avoid costly missteps.
Here is what the process looks like step by step:
- Schedule a professional inspection. A licensed roofer documents all damage, including both visible and hidden issues. This report is your foundation for everything that follows.
- Receive a written estimate. The estimate should itemize materials, labor, and scope of work. It should follow standard industry pricing so your insurance adjuster can verify it without disputes.
- File your insurance claim. Submit your documentation, photographs, and the professional estimate to your insurer. Understand your insurance deductibles before agreeing to any scope of work so there are no financial surprises.
- Get insurance approval. Work with your contractor and adjuster to align on the approved scope. Some contractors will coordinate directly with your insurer, which simplifies the process considerably.
- Schedule permanent repairs. Once approval is in hand, coordinate the start date and confirm that all materials meet current Florida Building Code requirements. Central Florida codes have been updated following major storms, and non-compliant repairs can create problems at resale.
- Conduct a final walkthrough. Before the crew leaves, inspect the completed work and confirm that debris has been removed, gutters are clear, and all penetrations are properly sealed.
Working with a reputable contractor makes each of these steps more predictable. Ask for references, verify licensing, and read practical roof repair tips tailored to Florida conditions before you commit to a contractor.
Our experience: What most guides miss about Central Florida storm roof recovery
Every step-by-step guide covers the obvious: tarp it, document it, call your insurer, get it fixed. What those guides rarely address is the specific pattern of failures we see over and over again in Central Florida, failures that cost homeowners far more than the original storm damage ever would have.
The single biggest missed issue is fasteners and flashing, not shingles. After a major storm, everyone looks at the shingles. But the real vulnerabilities are almost always at transition points: where the roof meets a wall, where flashing wraps around a chimney or skyline vent, and where roofing nails have been working loose through years of thermal expansion and contraction in Florida’s heat. A storm does not have to pull a shingle completely off to create a leak. It just has to lift that shingle enough to let water find a path underneath.
We have inspected roofs that looked fine from the street, only to find systematically backed-out fasteners across entire sections and flashing lifted by just a fraction of an inch at every penetration. Left alone, those roofs would have developed active leaks within two or three rainstorms after the original event.
The other reality that rarely makes it into guides is the insurance limitation problem. Policies vary widely, and many homeowners discover after the fact that their coverage does not fully account for code upgrades required on older roofs. If your roof was built to a standard that has since been updated by Florida Building Code revisions, you may owe the difference out of pocket. Knowing this before you file, not after, changes how you negotiate your claim.
Our strong advice: when you are building your evidence file, do not just document the obvious damage. Use these evidence documentation tips to capture every transition zone, every penetration, and every prior repair site on your roof. Thoroughness in documentation is where real money is saved, not in cutting corners on the repair itself.
The cost savings in storm recovery do not come from finding the cheapest contractor or patching only what is obviously broken. They come from catching everything once, fixing it right, and never dealing with that leak again.
Get trusted help for storm-damaged roofs in Central Florida
When your roof has taken a hit from a Central Florida storm, speed and accuracy both matter. Waiting too long means water damage that spreads through your home’s structure and insulation, while moving too fast with the wrong contractor means incomplete repairs that fail again in the next storm.

At Thomas Roofing and Repair, we serve homeowners and property managers across Brevard, Volusia, and Orange counties with licensed inspections, emergency tarping, and full roof restoration services. Whether you need immediate help or want to understand your options, our team is ready. Start with our storm damage repair guide for a complete overview, review the emergency repair workflow to know what to expect from our crew, and follow our roof recovery guide through each stage of the process. Contact us today for your free roof inspection and estimate. We make the process straightforward so you can focus on getting your home back to normal.
Frequently asked questions
How can I tell if storm roof damage is an emergency?
If you see exposed decking, interior leaks, or major structural impacts, it is an emergency that needs immediate professional attention. Visible water inside the attic or on ceilings after a storm means call a roofer now, not tomorrow.
Should I tarp my roof myself after a storm?
Tarping should be done by a professional if possible, as improper installation can cause further damage and may affect your insurance claim. A contractor-installed emergency tarp also creates documented evidence that you took reasonable steps to mitigate damage.
What hidden roof issues should I watch for after a hurricane?
Look for cracked shingles, warped roof lines, attic water stains, and lifted flashing because hidden structural issues often do not show up immediately but can become serious within weeks.
Do older roofs need replacing after every storm?
Older and aging shingle roofs tend to suffer more damage and may need replacement, while tile and metal roofs often last longer but should still be inspected. IBHS research confirms that asphalt shingle roofs experience the highest damage rates in hurricanes, making replacement more likely for roofs over 15 years old.
What does a professional roof restoration process include?
It involves a detailed inspection, a written estimate, insurance alignment, and permanent code-compliant repairs from targeted fixes to full replacement. A reliable Florida workflow follows these four stages in sequence to ensure nothing is missed and all work meets current building code requirements.