
The most common roofing mistakes homeowners make come down to four categories: unsafe DIY inspections, skipping small repairs until they become big ones, choosing the wrong material or an unvetted contractor, and ignoring ventilation or drainage. Fix these first, and you protect your home’s most expensive single component.
What to do right now if you suspect roof damage:
- Stay off the roof. OSHA requires fall protection for any work at 6 feet or above, and roofing accidents statistics show that homeowners account for a disproportionate share of roofing-related injuries.
- Grab binoculars and scan from the ground. Look for missing shingles, lifted flashing, or dark staining along the eaves.
- If water is actively entering the home, move valuables, place buckets, and call a licensed roofer for emergency tarping.
- Document everything with photos before touching anything. Time-stamped images are your best insurance asset.
- Contact a licensed roofing contractor for a professional inspection. Thomasroofingandrepair serves Brevard, Volusia, and Orange counties and can respond quickly after storm events.
Key Takeaways
The single most expensive roofing mistake is deferring small repairs: a $150–$500 fix left unaddressed can escalate to a multi-thousand-dollar replacement once deck rot and mold take hold.
| Point | Details |
|---|---|
| Never climb on the roof yourself | OSHA fall-protection rules apply at 6 feet; most roofing accidents involve homeowners, not pros. |
| Fix small issues fast | Early repairs cost $150–$500; deferred damage can reach tens of thousands once decking and mold are involved. |
| Vet contractors beyond price | Verify license, liability insurance, workers’ comp, and a written scope before signing anything. |
| Document everything | Time-stamped photos, maintenance receipts, and a contractor scope protect both warranty and insurance claims. |
| Thomasroofingandrepair | Serves Central Florida with licensed repair, replacement, emergency tarping, and insurance claim assistance. |
Table of Contents
- 1. Installation and material errors that cause the most long-term damage
- 2. Maintenance mistakes that turn cheap fixes into expensive repairs
- 3. Why DIY quick fixes usually make things worse
- 4. Hiring mistakes: choosing the cheapest or unvetted contractor
- 5. When leaks happen: emergency steps, costs, timelines, and insurance
- 6. Roof lifespan, warranties, and the repair-vs.-replace decision
- 7. A contractor-ready inspection checklist you can use today
- A local roofer’s perspective on what actually goes wrong
- Thomasroofingandrepair: fast, licensed help when you need it most
- Sources
1. Installation and material errors that cause the most long-term damage
Poor installation is the roofing mistake that costs the most and shows up the latest. A missing ice-and-water barrier, incorrectly lapped underlayment, or flashing installed out of sequence can allow water to bypass the surface entirely, soaking the decking for months before a ceiling stain appears. Proper roof replacement is a sequence-sensitive system: deck repair, drip edge, ice-and-water barrier, underlayment laps, step flashing, valley flashing, and shingle nailing pattern all have to happen in the right order. Miss one step or reverse two, and the failure is delayed, not prevented.
Common material mistakes:
- Choosing a shingle rated for a steeper pitch on a low-slope roof, or vice versa.
- Roofing over an existing layer when the deck already has two layers, which most building codes prohibit and which traps moisture.
- Using low-grade pipe boots, drip edge, or step flashing that corrodes within a few seasons.
What to verify in any written scope of work: underlayment type and weight, flashing material and gauge, nail pattern (typically 4 nails per shingle minimum, 6 in high-wind zones), and whether the job is a full tear-off or a roof-over. If the estimate does not specify these, ask. A contractor who cannot answer is a red flag.
Installation errors often void manufacturer warranties. Most shingle manufacturers require certified installation and a documented scope to honor a workmanship or material claim. If the installer skipped the ice-and-water barrier or used the wrong nail length, the warranty is gone before the first rain.
Pro Tip: After any new installation, photograph the completed roof from multiple angles the same day. If a problem surfaces six months later, that photo record establishes the baseline and supports both warranty and insurance claims.
2. Maintenance mistakes that turn cheap fixes into expensive repairs
A missing shingle costs a modest amount to fix in an early repair. Leaving it unrepaired through a rainy season can lead to deck rot, mold remediation, and interior drywall repair that can become very expensive. Deferred small repairs consistently multiply costs, and delayed leak repairs add mold risk, structural rot, energy loss, and potential insurance denial on top of that.
A twice-yearly maintenance pass covers the most ground:
- Spring (after storm season ends): Check the attic for daylight, moisture stains, or soft spots in the decking. Walk the perimeter and look for granule accumulation in the gutters — heavy granule loss means the shingles are near end of life.
- Fall (before storm season): Clear gutters and downspouts completely. Inspect visible flashing at chimneys, vents, and skylights for rust, lifting, or gaps. Look for shingle curling, cracking, or missing tabs from the ground.
Early warning signs worth acting on immediately: shingle curling at the edges or corners, dark streaking (algae or moisture), sagging anywhere along the roofline, and any discoloration on attic sheathing or interior ceilings. These are not cosmetic issues. Each one points to a specific failure mode that gets worse with time.
Keep a simple maintenance log: date, what you observed, photos taken, and any work performed with receipts. That record protects your manufacturer warranty and gives an insurer the documentation they need. Lack of maintenance records is one of the most common reasons warranty and insurance claims get denied. You can find a full list of common roofing damage types to cross-reference against what you observe.
3. Why DIY quick fixes usually make things worse
Most roofing and ladder accidents involve homeowners, not professionals, and the gap in safety equipment and training is the reason. Professionals use harnesses, roof jacks, and non-slip footwear on every job. Homeowners typically use none of those. “Being careful” does not substitute for fall-arrest gear at 6 feet above grade. Ground-level inspections detect the majority of visible problems without any roof access at all.
Beyond safety, the most common DIY quick-fix errors are:
- Sealing a penetration with caulk or roofing cement without addressing the underlying flashing failure. The sealant fails within one season; the water path remains.
- Reworking step flashing incorrectly, which redirects water behind the wall rather than away from it.
- Installing a tarp that pools water or traps moisture against the decking, accelerating the rot it was meant to prevent.
- Skipping permits on structural repairs, which can void homeowner’s insurance and create problems at resale.
The apparent savings from DIY roof replacement disappear quickly once you add tool rentals, permit fees, safety gear, disposal costs, and the warranty exposure that comes with unlicensed installation. For most homeowners on a standard two-story house, the math does not work.
Safe actions you can take from the ground while waiting for a pro: use binoculars to document damage, clear debris from gutters with a ground-level tool, move valuables away from water-affected rooms, and take time-stamped photos from multiple angles. That is genuinely useful work that carries zero fall risk.
Pro Tip: If you are considering DIY on a small outbuilding or a very low single-story structure, the minimum criteria are: a pitch below 4:12, dry conditions, a second person present, proper footwear, and a secured ladder. If any one of those conditions is not met, call a pro. The ER visit costs more than the repair. You can also read about common DIY pitfalls in other home trades to see how the same pattern plays out across renovation projects.
4. Hiring mistakes: choosing the cheapest or unvetted contractor
Price is the wrong primary filter for a roofing contractor. Verifying license, roofing-specific insurance, and a detailed scope of work protects against workmanship errors and warranty loss in ways that a low bid never can. The cheapest quote often reflects missing steps: no tear-off, no ice-and-water barrier, no permit, or substandard accessories.
The contractor checklist that actually matters:
- State roofing license — verify it directly on your state contractor licensing board website, not just from the contractor’s business card.
- General liability insurance — minimum $1 million per occurrence for residential work.
- Workers’ compensation insurance — if a worker is injured on your property and the contractor lacks workers’ comp, you may be liable.
- Manufacturer-certified installer status — required for enhanced warranty coverage from most major shingle brands.
- Local physical address and references — storm chasers often have no local office; ask for two or three recent local references and call them.
- Written, itemized scope of work — materials specified by brand and grade, nail pattern, tear-off vs. roof-over, flashing details, cleanup plan, and payment schedule.
Red flags that should end the conversation: cash-only payment demands, pressure to sign before you get a second bid, refusal to pull permits, or a verbal-only scope. Get everything in writing before any money changes hands.
Use three bids strategically. You are not looking for the lowest number; you are looking for the bid that specifies the most detail at a fair price. A contractor hiring guide for Central Florida walks through the local-specific questions worth asking, and a pre-built question list gives you exactly what to bring to the estimate appointment.
5. When leaks happen: emergency steps, costs, timelines, and insurance
The first 30 minutes after discovering an active leak matter more than most homeowners realize. Stop further water entry with towels or buckets, document the damage with photos and video before moving anything, and call a licensed roofer for rapid assessment and emergency tarping. Do not wait to see if it stops on its own.
Realistic cost ranges for common repairs give you a baseline for evaluating bids:
Timelines: a licensed contractor can typically complete a small repair within one to three days of inspection. Partial replacements run three to five days. Full replacements on a standard home take two to four days once materials are staged, weather permitting. Emergency tarping can happen same-day or next-day after a storm event.
For insurance documentation, the checklist is straightforward: time-stamped photos of all visible damage before any cleanup, a written contractor scope of work, itemized repair receipts, and your maintenance log showing the roof was serviced regularly. Insurers look for evidence of neglect to justify denial. A well-documented maintenance history removes that argument. Warranty claim denials in Central Florida are more common than most homeowners expect, and the documentation gap is usually why.
6. Roof lifespan, warranties, and the repair-vs.-replace decision
Knowing what your roof is made of and how old it is shapes every repair decision you make.
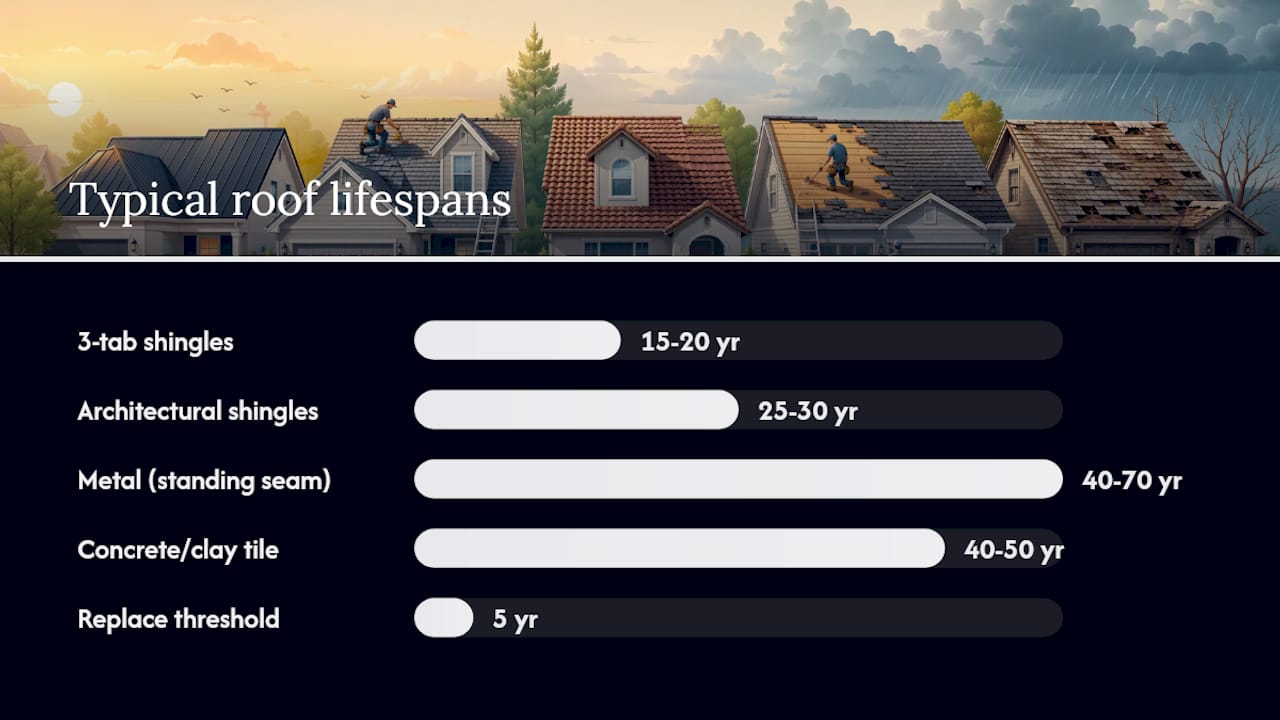
Typical material lifespans under normal conditions:
- 3-tab asphalt shingles: 15–20 years
- Architectural (dimensional) asphalt shingles: 25–30 years
- Metal roofing (standing seam): 40–70 years
- Concrete or clay tile: 40–50 years
Poor attic ventilation, trapped moisture, and improper installation shorten every one of those numbers. A 25-year architectural shingle installed without adequate ridge ventilation in a Florida climate may fail in 15 years.
Manufacturer warranties have two components: a material defect warranty (covers the shingle itself) and a workmanship warranty (covers installation errors, usually offered by the contractor). Most material warranties require licensed installation, documented maintenance, and no unauthorized modifications. Roofing over an existing layer, using non-approved accessories, or hiring an unlicensed installer can void the material warranty entirely before the first claim is filed. A roofing materials comparison lays out expected lifespans and performance trade-offs by material type.
The repair-vs.-replace threshold is roughly this: if the roof is within 5 years of its expected lifespan, has multiple failure points, or has already had two or more significant repairs, replacement is usually the more economical choice over a 5-year horizon. A single isolated failure on a roof with 10+ years of life remaining is a repair. When in doubt, get two independent assessments.
7. A contractor-ready inspection checklist you can use today
A structured inspection from the ground takes about 20 minutes and gives a licensed contractor a useful starting point. Work through it in this order:
- Attic first. Check for daylight penetrating the decking, moisture stains on sheathing, soft or discolored wood, and any signs of mold. Bring a flashlight.
- Gutters and downspouts. Look for granule accumulation (heavy loss signals aging shingles), rust staining, sagging sections, or separation from the fascia.
- Ground-level perimeter scan. Use binoculars. Look for missing, curling, or cracked shingles; lifted or separated flashing at walls, chimneys, and vents; and any sagging along the ridge or eaves.
- Penetrations. Scan every pipe boot, vent, skylight, and chimney. Cracked rubber boots and missing caulk at penetrations are among the most common entry points for water.
- Decking condition. If you can safely access a low eave edge, press gently on the fascia board. Soft or spongy wood indicates moisture has already reached the structure.
- Document everything. Photograph each area from two distances: one wide shot for context, one close shot for detail. Include the date in the file name or use your phone’s location and timestamp feature.
When the contractor arrives, ask for: an itemized scope of work with material specifications, the manufacturer’s product data sheet for the proposed shingle, proof of certified installer status, and the permit number once it is pulled. A detailed inspection checklist and a pre-built contractor question list are worth printing before any estimate appointment.
A local roofer’s perspective on what actually goes wrong
The pattern I see most often in Central Florida is not dramatic storm damage. It is a small flashing gap or a cracked pipe boot that sat unaddressed through two or three rainy seasons. By the time the homeowner notices a ceiling stain, the decking has been wet for months. The repair that would have cost a few hundred dollars is now a partial replacement.
Florida’s storm season runs roughly June through November, which means the window for proactive maintenance is tight. The best time to schedule an inspection is March or April, before the heat and humidity peak and before contractors are fully booked with storm response work. A roof that goes into hurricane season with known vulnerabilities is a liability.
The other pattern worth naming: homeowners who climb on the roof to “take a quick look” after a storm. The roof is wet, the pitch is steeper than it looks from the ground, and the adrenaline of storm damage makes people take risks they would not otherwise take. Stay down. The damage will still be there when a professional arrives with the right equipment.
Thomasroofingandrepair: fast, licensed help when you need it most
When a storm hits Brevard, Volusia, or Orange County and your roof is compromised, the difference between a $400 repair and a $12,000 replacement often comes down to how fast you get a licensed contractor on site.

Thomasroofingandrepair handles the full range: emergency tarping, storm damage repair, full replacements, insurance claim documentation, and code-aware installations built to manufacturer spec. Financing options are available for larger jobs, and every estimate comes with a written, itemized scope so you know exactly what you are paying for. Before you call, pull together your time-stamped damage photos, your maintenance log if you have one, and the approximate age of your current roof. That 10-minute prep makes the inspection faster and your insurance claim stronger. Request your free estimate today.
Sources
- 5 reasons to avoid DIY roof repair — Colorado Roofing
- The true cost of ignoring small roof repairs — Lehman Contracting
- 19+ Fascinating Roofing Accidents Statistics You Need to Know — Journeyman HQ
- DIY roof replacement: Why you should not (usually) — Do It Or Hire
- Why DIY roof inspections send 200+ Illinois homeowners to the ER yearly — Advanced Roofing Inc.