
TL;DR:
- If your insurer declares your roof a total loss, they will pay based on your policy’s loss-settlement terms, minus deductibles and holdbacks.
- The initial payment is rarely the final amount, as depreciation and proof of work completion affect the final payout.
If your insurer declares your roof a total loss, they will pay to replace it according to your policy’s loss-settlement terms — either Replacement Cost Value (RCV) or Actual Cash Value (ACV) — minus your deductible and any applicable holdbacks. The initial check you receive is rarely the final number. Most RCV policies withhold depreciation until you submit proof that the work is complete. ACV policies deduct depreciation upfront, so what you receive is what you get unless you negotiate a supplement.
Here is what to do the moment you get a total-loss declaration:
- Document everything now. Photograph wide shots, close-ups, interior water stains, and any test squares the adjuster marked. Timestamp every image.
- Protect the structure. Install a tarp or other temporary cover to stop further water intrusion. Failing to mitigate can reduce your claim.
- Get an independent contractor estimate before you sign anything or accept a settlement figure.
- Notify your insurer, record your claim number, and confirm in writing whether your policy is RCV or ACV and whether a separate wind or hail deductible applies.
That last point matters more than most homeowners realize. A standard deductible and a wind/hail deductible are not the same thing, and confusing them can leave you short by thousands of dollars.
Table of Contents
- What does “totaled” actually mean for a roof?
- How insurers actually pay: RCV, ACV, depreciation, and deductibles
- What to do, step by step, after a total-loss declaration
- How adjusters and contractors see the same roof differently
- What drives the total cost of a roof replacement after a total loss
- How long does the whole process take?
- What are your options when you disagree with the insurer?
- How a local contractor helps you get from initial estimate to final payout
- Key Takeaways
- What most homeowners get wrong about insurance roof claims
- Thomasroofingandrepair makes the claims process work for you
- Authoritative sources and regulators for roof insurance claims
What does “totaled” actually mean for a roof?
A roof is considered a constructive total loss when the cost to repair it equals or exceeds what the policy’s loss-settlement provision would pay for a full replacement. Unlike with cars, there is no universal percentage threshold baked into law. Insurers evaluate the damage against the policy’s RCV or ACV terms and the dwelling coverage limit, not against a single industry-wide number.
In practice, adjusters use test-square assessments: they inspect a sample section of the roof, count damaged shingles or granule loss, and extrapolate across the full surface. If the damage is widespread enough that repairs would require matching discontinued materials, compromise the roof’s integrity, or cost more than replacement, the carrier will typically call it a total loss. Thresholds vary by carrier and by state, which is why two adjusters from different companies can look at the same storm-damaged roof and reach different conclusions.
Homes are declared total losses far less often than vehicles, partly because dwelling coverage is designed to cover full replacement and partly because land value is never part of the calculation. When a roof specifically is totaled, it almost always means the damage is extensive enough that a patch job would leave the structure compromised.
Pro Tip: Pull out your declarations page right now and find the “Loss Settlement” section. It will say either “Replacement Cost” or “Actual Cash Value.” That single line determines how much money you can recover and when you receive it. If you cannot find it, call your agent and ask them to read it to you verbatim.
How insurers actually pay: RCV, ACV, depreciation, and deductibles
Understanding the payout mechanics is the fastest way to avoid being blindsided by a check that looks nothing like the contractor’s estimate.
RCV vs. ACV: the core difference
| Policy Type | What you receive first | What is withheld | How you recover the rest |
|---|---|---|---|
| RCV (Replacement Cost Value) | Actual Cash Value portion (replacement cost minus depreciation) | Recoverable depreciation holdback | Submit proof of completed work and final invoices |
| ACV (Actual Cash Value) | Replacement cost minus depreciation, paid in full | Nothing further is owed | No additional recovery; depreciation is permanent |
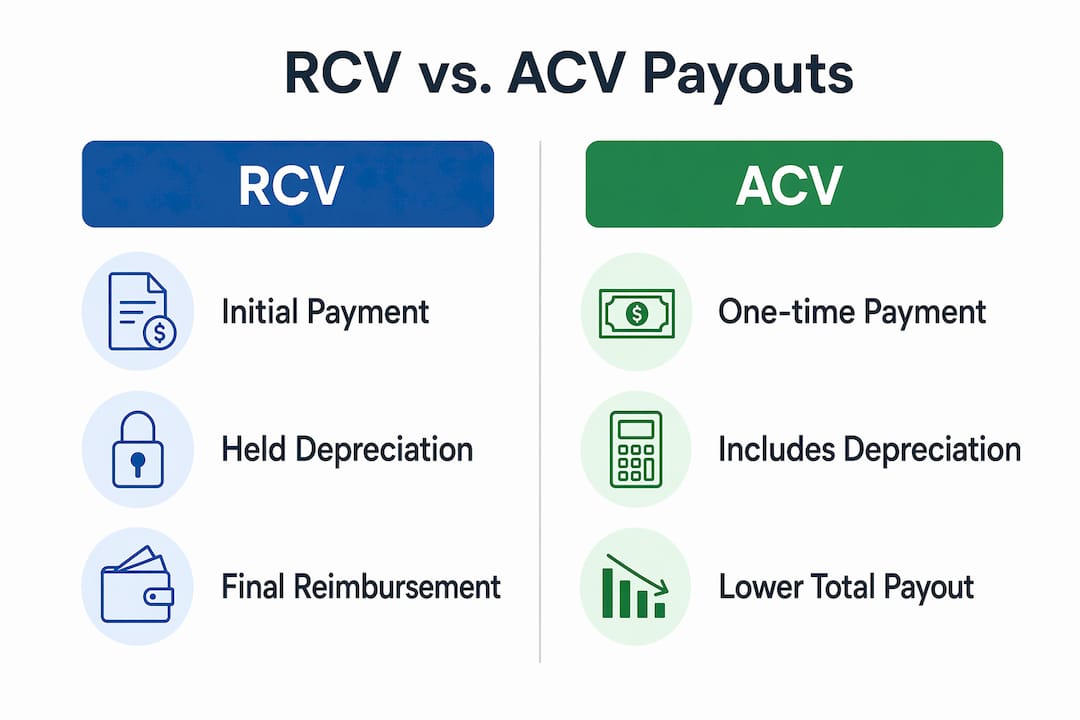
With an RCV policy, the insurer issues an initial payment equal to the ACV of your roof, then holds the depreciation amount until you show the work is done. Once you submit completion documentation, they release the holdback. That second check is often called the “recoverable depreciation” payment, and it only arrives after repairs are verified.
Deductibles and wind/hail riders
Your deductible comes off the top before any payment. Many Florida and Gulf Coast policies carry a separate wind or hail deductible, often expressed as a percentage of your dwelling coverage (1%–5% is common) rather than a flat dollar amount. On a home insured for $300,000, a 2% wind deductible means a significant amount comes out of your pocket before the insurer pays anything. The Texas Department of Insurance publishes clear guidance on how percentage deductibles work, and most state regulators offer similar resources.
Your dwelling coverage limit can also cap the payout. If your roof replacement costs more than the remaining coverage after other claims or depreciation, you may not be made whole without a supplement or a coverage review.
Pro Tip: Request a line-item estimate from your insurer in writing. Ask specifically: How was depreciation calculated? Was an overhead and profit (O&P) allowance included? If the project requires multiple trades, O&P of roughly 10% overhead plus 10% profit is standard industry practice, and omitting it from the initial estimate is common.
What to do, step by step, after a total-loss declaration
The sequence matters. Skipping steps or doing them out of order can cost you money or create gaps in your claim record.
- Secure the structure immediately. Emergency tarping stops further water damage and is explained in detail in the tree service cleanup process: A homeowner’s guide. Insurers can reduce your claim if you fail to mitigate. For storm damage documentation, start before the tarp goes on so you have photos of the raw damage.
- Document thoroughly. Wide-angle shots of the full roof, close-ups of impact craters or missing shingles, interior ceiling and attic photos showing water intrusion, and images of any test squares the adjuster marked. Timestamp everything and store copies in at least two places (cloud and a USB drive).
- Get an independent contractor estimate before the adjuster’s visit if possible. This gives you a baseline to compare against the insurer’s scope.
- File the claim and record your claim number. Confirm the filing date in writing. Most policies require prompt notice, and some states set deadlines.
- Meet the adjuster on-site with your contractor present. Your contractor can point out items the adjuster might otherwise miss: ventilation requirements, flashing conditions, decking damage visible from the attic.
- Review the initial estimate line by line. Compare it against your contractor’s bid. Note every discrepancy.
- Sign a contract with your chosen contractor only after reviewing the full scope. Do not sign a release or final settlement paperwork until the work is complete and all invoices are submitted. Homeowners who sign early can inadvertently waive their right to supplemental payments.
- Submit completion documentation. Final invoices, municipal inspection certificates, and contractor completion forms trigger the release of any withheld depreciation on an RCV policy.
When it comes to what you say to an adjuster, be factual and stick to the storm event. Avoid volunteering information about prior leaks or maintenance lapses without context, because those statements can be used to argue pre-existing conditions. If the roof had prior issues, let your contractor document what is storm-related versus what is wear.
Pro Tip: Keep a single, dated claim folder — both digital and physical. Every estimate, invoice, email, and adjuster communication goes in it. If a dispute arises months later, that folder is your evidence.
How adjusters and contractors see the same roof differently
Adjusters work from estimating software templates. Contractors work from what they find when they strip the roof. Those two perspectives almost never produce the same number on the first pass.

The adjuster’s initial scope is built before teardown, which means it cannot account for what is hidden under the shingles. Contractors routinely discover items during teardown that were not visible during the adjuster’s inspection: rotted decking, deteriorated underlayment, inadequate ventilation that now triggers a code upgrade, or corroded flashing that must be replaced to meet current standards.
Common items adjusters miss or understate:
- Code-triggered upgrades: Local building codes may require new underlayment types, additional ventilation, or upgraded flashing that did not exist when the original roof was installed.
- Deck/sheathing replacement: Soft spots and rot are invisible until the shingles come off.
- Ventilation: Many older roofs are under-ventilated by current standards; replacement triggers a code-compliant upgrade.
- Ice and water shield: Required in certain zones and at eaves, valleys, and penetrations; often omitted from initial estimates.
- Flashing and valley details: Labor-intensive and frequently underpriced in template-based estimates.
Because adjusters are not always code experts, the burden of documenting these items falls on the contractor and the homeowner. During teardown, photograph every piece of damaged decking, every area of deteriorated underlayment, and every flashing detail. Your contractor should pull the relevant local code sections and attach them to a supplement packet with revised line-item pricing.
Pro Tip: A supplement packet that pairs teardown photos with the specific code citation and a revised line-item bid is far more persuasive than a verbal request. Ask your contractor to prepare it on their letterhead and submit it directly to the insurer’s adjuster.
What drives the total cost of a roof replacement after a total loss
The insurer’s initial estimate and the contractor’s final bill diverge for predictable reasons. Knowing the line items helps you spot gaps and push for legitimate supplements.
Key cost components
- Shingles or roofing material: The largest single line item; price varies by material grade and manufacturer.
- Underlayment and ice/water shield: Required by code in many areas; often underpriced in initial estimates.
- Labor: Tear-off, disposal, and installation; varies by roof complexity and local labor market.
- Decking/sheathing replacement: Priced per sheet; the actual count is unknown until teardown.
- Ventilation: Ridge vents, soffit vents, or power ventilators required by code.
- Flashing: Step flashing, counter-flashing, drip edge, and valley flashing.
- Permits and inspections: Required by virtually every Florida municipality; costs vary by county.
- Disposal/haul-away: Dumpster fees and landfill charges.
- Overhead and profit (O&P): Standard on projects requiring multiple trades.
- Waste factor: Applied to material quantities to account for cuts and overlaps.
O&P and waste factor reference
| Line Item | Typical Allowance | Notes |
|---|---|---|
| Overhead | 10% | Applied to total project cost when multiple trades are involved |
| Profit | 10% | Standard contractor margin on coordinated projects |
| Waste factor (simple gable roof) | 10% | Applied to material quantities |
| Waste factor (complex hip/valley/dormer) | 1%–5% | Higher geometry requires more cuts and overlap |
Code-triggered costs are the most common source of supplement disputes. If your original roof was installed before current Florida Building Code requirements took effect, a full replacement must bring the entire system up to code. That can mean adding a secondary water barrier, upgrading ventilation, or replacing decking that meets current thickness standards. None of those items appear in a simple shingle-swap estimate.
Pro Tip: Ask your contractor for a line-item estimate that uses the same format as the insurer’s estimate. When the two documents share the same structure, discrepancies are easy to identify and easier to negotiate.
How long does the whole process take?
A straightforward total-loss replacement, with no disputes and no hidden damage, typically runs six to twelve weeks from claim filing to final payment. Complex situations stretch longer.
| Milestone | Typical Timeframe |
|---|---|
| Adjuster inspection after filing | 3–10 business days |
| Initial estimate from insurer | 1–3 weeks after inspection |
| Contractor selection and scope review | 1–2 weeks |
| Permit issuance (Florida) | 1–4 weeks depending on county |
| Demolition and deck inspection | 1–2 days |
| Installation | 1–3 days for most residential roofs |
| Municipal inspection | 3–10 business days after installation |
| Final payment (depreciation release) | 2–4 weeks after submitting completion docs |
The biggest bottlenecks are permit delays and supplement negotiations. Florida counties vary widely in permit processing speed, and a supplement dispute can add weeks to the timeline. Scheduling the permit application early, keeping all communications in writing, and using a contractor experienced with insurance claims can compress the timeline significantly. Storm season backlogs are real: if a hurricane or major hail event hits your area, every step takes longer because adjusters, contractors, and permit offices are all working through the same surge.
What are your options when you disagree with the insurer?
Disagreements happen. The insurer’s estimate is often a starting point, not a final offer. Here is the escalation path, in the order that makes the most sense to follow:
- Submit a supplement. This is the first and most common step. Your contractor documents additional items found during teardown and submits a revised line-item bid. Most disputes are resolved here.
- Request a re-inspection. If the adjuster missed significant items, ask for a second on-site visit with your contractor present and your supplement packet in hand.
- Hire a public adjuster. A licensed public adjuster works for you, not the insurer. They typically charge a percentage of the additional recovery they secure. They are most valuable when the gap between the insurer’s estimate and the contractor’s bid is large and well-documented.
- Invoke the appraisal clause. Most homeowner policies include an appraisal provision: each party hires an independent appraiser, and those two appraisers select an umpire. The umpire’s decision is binding. This process works well when the dispute is about the dollar value of agreed-upon damage, not about coverage itself.
- File a complaint with your state insurance regulator. In Florida, that is the Florida Department of Financial Services. In Texas, it is the Texas Department of Insurance. Regulators cannot force a settlement, but a formal complaint creates a record and often prompts a faster response from the carrier.
- Consult an attorney. If the insurer repeatedly denies a clearly covered scope or acts in bad faith, a policyholder attorney who works on contingency may be the right move. This is a last resort, but it is a real one.
Do not sign any release or final settlement document until you are confident the scope is complete. Signing early can close your right to future supplements.
How a local contractor helps you get from initial estimate to final payout
A contractor who handles insurance claims regularly does more than swing a hammer. They function as a documentation partner throughout the process.
Thomasroofingandrepair serves Central Florida, including Brevard, Volusia, and Orange counties, and works directly with homeowners navigating total-loss claims. Here is what that looks like in practice:
- Free inspection and photo documentation before and during teardown, creating a visual record that supports supplement requests.
- Line-item estimates formatted to match the insurer’s scope, making discrepancies easy to identify.
- Supplement packet preparation: teardown photos paired with local code citations and revised pricing, submitted on contractor letterhead.
- Emergency tarping and mitigation to stop further damage while the claim is processed.
- Permit pull and inspection coordination so the homeowner does not have to manage county offices while also managing a claim.
- Completion documentation — final invoices, inspection certificates, and contractor sign-off — submitted to the insurer to trigger the depreciation release on RCV policies.
Before you hire any contractor for an insurance-related replacement, ask these three questions:
- Are you licensed and insured in Florida, and can you provide your license number?
- How many insurance-related roof replacements have you handled, and do you assist with supplement submissions?
- What is your typical timeline from permit application to final inspection in this county?
Pro Tip: Check the contractor’s license on the Florida DBPR website before signing anything. A contractor who cannot answer the supplement question clearly has probably not done many insurance claims. That gap will cost you money.
For more on what to ask before signing, see questions to ask roofers before you commit to a contract.
Key Takeaways
A roof declared a total loss is covered by your policy’s loss-settlement terms, and the initial check is almost never the final payment — documentation and supplements are what close the gap.
| Point | Details |
|---|---|
| RCV vs. ACV determines your recovery | Check your declarations page; RCV holds depreciation until work is done, ACV pays less upfront with no second check. |
| Document damage promptly | Photos, videos, and timestamps before any tarp or repair work protect your claim from pre-existing-condition disputes. |
| Treat the initial estimate as a starting point | Supplements for code upgrades, decking, and O&P are common and legitimate; get a line-item contractor bid to compare. |
| Know your escalation path | Supplement first, then re-inspection, then public adjuster or appraisal clause, then state regulator complaint. |
| Thomasroofingandrepair handles the full process | From free inspection and supplement packets to permit coordination and completion docs for Central Florida homeowners. |
What most homeowners get wrong about insurance roof claims
The conventional wisdom says “let the adjuster handle it.” That advice costs homeowners money every single time.
Adjusters are professionals, but they are working from a template built before they ever set foot on your roof. They cannot see what is under the shingles, they are not always current on local code requirements, and their estimating software does not automatically flag that your 1998 roof needs a secondary water barrier to meet today’s Florida Building Code. That is not bad faith. It is just the nature of a pre-teardown inspection.
The homeowners who recover the most from a total-loss claim are the ones who treat it like a project, not a passive process. They show up to the adjuster meeting with a contractor estimate already in hand. They photograph the decking the moment it is exposed. They ask about O&P before accepting the first check. They know whether their policy is RCV or ACV before the adjuster arrives.
The other mistake I see repeatedly: homeowners who accept the first check and start work before the scope is fully agreed upon. Once the old roof is gone and the new one is on, your leverage to negotiate additional line items drops sharply. Get the scope right before the tear-off begins, not after.
Thomasroofingandrepair makes the claims process work for you
When your roof is declared a total loss, the paperwork and negotiations can feel like a second job on top of an already stressful situation. Thomas Roofing & Repair gives Central Florida homeowners a faster, cleaner path from initial claim to completed roof replacement: free inspection, line-item estimates that match your insurer’s format, supplement packet preparation, permit coordination, and final documentation to release your depreciation holdback.
To get a fast, accurate estimate, have these three things ready when you call:
- Your claim number and insurer contact
- Recent photos of the damage (or let us document it during the free inspection)
- Your policy type (RCV or ACV) or a copy of your declarations page
Ready to get started? Request a free inspection and let the team handle the documentation, supplements, and coordination so you can focus on getting your home back in order.
Authoritative sources and regulators for roof insurance claims
When you need binding answers about your policy or want to escalate a dispute, go to primary sources:
- Texas Department of Insurance (TDI): Consumer guidance on roof replacement claims, deductibles, and filing decisions. Applicable to Texas policyholders; other states have equivalent departments.
- Maryland Insurance Administration: Publishes a clear advisory on RCV vs. ACV and depreciation holdbacks; useful as a model for understanding how most state regulators approach the issue.
- NAIC (National Association of Insurance Commissioners): Consumer resources on homeowner insurance, filing complaints, and understanding policy terms.
- FEMA: Disaster assistance programs for federally declared disasters; relevant if your damage occurred during a named storm event.
- Florida Department of Financial Services: Florida’s primary regulator for insurance complaints; search “Florida DFS insurance complaint” to reach the filing portal.
One reminder: your declarations page and your agent are the only sources for binding interpretations of your specific policy. Everything else, including this guide, is general information. For your own situation, confirm the details with your insurer or a licensed public adjuster before making decisions. If you believe your insurer is acting outside your policy terms, file a complaint with your state regulator and retain every piece of claim documentation before you do.