
If a screwdriver sinks more than a quarter inch into your fascia, stop patching and start planning a replacement, plus a framing inspection. Anything less than that, and a repair patch is usually enough, but only after you stop the water causing the problem.
Here’s the immediate playbook:
- Cut the water source now. Clear the gutter, temporarily reroute a downspout, or tarp an active leak before you touch the wood.
- Run the screwdriver probe along the fascia every foot or so. Soft but firm resistance under a quarter inch means repair. A screwdriver that sinks in easily, or rot that has spread toward the soffit or rafters, means full replacement.
- Call a pro if you’re working above one story, or if the rot looks extensive. A fascia board that’s failed enough to sink a screwdriver is often a sign the rafter tails behind it need a look too.
Pro Tip: Do the probe test in three spots per gutter section, not one. Rot travels sideways under paint long before it shows on the surface, so a single good reading can hide a bad section two feet away.
Key Takeaways
Fascia rot almost always starts with a gutter or flashing failure, not the wood itself, and the screwdriver probe test is the fastest way to decide between a patch and a full replacement.
| Point | Details |
|---|---|
| Probe before you decide | Softness under a quarter inch usually means repair; deeper sinking means replace and check rafters. |
| Fix the cause, not just the board | Clogged gutters or missing drip edge cause most rot, and skipping that fix leads to repeat failure. |
| Match material to maintenance tolerance | Wood costs less upfront; PVC and composite cost more but need almost no upkeep for decades. |
| Budget realistically | Full perimeter replacement typically runs $1,050 to $3,300, or $6 to $20 per linear foot installed. |
| Insurance rarely covers gradual rot | Coverage usually requires a sudden covered event, not routine wear, so document any storm trigger carefully. |
| Call Thomas Roofing and Repair for structural or multi-story jobs | Their inspection checks rafter tails and gutters together, not the fascia board alone. |
Table of Contents
- What Causes Fascia Board Rot?
- How Do You Know If Your Fascia Is Rotting?
- What Are Your Repair Options for Rotted Fascia?
- Which Material Should You Use to Replace Fascia?
- How Do You Prevent Fascia Rot From Coming Back?
- What Does Fascia Repair Cost, and Will Insurance Cover It?
- When Should You Hire a Professional for Fascia Repair?
- How a Professional Handles a Fascia Rot Repair
- Fascia Board Rot: How to Tell, Fix, and Stop It for Good
- Get a Professional Fascia and Roofline Inspection
- Frequently Asked Questions
- Sources
What Causes Fascia Board Rot?
The fascia is the flat board that runs along the roof edge, right behind your gutters. It does two jobs most homeowners never think about until they fail: it gives your gutters something solid to hang from, and it seals the gap between the roof deck and the outside air, keeping insects, water, and drafts out of the attic. When it rots, both jobs stop happening at once, which is why a bad fascia section often shows up as a sagging gutter first.
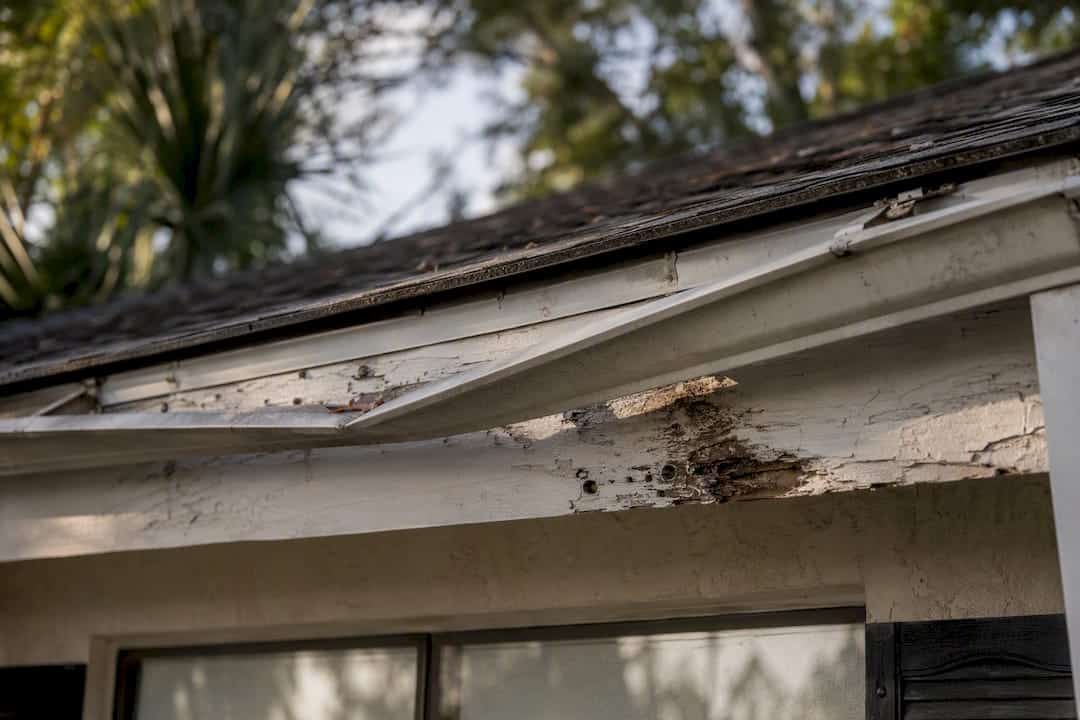
Rot doesn’t start in the wood. It starts with whatever keeps dumping water on the wood. Clogged gutters overflow and run water straight down the face of the fascia instead of through the downspout, soaking the same six inches of board every time it rains. A missing or damaged drip edge lets water wick backward under the shingles and behind the fascia instead of dripping clear of it. Ice dams in cold climates back up melting snow under the roofline, where it sits against the board for days. Paint failure lets any of that moisture soak straight into bare wood instead of beading off.
Gutter overflow and missing drip edge are the most common root causes of fascia rot, and fixing that root cause matters more than the repair itself. Replace the board without fixing the gutter slope or drip edge, and you’ll be back up the ladder in three or four years.
- Clogged or misaligned gutters that overflow onto the fascia face
- Missing, damaged, or improperly installed drip edge flashing
- Ice dams that trap standing water against the roofline
- Peeling or failed paint that exposes bare wood to weather
- Carpenter ants, termites, or woodpeckers exploiting existing soft spots
How Do You Know If Your Fascia Is Rotting?
Rot rarely announces itself. It creeps in behind gutters and under paint, and by the time it’s visible from the ground, it’s usually been active for a season or two. Here’s how to check it properly.
- Look for the visual tells first. Peeling or bubbling paint, dark streaks running down from under the gutter, a gutter section that’s started to sag or pull away from the fascia, and visible gaps at board seams all point to moisture getting in.
- Probe with a screwdriver or an awl. Press firmly at multiple points along the board, focusing on areas below gutter seams and downspout outlets. Solid wood resists. Wood that gives easily under light pressure, or that a screwdriver sinks into, is actively decayed.
- Check the corners and end grain. End cuts absorb water faster than the flat face of the board, so corners rot first, especially where two fascia boards meet at a miter joint.
- Follow the trail behind the gutter. Pull back a gutter hanger or two, if you can do it safely, and look at the board surface the gutter normally hides. This is where the worst damage often lives, invisible from a ladder glance.
- Check rafter tails and the soffit from below. If you see daylight, staining, or soft wood where the fascia meets the soffit, or where rafter tails poke through, the rot has moved past the fascia into structural framing. That changes the job from a board swap to a framing repair.
A screwdriver probe is the standard diagnostic test roofers use precisely because it’s fast, cheap, and hard to argue with. Wood either holds or it doesn’t. If you find soft spots in more than two or three separate locations around the roofline, treat it as a whole-perimeter problem, not a spot repair, even if some sections still test solid.
What Are Your Repair Options for Rotted Fascia?
Three repair paths cover almost every situation: patch it, sister it, or replace the whole run. Which one applies depends entirely on how far the rot has spread.
- Epoxy or wood-filler patch, for shallow, contained soft spots. Chisel out the loose, punky wood down to solid material. Apply a wood hardener to stabilize the remaining fibers, let it cure, then build up the void with a two-part epoxy filler. Sand it flush once cured, then prime and paint. Done correctly, a patch on a small area can last several years, though it’s a stopgap on an aging board, not a permanent fix. Materials for an epoxy patch typically run $25 to $60, and most homeowners can finish one in an afternoon.
- Sister or partial replacement, for rot confined to a few feet of a longer run. Cut back to solid wood on both sides of the damaged section, ideally landing your cuts over a rafter tail so the new piece has something to bite into. Fasten the new board section into that framing, overlap or scarf the joint where it meets the old board, then caulk and seal the seam before priming. Materials for a partial replacement generally cost $40 to $120, depending on length and material.
- Full replacement, when rot runs the length of a section or has reached the framing. Remove the gutter and drip edge first, then pull the old fascia entirely. Inspect every rafter tail behind it. Soft or split rafter tails need sistering with new lumber before the fascia goes back on. Install the new fascia board, back primed on all faces before it ever touches a nail, then reinstall the drip edge, flashing, and gutter in that order. DIY material costs for a short full-replacement run land around $150 to $300, while contractor-installed jobs run considerably higher once labor, disposal, and gutter work factor in.
You’ll need a pry bar, a reciprocating saw or circular saw for clean board cuts, a caulk gun, exterior wood filler or epoxy, a moisture meter if you own one, and a stable ladder setup or scaffolding for anything above a single story.
The most common DIY mistake isn’t the woodworking. It’s skipping the cause. Homeowners replace the board, skip the gutter adjustment or drip edge fix that caused the failure, and end up redoing the same repair a few years later. The second most common mistake is nailing new fascia directly into rotted rafter tails because pulling the old board revealed more damage than expected, and nobody wants to open that can up further.
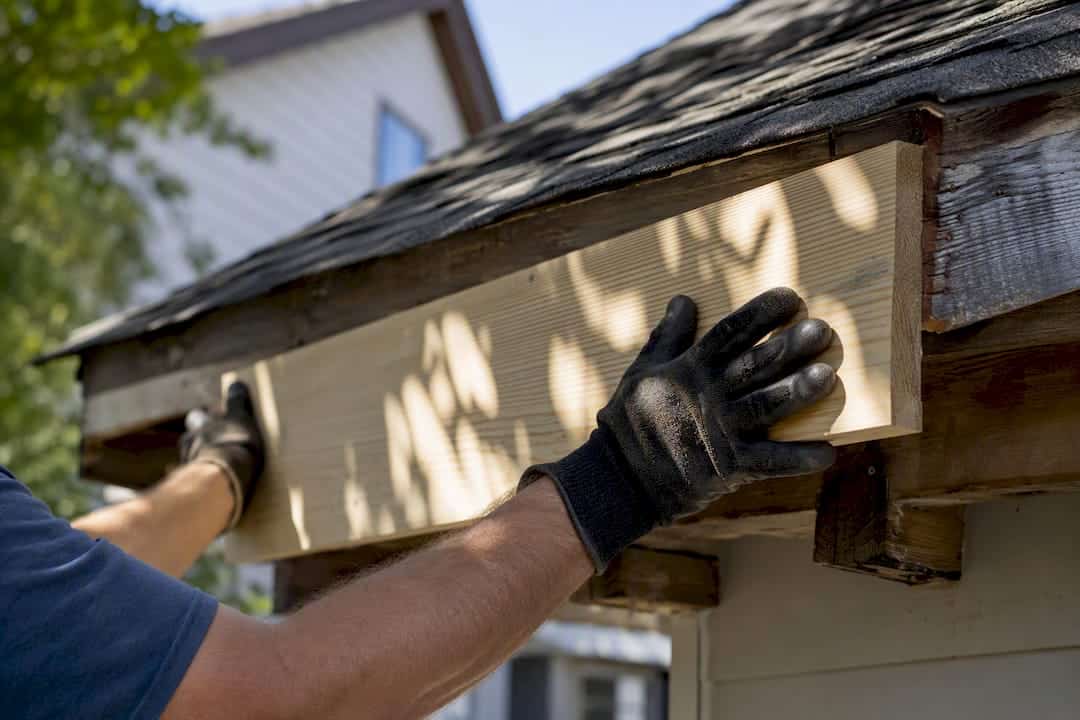
Pro Tip: Always cut your board joints so they land over a rafter tail, never in the open span between two rafters. An unsupported seam is the first place the next round of water damage will start.
Which Material Should You Use to Replace Fascia?
Once the old board is off, you get to choose what goes back up, and this decision affects how many times you’ll ever do this job again.
- Wood is the cheapest option upfront and matches existing trim easily, but it’s also the most maintenance heavy. It needs paint every few years and will rot again without diligent back priming and caulking.
- PVC cellular trim is essentially immune to moisture damage and needs almost no maintenance over a 30 to 50 year lifespan, but it costs more per foot than wood and expands and contracts noticeably with temperature swings.
- Composite fascia (often a wood-fiber and resin blend) splits the difference: better rot resistance than raw wood, lower cost than PVC, and paintable if you want a specific color.
- Aluminum wrap goes over existing wood fascia rather than replacing it. It protects sound wood underneath and eliminates repainting, but it only works if the wood beneath it is still structurally solid, since wrapping rotted wood just hides the problem.
Installation details matter as much as the material choice. Back-priming wood fascia, coating every face including the end grain before it goes up, roughly doubles its functional life compared to priming just the front after installation. PVC needs fasteners set in slotted holes rather than tight pilot holes, because the material expands and contracts with temperature and rigid fastening will eventually pull the trim loose or crack it. If you’re weighing PVC against traditional options for your whole roofline, the lifespan math tends to favor PVC or composite anywhere gutters have failed before, since paying more upfront beats redoing wood trim every decade.
How Do You Prevent Fascia Rot From Coming Back?
Prevention is cheaper than any repair on this list, and most of it takes an afternoon twice a year.
- Clean gutters at least twice a year, more often under heavy tree cover, and check that they still slope toward the downspouts instead of pooling water against the fascia.
- Repaint or reseal wood fascia on a regular cycle, checking especially at seams, corners, and end grain where failure starts first. Caulk any gap where two boards meet or where the fascia meets a corner trim piece.
- Inspect the drip edge and roof flashing every spring, looking for lifted or missing sections that let water track behind the fascia instead of off the roof edge.
- In colder climates, check attic insulation and ventilation before winter. Poor attic ventilation lets heat escape through the roof deck, melts snow unevenly, and drives the ice dams that back water up under fascia and shingles alike.
Spring and fall are the two checkpoints that matter most: spring to catch winter damage before summer storms add to it, fall to clear leaves and check seals before freezing weather starts. If your budget allows it, swapping a chronically wet section to aluminum wrap or PVC during a routine repaint removes that section from your maintenance list permanently.
Pro Tip: Walk the roofline with a garden hose during a dry week and run water into the gutter at a slow trickle. Watching where it overflows tells you more about your real drainage problem than any amount of staring at stains ever will.
What Does Fascia Repair Cost, and Will Insurance Cover It?
Cost depends heavily on how much of the perimeter is affected and whether the rot reached the framing. National averages put full fascia replacement around $1,050 to $3,300, with installed pricing commonly running $6 to $20 per linear foot depending on material and how hard the section is to access. A single rotted corner is a very different bill than a full perimeter job.
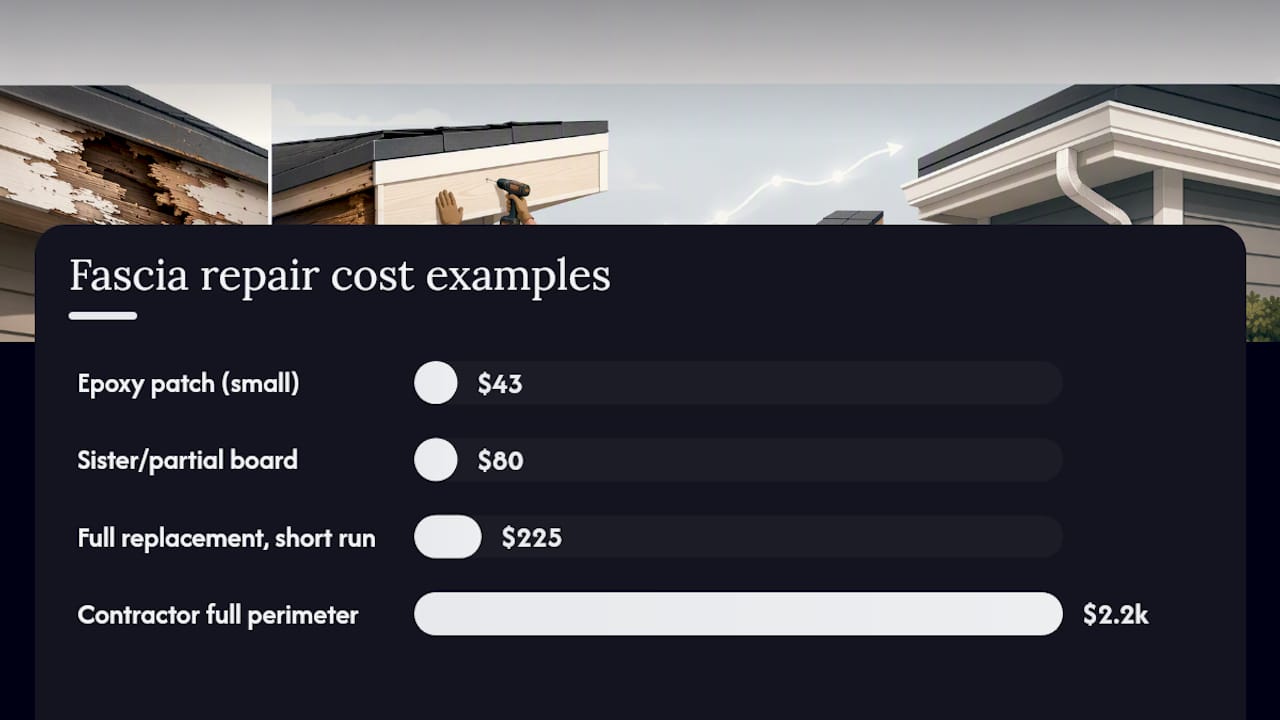
| Repair type | Typical DIY material cost |
|---|---|
| Epoxy patch (small soft spot) | $25 to $60 |
| Sister/partial board replacement | $40 to $120 |
| Full replacement, short run | $150 to $300 |
| Contractor full-perimeter replacement | $1,050 to $3,300 |
Several things push the price up beyond the base range:
- Rotted rafter tails discovered once the fascia comes off, which add framing repair on top of trim work
- Gutters that need to be reset, resloped, or replaced rather than just reinstalled
- Extra prep and priming time for wood versus a drop-in PVC or composite section
- Difficult access, like steep rooflines or multi-story sections requiring scaffolding
On insurance: homeowners policies typically exclude gradual rot and maintenance-related decay as a matter of course. Coverage generally only kicks in when the rot is the direct result of a sudden, covered peril, like a storm-torn gutter that dumped water for weeks before you noticed. Insurers frequently push back on these “ensuing loss” claims, so document the triggering event with photos and dates, and get a written estimate that separates storm-caused damage from pre-existing wear. If the repair cost is close to your deductible, paying cash is often simpler than fighting a claim that may get denied anyway.
When Should You Hire a Professional for Fascia Repair?
Some jobs are a Saturday project. Others aren’t, and knowing the difference before you’re on a ladder matters more than any tool in your garage.
Call a professional when:
- The damaged section is above the first story or requires scaffolding to reach safely
- You’ve found soft or split rafter tails, meaning the repair now involves structural framing, not just trim
- The rot is spreading into hard-to-access corners, valleys, or areas behind chimneys
- There’s an active leak into the attic that needs immediate mitigation
If you’re vetting a contractor for the job, ask these questions before you sign anything:
- Are you licensed and insured for this type of work in this state?
- Will you provide a written scope that specifies material, linear footage, and whether gutters get removed and reinstalled?
- Who inspects the rafter tails, and what happens to the price if they find structural damage?
- What warranty comes with the material and the labor?
- Can you provide references from similar fascia or roofline repairs?
A proper professional inspection should check the fascia, the gutters, the drip edge, and the rafter tails together, not the fascia in isolation. Expect a site visit and written estimate within a few days for most residential jobs.
How a Professional Handles a Fascia Rot Repair
Thomas Roofing and Repair works fascia and rot repairs across Central Florida homes and commercial roofs, and the sequence rarely changes because skipping a step is what causes callbacks.
- Inspect first. Every visible section gets probed, and gutters come down far enough to check what’s hiding behind them.
- Stop the water. Any active leak gets addressed before demolition starts, not after.
- Remove damaged material and check framing. Rafter tails get inspected the moment the old fascia comes off, before anything new goes up.
- Install and seal. New material goes in back primed or pre finished, gutters and drip edge go back on in the right order, and every seam gets sealed.
Fascia problems are almost never really about the fascia. They’re about whatever kept dumping water on it, and a repair that ignores that just buys you a few quiet years before the same rot shows up again.
Homeowners weighing DIY repair against a professional job should factor in that a licensed crew catches framing damage on the first visit, not after the new boards are already painted.
Fascia Board Rot: How to Tell, Fix, and Stop It for Good
Most articles on this topic treat fascia rot as a carpentry problem. It isn’t. It’s a drainage problem that happens to show up in the wood first. That distinction changes how you should spend your time and money on this repair.
The conventional advice, replace the bad section and move on, misses the part that actually prevents a repeat. If you don’t fix the gutter slope, the missing drip edge, or the paint failure that let water in originally, you’re on a three to five year replacement cycle for life. Prioritize the water source first, every time, even if it means delaying the cosmetic fix by a week to get a gutter contractor out.
The other place homeowners underinvest is back priming. It’s tedious, it adds a day to the job, and it’s invisible once the board goes up. It’s also the single change that does the most to prevent the next rot cycle, more than material choice, more than paint brand. Skip it, and you’re painting a board that’s already halfway to failing again.
Get a Professional Fascia and Roofline Inspection
If you’ve found soft wood, sagging gutters, or rot that’s crept past the fascia into the rafters, this is where a phone call beats another weekend on a ladder. Thomas Roofing and Repair inspects fascia, gutters, drip edge, and rafter framing together on every visit, which means the estimate you get accounts for hidden damage instead of missing it until the second trip.

That matters most on multi-story homes, roofs with extensive rot, or any job where an active leak has already reached the attic, exactly the situations where a DIY patch buys you very little. Thomas Roofing and Repair’s emergency repair workflow handles active leaks fast, and for full fascia and roofline work, the roof repair process covers inspection through final gutter reinstallation as one job, not three separate headaches. If your fascia problem looks bigger than a Saturday project, request an inspection and get a written scope before the rot spreads any further.
Frequently Asked Questions
How do I know if my fascia board is rotted?
Look for peeling paint, dark streaks below the gutter line, or a gutter section pulling away from the roofline. Confirm it with a screwdriver probe. Wood that gives easily or lets the screwdriver sink in more than a quarter inch is actively rotted.
Can you repair fascia rot without replacing the whole board?
Yes, for shallow or localized soft spots. An epoxy patch or a sistered partial replacement works fine when the damage is contained and the surrounding wood tests solid on a screwdriver probe.
Does homeowners insurance cover fascia board rot?
Usually not. Insurers generally treat rot as gradual, maintenance-related damage, which is excluded. Coverage typically applies only when the rot resulted directly from a sudden covered event, like storm damage that went undetected for a short period.
What is the best material to replace rotted fascia with?
Wood is cheapest but needs the most upkeep. PVC and composite cost more upfront but resist moisture almost entirely and can last 30 to 50 years with minimal maintenance, which often makes more sense long term in wet or humid climates.
How much does it cost to fix fascia board rot?
DIY costs range from $25 to $60 for a small epoxy patch, up to $150 to $300 for full replacement materials on a short run. Contractor-installed full-perimeter replacement typically runs $1,050 to $3,300, depending on length, material, and access.
Sources
- Fascia Board: What It Is + 2026 Replacement Cost | The Roofing Brief
- Fascia board replacement cost guidance | Angi
- Does homeowners insurance cover rotting wood? | LegalClarity
- Rotted fascia board repair guidance | ThePlywood