
A durable, code-compliant roof comes down to five non-negotiables: third-party tested products, AHJ-approved installation methods, correct fasteners and underlayment, positive slope with balanced ventilation, and documented inspections at every stage. Skip any one of them and you are looking at premature failure, voided warranties, or a failed permit inspection.
Your pre-installation checklist at a glance:
- Roof deck condition verified (no rot, delamination, or loose sheathing)
- Permit pulled and product approvals/NOAs submitted to the AHJ
- Underlayment type confirmed for your climate zone (self-adhering in HVHZ)
- Flashing plan reviewed for all penetrations, valleys, and edges
- Wind rating confirmed: ASTM D7158 Class H or ASTM D3161 Class F for high-wind areas
- Nail pattern matches manufacturer instructions and NOA (where applicable)
- Ventilation design checked: intake/exhaust net free area balanced
- Final inspection scheduled before permit closeout
Typical residential install timeline: tear-off and deck repair (day 1), dry-in with underlayment and drip edge (day 1–2), field covering and flashing (day 2–3), ridge, cleanup, and final inspection (day 3–4). Total: 3–5 days for most single-family homes.
Cost range: residential re-roofing in Central Florida typically runs in the range of several thousand to tens of thousands of dollars, depending on square footage, material choice, and tear-off requirements. Get itemized bids that break out labor, materials, permit fees, and disposal.
Pro Tip: IBHS and RICOWI guidance, ASTM wind-rating standards, FM/UL product listings, and Thomasroofingandrepair are your four key reference points throughout this process. Bookmark them before the first nail goes in.
Table of Contents
- How to follow a roof installation checklist from start to finish
- How to select the right roofing materials and certifications
- Why fastening patterns and manufacturer instructions are non-negotiable
- Ventilation, slope, and drainage: what the code actually requires
- Permits, AHJ compliance, and safety on the job site
- Common installation mistakes and how to catch them before they cost you
- Routine maintenance and how warranties actually work
- Where to find authoritative product approvals and code references
- Key Takeaways
- Why the details that look minor are the ones that matter most
- Thomasroofingandrepair handles the permits, the inspections, and the installation
- Useful sources
How to follow a roof installation checklist from start to finish
A roof project has six distinct phases. Knowing what should happen in each one lets you verify the work, not just watch it.
1. Pre-job inspection and planning
Measure the roof area accurately, including all hips, valleys, and penetrations. Evaluate the deck for soft spots, delamination, and missing fasteners. Pull the permit before any material is ordered. In Florida, submit product approval numbers and NOAs with the permit application.
2. Site prep and protection
Stage tarps over landscaping and HVAC equipment. Store shingles flat on a supported platform, never leaning against a wall or on uneven ground. Confirm fall protection is in place before anyone steps on the roof.
3. Tear-off vs. recover
IBC re-roofing rules limit asphalt coverings to two layers on low-slope roofs before a full tear-off is required. Wet or damaged decking must be repaired before new material goes down. When in doubt, tear off. Recovering over a compromised deck is one of the most common and costly mistakes in residential roofing.
4. Dry-in
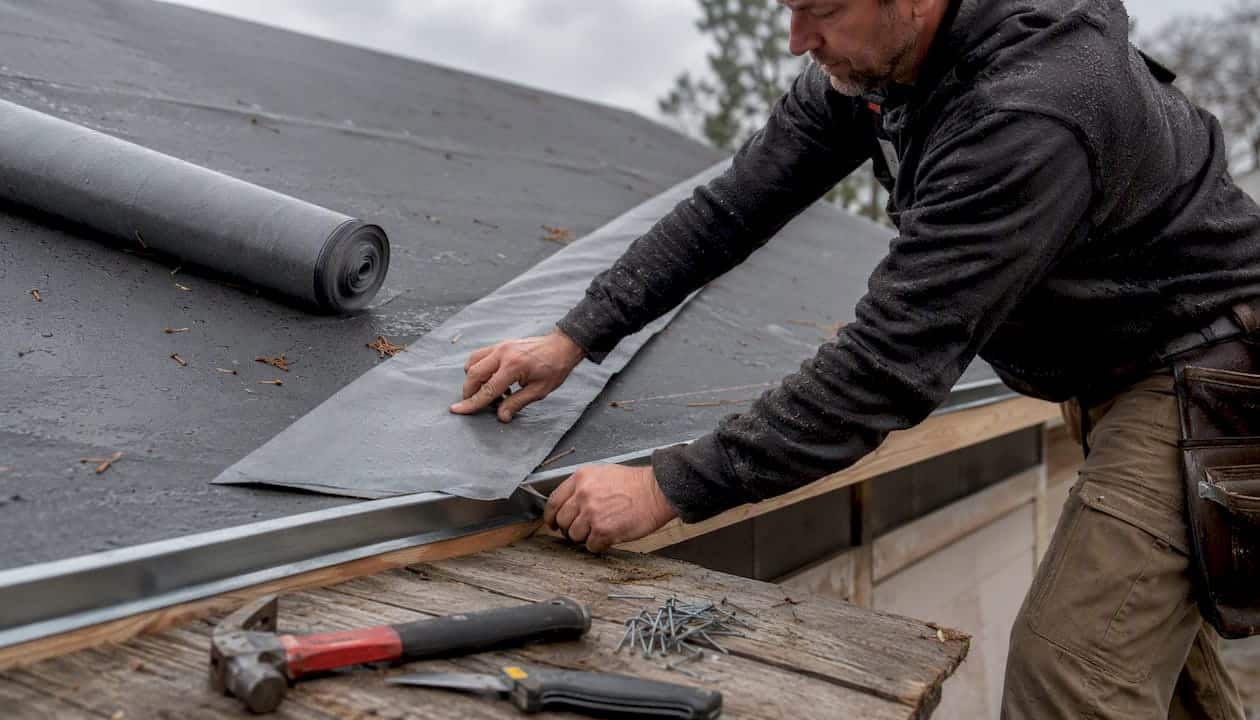
Install drip edge at the eaves first, then underlayment, then drip edge at the rakes on top of the underlayment. Lap underlayment per manufacturer specs. In HVHZ, self-adhering polymer-modified bitumen underlayment is required over the entire deck. Apply starter strip with compatible flashing cement at eaves and rakes.
5. Covering
Install field shingles or panels per the manufacturer’s sequence. Verify nail pattern at each course. Flash all penetrations, valleys, and sidewalls before the adjacent field material is installed. Install ridge cap last.
6. Finish and cleanup
Sweep the site with a magnetic roller to collect loose nails. Remove all debris and dispose of old materials per local regulations. Photograph the completed roof, all flashing details, and the permit card before final payment.
Pro Tip: Schedule the dry-in inspection with your AHJ before the field covering goes on. Catching an underlayment or flashing issue at that stage costs a fraction of what it costs after the shingles are down.
| Phase | Key verification item | Who checks it |
|---|---|---|
| Pre-job | Deck condition, permit issued | Homeowner + contractor |
| Dry-in | Underlayment type, drip edge, starter | AHJ inspector |
| Covering | Nail pattern, flashing at penetrations | Contractor + homeowner |
| Final | Cleanup, documentation, permit closeout | AHJ inspector |
How to select the right roofing materials and certifications
The single most important rule: prioritize products tested by FM Approvals or UL over products that rely solely on advertised warranties. A tested assembly performs predictably in extreme weather. Marketing language does not.
Shingles
Architectural (laminated) shingles outperform 3-tab in wind resistance and carry longer manufacturer warranties. For high-wind areas, specify shingles rated to ASTM D7158 Class H or ASTM D3161 Class F. In Florida’s HVHZ, the product’s NOA governs the nailing pattern, not just the manufacturer’s general instructions.
Underlayment
Synthetic underlayments offer better tear resistance and moisture resistance than traditional felt. In HVHZ or high-exposure coastal locations, self-adhering polymer-modified bitumen is the code-required choice. Standard 15-lb or 30-lb felt is frequently non-compliant in those zones.
Metal roofing
Standing seam panels offer superior wind resistance because fasteners are concealed and the panel floats with thermal movement. Exposed-fastener panels cost less but require periodic re-torquing of screws. Both systems need FM- or UL-listed assemblies for wind uplift compliance.
Tile
Mechanical attachment requirements for tile are strict. Fasteners must penetrate at least ¾ inch into the roof sheathing even when battens are used, per current Florida Building Code standards. All underlayment systems used under tile must carry Product Approval.
Flashing
Use galvanized steel, aluminum, or copper flashing. Avoid dissimilar metals in contact with each other (galvanic corrosion). At chimneys and skylights, step flashing with counter-flashing is the correct method, not a single bead of sealant.
| Material | Min. slope (IBC/IRC) | Key certification target |
|---|---|---|
| Asphalt shingles | 2:12 (with double underlayment below 4:12) | ASTM D7158 Class H, ASTM D3161 Class F |
| Metal panels | ¼:12 (standing seam) | FM/UL assembly listing |
| Low-slope membrane | ¼:12 | FM/UL assembly listing |
| Concrete/clay tile | 2:12–4:12 (varies by system) | NOA / Product Approval (Florida) |
Pro Tip: For any Florida project, look up the product’s NOA number on the Florida Building Commission’s product approval portal before the material ships. Keep the spec sheet and NOA printout in the permit folder.
Why fastening patterns and manufacturer instructions are non-negotiable
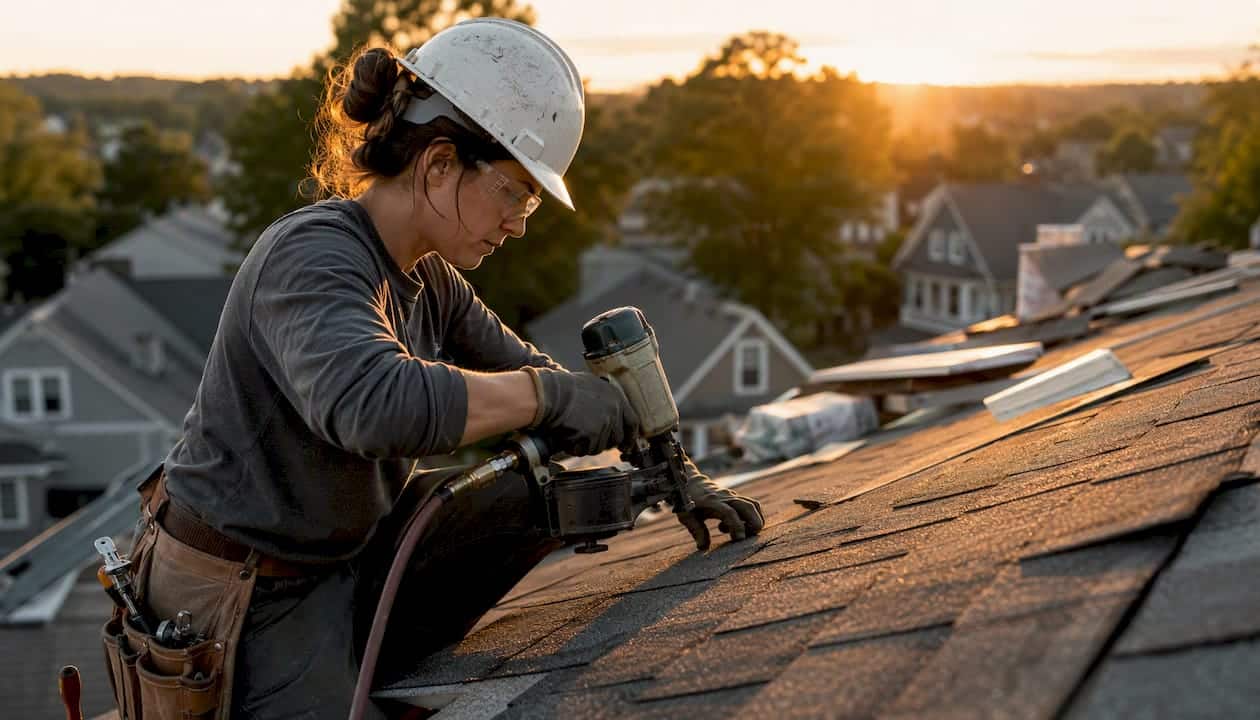
Nail placement is where most residential roofs fail in high-wind events. A shingle installed with nails even half an inch above the nailing zone can lose its wind resistance rating entirely. That is not a minor deviation.
What the right fastener looks like:
- Hot-dipped galvanized or stainless steel roofing nails (not staples for shingles)
- Minimum 1¼-inch shank length for new decks; 1¾-inch for re-roofing over existing material
- Minimum 3/8-inch head diameter
- Corrosion resistance matched to the coastal exposure category of the site
4-nail vs. 6-nail patterns: Standard installations use four nails per shingle. In HVHZ or when the product’s NOA specifies it, six nails per shingle are required. The difference in material cost is negligible. The difference in storm performance is not. IBHS guidance consistently points to fastening schedule adherence as one of the highest-leverage factors in wind resistance.
Deck fastening matters too. Re-nailing schedules for roof sheathing (typically 8d nails at 6 inches on center at panel edges and 12 inches in the field) are part of the permit record in many jurisdictions. For Central Florida wind-speed requirements, the deck-to-framing connection is as critical as the shingle-to-deck connection.
Wind uplift is evaluated at the assembly level, not the component level. A high-rated shingle on an unlisted assembly does not guarantee the system meets ASCE 7 wind pressures. The FM or UL assembly listing must match the actual combination of deck, insulation, and covering used on the job.
Pro Tip: Ask the contractor to include the fastening schedule and manufacturer spec sheet with the permit application. If the AHJ requests it during inspection, having it on file avoids delays.
Ventilation, slope, and drainage: what the code actually requires
Poor drainage is a leading cause of membrane failure and interior water damage, and it is consistently underestimated during the design phase. IBC requires positive slope for all roofs and mandates secondary drainage for low-slope roofs with parapets.
Minimum slope requirements:
- ¼:12 for most low-slope membrane systems
- 2:12 for asphalt shingles (with modified underlayment requirements below 4:12)
- Steeper slopes required for some tile systems depending on the product
Secondary drainage: Any low-slope roof with a parapet must have overflow scuppers or a secondary drain system sized to handle the full design storm load. A blocked primary drain on a parapet roof can accumulate hundreds of pounds of water per square foot.
Ventilation: The IRC/IBC ventilation sections require balanced intake and exhaust. The general rule is 1 square foot of net free area (NFA) per 150 square feet of attic floor area, reducible to 1:300 when the intake/exhaust split is at least 50/50. Unvented conditioned attics are permitted under recent code editions, but only with specific insulation and air-barrier requirements. Ice barriers (self-adhering underlayment or two layers of felt) are required at eaves in climates where ice damming has historically occurred.
For Florida properties, ice dams are not the concern. The priority is heat management and moisture control. Soffit-to-ridge ventilation keeps attic temperatures lower, extending shingle life and reducing cooling loads.
| Roofing system | Code min. slope | Drainage note |
|---|---|---|
| TPO/EPDM membrane | ¼:12 | Secondary drain required with parapet |
| Asphalt shingles | 2:12 | Gutters sized for local rainfall intensity |
| Standing seam metal | ¼:12 | Panel profile provides positive drainage |
| Clay/concrete tile | 2:12 | Underlayment drainage plane critical |
Pro Tip: During the dry-in inspection, count the intake and exhaust NFA against the attic square footage. It takes five minutes and catches ventilation deficiencies before they are buried under insulation.
Permits, AHJ compliance, and safety on the job site
Local AHJ amendments frequently override national model codes on underlayment type, flashing details, and fastener requirements. Relying solely on the IRC or IBC without checking the locally adopted version is a common mistake that leads to failed inspections.
What to submit with a permit application:
- Product approval numbers and NOAs (Florida)
- Manufacturer installation instructions and spec sheets
- Nailing pattern diagram
- Deck re-nailing schedule if applicable
- Any AHJ-specific forms for the jurisdiction
If the AHJ grants a variance from manufacturer instructions, get it in writing. A verbal approval from an inspector does not protect your warranty or your insurance claim after a storm.
Florida HVHZ specifics: The High-Velocity Hurricane Zone covers Miami-Dade and Broward counties. In those areas, standard felt underlayment is non-compliant; the code requires self-adhering polymer-modified bitumen applied directly to the deck with specific overlap and bonding rules. Inspection points are more frequent, and NOA adherence is enforced at each stage. Central Florida properties outside the HVHZ still follow the Florida Building Code, which carries its own elevated wind requirements. See the 2026 FBC roofing code requirements for the specifics that apply to your county.
Jobsite safety: OSHA 29 CFR 1926.501 requires fall protection for any worker on a roof with unprotected edges 6 feet or more above a lower level. On steep roofs, that means guardrails with toeboards, safety nets, or personal fall arrest systems. On low-slope roofs under 50 feet wide, a safety monitoring system alone is permitted. Extension ladders must extend at least 3 feet above the roof edge and be secured against displacement. Skylights and roof openings require covers, guardrails, or personal fall arrest systems.
Pro Tip: Keep all product approval numbers in a dedicated permit folder, physical or digital. When the inspector arrives, hand them the folder. It signals professionalism and speeds up the inspection.
Common installation mistakes and how to catch them before they cost you
Most roof failures trace back to a handful of recurring errors. Knowing them lets you ask the right questions before the crew packs up.
The most frequent mistakes:
- Skipping tear-off when it is required. Two layers of asphalt on a low-slope roof is the IBC maximum. A third layer traps moisture, adds weight, and voids most manufacturer warranties.
- Wrong underlayment for the zone. Felt paper in an HVHZ application, or a single layer of synthetic where the product requires two, are both permit failures.
- Improper flashing. Sealant-only flashing at chimneys and skylights fails within a few years. Step flashing with counter-flashing is the correct method. Read more about flashing methods for chimneys and valleys.
- Nail placement outside the nailing zone. High nailing (above the manufacturer’s specified zone) dramatically reduces wind resistance and voids the warranty.
- Inadequate ventilation. Undersized or blocked soffit vents cause heat buildup that degrades shingles from the underside.
- Improper material storage. Shingles stored on end or in direct sun before installation can warp and lose granule adhesion.
Inspector’s checklist for homeowners and property managers:
- Deck: no soft spots, no delamination, re-nailing schedule completed
- Underlayment: correct type, laps per spec, no fishmouths or tears
- Drip edge: installed at eaves under underlayment, at rakes over underlayment
- Starter course: full-width starter strip with sealant, not field shingles reversed
- Flashing: step flashing at all sidewalls, counter-flashing at chimneys, sealed valleys
- Fastener pattern: nail count and placement verified in field, perimeter, and corner zones
- Ventilation: intake and exhaust NFA confirmed
- Cleanup: magnetic sweep completed, all debris removed, permit card visible
Documenting issues: Take dated photos at each stage. Note any inspector comments on the permit card. If a deficiency is corrected, photograph the repair before it is covered. This documentation is your evidence for warranty claims and insurance adjusters.
Pro Tip: Do a magnet sweep yourself before signing off on final payment. Walk the yard, driveway, and any area where material was staged. Loose nails in a lawn are a liability, and a contractor who skips the sweep often skipped other things too.
Routine maintenance and how warranties actually work
A roof installed correctly still needs attention. The maintenance schedule is what keeps the warranty intact and the roof performing through its rated life.
Recommended inspection cadence:
- After every named storm or significant wind event
- Spring walkthrough (check winter damage, clear debris from valleys and gutters)
- Fall walkthrough (clear leaves before rainy season, inspect sealants before temperature drops)
- Every 3–5 years: professional inspection with written report
What to check each time:
- Flashings at chimneys, skylights, and sidewalls for lifting or cracking
- Ridge cap for missing or displaced shingles
- Gutters and downspouts for blockage and proper slope
- Soffit and ridge vents for blockage or damage
- Any penetrations (pipes, HVAC curbs) for sealant integrity
Manufacturer vs. installer warranties: Manufacturer warranties cover product defects. They typically require installation per the published instructions and may require registration within a set window after installation. Installer workmanship warranties cover labor errors. They are separate documents and often shorter in duration. Both can be voided by unauthorized repairs, improper maintenance, or failure to address known damage promptly. Replacing a few damaged shingles quickly is almost always cheaper than the warranty dispute that follows ignoring them.
For a detailed roof maintenance schedule you can copy into your property calendar, Thomasroofingandrepair has a practical reference that covers both residential and commercial assets.
Pro Tip: Store the manufacturer spec sheet, installation photos, permit, and inspection records in a single folder, physical or cloud-based. At resale, that documentation adds credibility and can support a higher asking price.
Where to find authoritative product approvals and code references
Knowing where to look is half the battle. These are the directories and documents that matter.
Primary directories:
- IBHS/RICOWI Roof Best Practices Guide: Use for installation sequence guidance, product testing philosophy, and wind/hail/fire hazard framing. Best starting point for any residential or commercial project.
- IBHS RICOWI Codes and Standards Guide: Use to understand how model codes (IBC/IRC) interact with local AHJ amendments. Critical before pulling a permit in any jurisdiction.
- FM Approvals (fmapprovals.com): Search by assembly type to find wind uplift and fire ratings for complete roof systems. Use this to verify that the deck, insulation, and covering combination you plan to use is actually listed.
- UL Product iQ (iq.ul.com): Similar to FM, but covers a broader range of residential products. Search by product category or manufacturer.
- ICC-ES (icc-es.org): Evaluation Service Reports (ESRs) provide third-party evaluation of products against model codes. Useful when a product is newer or not yet in a UL/FM directory.
- Florida Building Commission Product Approval Portal (floridabuilding.org): The authoritative source for Florida NOA and Product Approval numbers. Search by product category, manufacturer, or approval number. Required for any Florida permit submission.
How to use NOA/Product Approval numbers:
Look up the number on the Florida Building Commission portal before the material ships. Confirm the approval is current (not expired), covers your application (roof slope, exposure category, wind speed), and matches the specific product model being installed. Print the approval and include it in the permit folder. During inspection, the AHJ will cross-reference the installed product against the submitted approval number.
When to bring in a specialist: For complex conditions (low-slope roofs over conditioned space, roofs with multiple penetrations, high-rise or commercial assemblies, or any project in a coastal high-hazard area), consult a licensed building envelope specialist or design professional before finalizing the assembly. The cost of a design review is a fraction of the cost of a failed inspection or a storm-loss claim on an improperly specified system.
Key Takeaways
Proper roof installation requires tested products, AHJ-compliant methods, correct fasteners and underlayment, positive drainage with balanced ventilation, and documented inspections at every stage.
| Point | Details |
|---|---|
| Use third-party tested products | Specify FM Approvals or UL-listed assemblies, not just manufacturer warranties, for reliable wind and weather performance. |
| Pull permits and verify NOAs | Submit product approval numbers and NOAs with every permit application; local AHJ amendments override national model codes. |
| Match fasteners to the NOA | Use the nail count, shank length, and placement zone specified by the manufacturer and NOA, especially in high-wind zones. |
| Confirm slope and drainage | IBC requires ¼:12 minimum for low-slope membranes and 2:12 for asphalt shingles; secondary drains are mandatory on parapet roofs. |
| Thomasroofingandrepair | Serves Central Florida homeowners and property managers with permit-coordinated, code-compliant installations and storm-ready roofing. |
Why the details that look minor are the ones that matter most
The conventional wisdom in residential roofing is that material quality drives longevity. Buy a 50-year shingle and you get 50 years. That framing is wrong, and it costs homeowners money every storm season.
The research from IBHS and RICOWI points consistently to installation execution, not product grade, as the primary driver of storm performance. A mid-grade shingle installed with the correct six-nail pattern on a sealed deck outperforms a premium shingle installed with four nails and standard felt. The deck connection, the underlayment seal, and the fastening schedule are what hold when a Category 1 or 2 hurricane moves through Central Florida.
The other thing most guides understate: the permit and inspection process is not bureaucratic friction. It is the only independent verification that the work was done correctly. An AHJ dry-in inspection catches underlayment and flashing deficiencies before they are buried under shingles. A final inspection creates a dated record that matters when an insurance adjuster is standing in your living room after a storm.
The gap between a roof that passes inspection and a roof that performs in a storm is smaller than most people think. It comes down to whether the contractor followed the manufacturer’s instructions exactly, whether the nailing pattern matched the NOA, and whether someone verified it before the next layer went on. Those are not expensive steps. They are disciplined ones.
Thomasroofingandrepair handles the permits, the inspections, and the installation
Getting a roof installed correctly in Central Florida means navigating the Florida Building Code, HVHZ underlayment requirements, NOA submissions, and AHJ inspection sequencing, all before a single shingle goes down. That is a lot to manage if you are doing it for the first time.
Thomasroofingandrepair works with homeowners and property managers across Brevard, Volusia, and Orange counties to handle every stage: permit coordination, product approval submissions, code-compliant installation, and final inspection documentation. The team installs storm-ready roofing systems built to the fastening schedules and sealed-deck standards that Central Florida’s wind exposure demands. Financing options are available for qualified customers, and the company supports insurance claim assistance when storm damage is involved.
If you are planning a new installation, a replacement, or need a post-storm inspection, request a free estimate at Thomasroofingandrepair’s installation page. Bring your questions about permits and product approvals. The estimate conversation is the right time to get them answered.
Useful sources
Installation standards and best practices:
- IBHS/RICOWI Roof Best Practices Guide: Installation sequence, wind/hail/fire product testing philosophy, and fastening guidance. Best first reference for any residential project.
- IBHS RICOWI Codes and Standards Guide: How IBC/IRC model codes interact with local AHJ amendments; critical for permit preparation.
- IBC Roof Assembly Requirements: Materials, Drainage and Wind Uplift: Slope minima, secondary drainage mandates, and wind uplift assembly evaluation under ASCE 7.
Florida-specific and HVHZ resources:
- Florida Building Commission Product Approval Portal: Search and verify NOA/Product Approval numbers before permit submission. Required for all Florida roofing permits.
- Florida Roofing Building Codes Guide: Plain-language summary of FBC requirements including HVHZ underlayment and nailing rules.
- 2026 FBC HVHZ Test Protocol Analysis: Detailed changes to tile, underlayment, and assembly test protocols in the 9th Edition FBC.
Safety and fall protection:
- OSHA 29 CFR 1926.501: Duty to have fall protection: Federal fall protection requirements for roofing work, including low-slope and steep-slope rules.
- OSHA Fall Protection in Residential Construction: Practical guidance on fall protection methods for residential roofing operations.
How to use NOA/Product Approval numbers: Search the Florida Building Commission portal by manufacturer name or approval number. Confirm the approval covers your specific product model, roof slope, and wind exposure category. Print the current approval and include it in the permit folder. During inspection, the AHJ cross-references the installed product against the submitted number. An expired or mismatched approval is a common cause of failed inspections.