TL;DR:
- Roof flashing is essential for waterproofing roof joints and penetrations, preventing most leaks on your roof. Proper layering and maintenance of flashing components are crucial, as failure often leads to costly interior damage and structural issues. Regular inspections and professional repairs help ensure long-term roof integrity and performance.
Roof flashing is thin metal sheeting installed at every point where your roof surface meets a wall, penetration, or change in direction, creating a waterproof barrier that channels water away from vulnerable joints. 90–95% of all roof leaks originate at flashing points rather than from damaged shingles. That single fact explains why understanding what is roof flashing matters more than most homeowners realize. Common materials include galvanized steel, aluminum, and copper, each suited to different roof conditions and budgets. Without properly installed flashing, even a brand-new roof can develop leaks within months.
What is roof flashing and where does it go?
Roof flashing is the industry term for thin metal strips or sheets that seal the joints and penetrations in a roofing system. Shingles alone cannot waterproof the spots where your roof meets a chimney, a dormer wall, a vent pipe, or a roof valley. Flashing fills that gap by creating a physical barrier that forces water to flow outward and downward, away from your home’s interior.
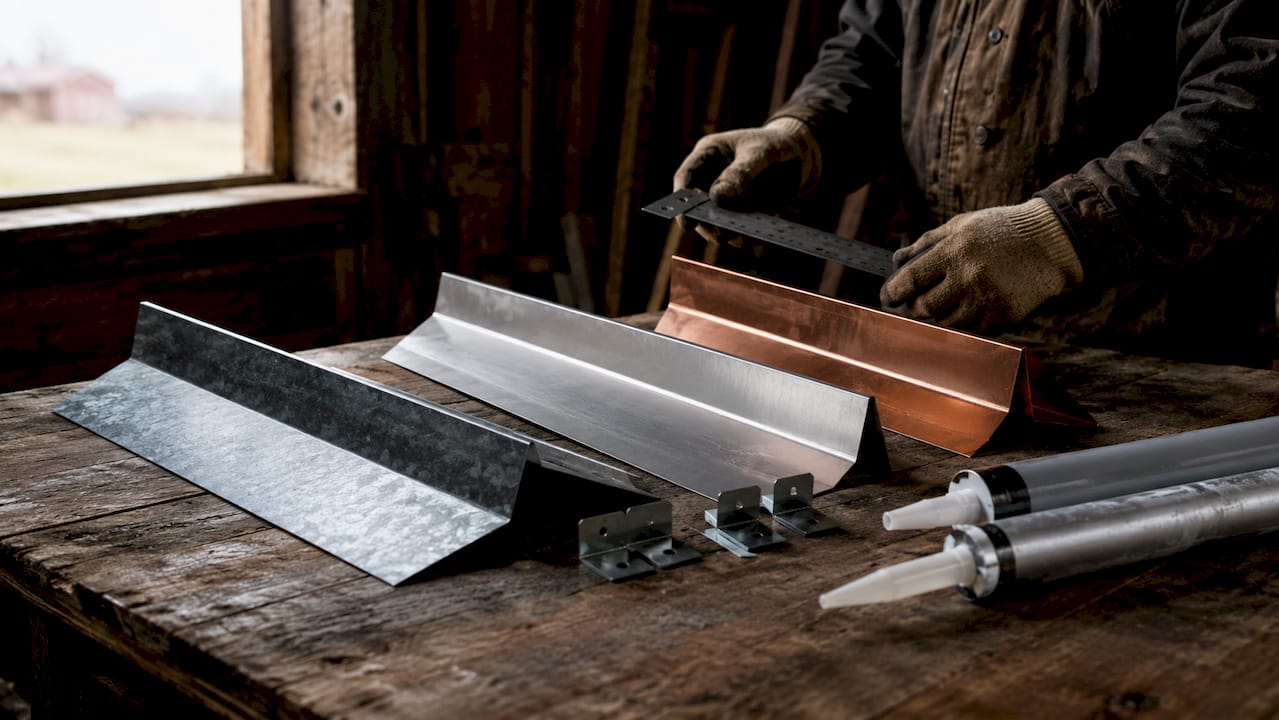
The most common flashing materials are galvanized steel, aluminum, and copper. Galvanized steel is the most widely used because it balances cost and durability well. Aluminum is lightweight and easy to shape, making it popular for complex roof geometries. Copper is the premium choice: it lasts decades and develops a protective patina, though it costs significantly more than the other options.
Flashing appears in several locations on a typical residential roof. You will find it around chimneys, along the edges where a roof slope meets a vertical wall, in the valleys where two roof slopes converge, around vent pipes and skylights, and along the lower roof edge above gutters. Each location has a specific flashing type designed for it.
What are the main types of roof flashing?
Seven main flashing types cover the full range of roof penetrations and intersections. Each type solves a specific water-intrusion problem, and knowing them helps you spot potential trouble spots during a roof inspection.
| Flashing Type | Where It’s Used | Common Material |
|---|---|---|
| Step flashing | Along walls where a roof slope meets a vertical surface | Galvanized steel, aluminum |
| Counter flashing | Over step flashing at chimneys and masonry walls | Galvanized steel, copper |
| Apron flashing | At the base of chimneys and dormers | Galvanized steel, copper |
| Valley flashing | In the V-shaped channel where two roof slopes meet | Galvanized steel, aluminum |
| Drip edge | Along the lower roof edge above gutters and fascia | Galvanized steel, aluminum |
| Pipe boot | Around vent pipes and plumbing stacks | Rubber-capped metal base |
| Kick-out flashing | Where a roof slope ends at a sidewall above a gutter | Galvanized steel, aluminum |
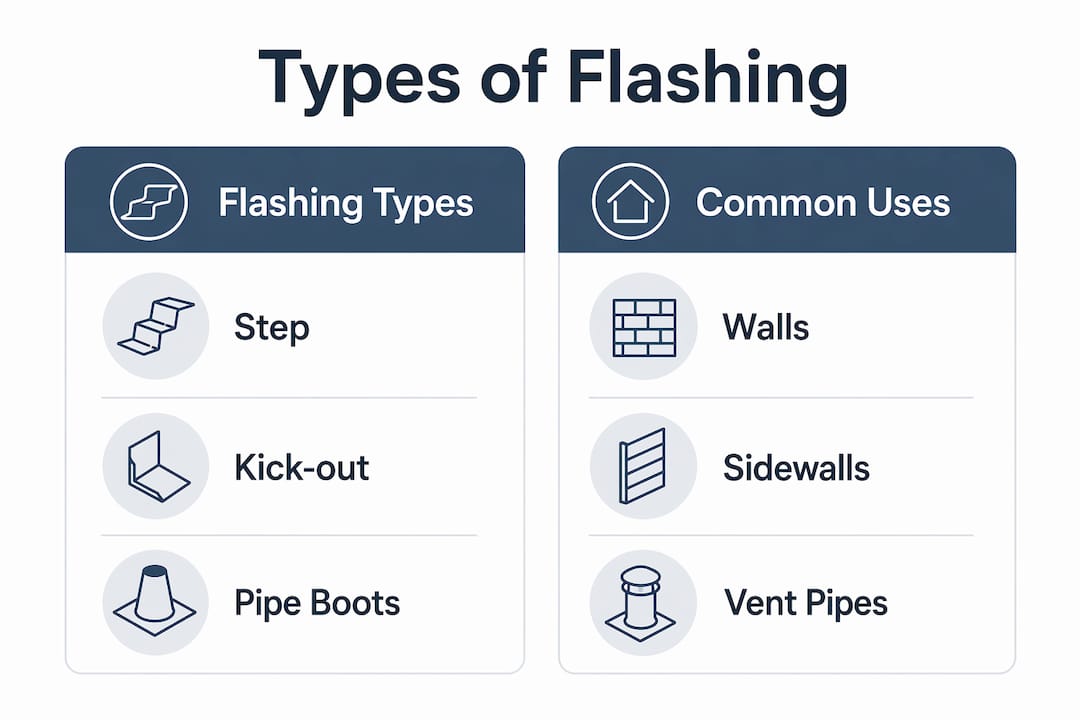
A few of these deserve extra attention. Step flashing is installed in overlapping L-shaped pieces woven between each shingle course along a wall. It is the most labor-intensive type to install correctly, which is why it is also one of the most common sources of leaks when done wrong.
Kick-out flashing is frequently missing on older homes, yet it is critical. Without it, water running down a sidewall has nowhere to go except behind the siding, where it silently rots the wall sheathing for years before you notice any damage inside.
Pipe boots use a rubber cone to seal around round vent pipes. The rubber works well initially, but UV exposure degrades it over time, eventually causing the cone to split and leak. This is one of the most predictable failure points on any roof.
How does roof flashing work to prevent leaks?
Roof flashing works by creating a waterproof bridge that directs water away from joints and penetrations rather than letting it pool or seep into the roof structure. The mechanism depends entirely on correct layering, not on sealant alone.
The correct installation sequence is non-negotiable:
- Install the underlayment first. The synthetic or felt underlayment goes down over the roof deck and must fully overlap the bottom edges of any flashing pieces placed on top of it.
- Set the flashing in position. Each piece of flashing sits on top of the underlayment at the joint or penetration it protects.
- Lay shingles over the flashing top edges. Shingles must cover the upper portion of each flashing piece so water flows over the metal, not under it.
- Apply sealant only as a secondary measure. Sealant fills micro-gaps at edges and seams but does not replace proper layering.
Water must always flow over roofing layers, never into them. When a roofer reverses this sequence, even slightly, water finds its way under the flashing and into the roof deck.
Step flashing at a sidewall illustrates this perfectly. Each L-shaped piece overlaps the one below it by at least two inches, and each shingle course covers the top leg of the piece beneath it. The result is a continuous staircase of overlapping metal that water cannot penetrate regardless of how hard it rains.
Pro Tip: Sealant is a gap filler, not a primary waterproofing barrier. If a roofer relies on heavy sealant application to compensate for poor flashing placement, the repair will fail within a few years. Proper flashing layering is the only reliable solution.
A common installation mistake is nailing through the face of a flashing piece rather than through the top leg only. Face nailing creates a hole directly in the water-shedding surface. Another frequent error is insufficient overlap between flashing pieces, which leaves a gap that heavy rain can penetrate under wind pressure.
What are the key benefits of roof flashing for homeowners?
Properly installed flashing delivers benefits that go well beyond stopping an obvious drip. Here is what you actually protect when flashing is done right:
- Structural integrity. Water that enters at a chimney base or wall junction soaks into roof decking, rafters, and wall framing. Rot in these structural components is expensive to repair and can compromise your home’s safety.
- Insulation protection. Wet insulation loses most of its thermal value and becomes a breeding ground for mold. Flashing keeps the attic space dry and your insulation performing as designed.
- Extended roof lifespan. A roof with properly maintained flashing lasts significantly longer than one where flashing has failed and water has repeatedly cycled through the decking.
- Mold and air quality control. Moisture intrusion at flashing points is one of the leading causes of attic mold growth, which affects indoor air quality throughout the home.
- Lower long-term repair costs. Addressing a failed pipe boot or resealing counter flashing costs a fraction of what you pay to repair water-damaged ceilings, walls, and framing after years of undetected leaks.
The hidden cost factor is the most important one. Because water can travel far from the actual flashing failure point before showing up inside your home, damage accumulates long before you see a stain on the ceiling. By the time a leak becomes visible, the underlying rot or mold may already be extensive. Flashing that works correctly eliminates that silent damage cycle entirely.
Roof flashing installation and maintenance: what you need to know
Flashing installation is governed by building code. IRC R903 mandates specific flashing dimensions and lap requirements to meet waterproofing standards. That code exists because the consequences of getting it wrong are serious and expensive.
Common failure points to watch
- Chimney counter flashing sealant. The sealant used to seal counter flashing into the masonry reglet (the groove cut into the chimney) dries and cracks after 8–12 years due to UV exposure and thermal cycling. This is a predictable failure with a known timeline, which means you can schedule maintenance before a leak starts.
- Pipe boot rubber cones. UV degradation causes the rubber cone to split, usually starting at the base of the pipe. Once the cone splits, every rain event pushes water directly into the roof deck around the vent pipe.
- Step flashing at additions. Home additions often have step flashing installed by general contractors rather than roofing specialists. The quality is frequently below standard, and these areas deserve close attention during any roof leak diagnosis.
- Valley flashing at debris accumulation points. Leaves and debris collect in valleys and hold moisture against the flashing for extended periods, accelerating corrosion on galvanized steel.
When to inspect and replace flashing
Inspect flashing at least once a year, ideally in the fall before the rainy season. Look for lifted edges, visible rust, cracked sealant, or missing kick-out pieces. Flashing replacement typically happens at the same time as a full roof maintenance process, since removing and reinstalling shingles to access old flashing is part of the same workflow.
Pro Tip: Do not attempt to DIY step flashing or counter flashing repairs unless you have direct experience with roofing installation. The layering sequence is precise, and a single piece installed out of order creates a leak path that is worse than the original problem. For most homeowners, professional installation is the only reliable path to a watertight result.
Key takeaways
Roof flashing is the single most critical waterproofing component on your roof, responsible for preventing 90–95% of potential leak entry points at joints and penetrations.
| Point | Details |
|---|---|
| Flashing prevents most leaks | 90–95% of roof leaks originate at flashing points, not damaged shingles. |
| Seven types cover all locations | Step, counter, apron, valley, drip edge, pipe boot, and kick-out each protect a specific area. |
| Layering sequence is non-negotiable | Underlayment, then flashing, then shingles: reversing this order creates leak paths. |
| Sealant is secondary only | Metal flashing woven with shingles is the primary barrier; sealant only fills micro-gaps. |
| Schedule predictable maintenance | Chimney counter flashing sealant fails after 8–12 years; plan inspections accordingly. |
Why flashing deserves more attention than your shingles
After years of working with homeowners on roof repairs, one pattern stands out clearly. Homeowners obsess over shingles. They notice a missing tab or a curled edge immediately. But flashing? It is invisible from the ground, and most people have never thought about it until water appears on their ceiling.
The uncomfortable truth is that your shingles are rarely the reason your roof leaks. The actual failure point is almost always a flashing joint: a cracked sealant bead at the chimney, a split pipe boot, a missing kick-out piece above a gutter. And because water travels along rafters and sheathing before it drips through your ceiling, the stain you see in your living room might be three feet from where the water actually entered.
This misdiagnosis problem is real and costly. Homeowners patch ceiling drywall, repaint, and assume the problem is solved. It is not. The flashing failure is still there, and the next rain event starts the damage cycle again.
My honest recommendation: shift your inspection focus away from shingles and toward every point where your roof meets something else. Chimneys, walls, vents, valleys, and the lower roof edge above your gutters deserve more scrutiny than the field of shingles between them. A trained eye on those joints once a year catches the predictable failures before they become expensive ones.
— Thomasroofingandrepair
Get expert flashing installation in central florida
Flashing problems are the leading cause of residential roof leaks, and they rarely announce themselves until the damage is already done. Thomasroofingandrepair specializes in roof installation and repair across Central Florida, including Horizon West, Titusville, and Palm Bay, with a focus on the precise flashing work that keeps roofs watertight for decades.

Whether you need a full roof installation in Horizon West with correctly sequenced flashing from day one, or a professional evaluation of existing flashing on your current roof, Thomasroofingandrepair brings the craftsmanship and local code knowledge Central Florida homes require. Contact us for a free estimate and find out exactly where your roof stands before the next storm season arrives.
FAQ
What is roof flashing made of?
Roof flashing is most commonly made from galvanized steel, aluminum, or copper. Galvanized steel is the most widely used material because it balances cost, durability, and ease of installation.
Is roof flashing necessary on every roof?
Yes. Every residential roof has joints, penetrations, and edges that shingles alone cannot waterproof. Flashing is required by IRC R903 building code at all these locations to meet minimum waterproofing standards.
How long does roof flashing last?
Metal flashing itself can last 20–30 years or longer, but the sealant used at chimney counter flashing typically fails after 8–12 years due to UV exposure. Pipe boot rubber degrades on a similar timeline and should be inspected regularly.
Can i repair roof flashing myself?
Minor sealant touch-ups on accessible areas are within DIY reach, but step flashing and counter flashing repairs require precise layering with shingles and are best left to a licensed roofer. Improper DIY repairs frequently create worse leak paths than the original failure.
How do i know if my flashing is failing?
Look for water stains on ceilings near chimneys or exterior walls, visible rust or lifted metal edges on the roof, and cracked or missing sealant at chimney bases. Because leaks appear far from the failure point, a professional inspection is the most reliable way to pinpoint the source.