TL;DR:
- Effective storm damage restoration involves immediate safety assessments and thorough documentation to strengthen insurance claims. Proper sequencing of exterior, moisture, and interior repairs prevents secondary damage, with licensed contractors ensuring quality work. Early, detailed documentation and careful claim process management result in faster recovery and fairer settlements in Central Florida.
Storm damage restoration is the process of safely repairing and recovering a property after storm-related events by assessing damage, securing vulnerable areas, coordinating with insurance, and completing physical repairs. Homeowners in Central Florida face this process regularly, given the region’s exposure to hurricanes, tropical storms, and severe thunderstorms. This storm damage restoration guide walks you through every phase, from the first hour after a storm passes to the final inspection that releases your insurance holdback. Follow the workflow here and you protect both your property and your claim.
What safety and documentation steps should homeowners take first?
The first 72 hours post-storm strongly influence the overall claim outcome. Decisive action during this window improves your insurer relationship and sets the foundation for a faster, fuller recovery. Before you walk through any damaged area, run through these safety checks:
- Confirm the structure is stable. Look for sagging rooflines, cracked foundation walls, or leaning exterior walls before entering.
- Shut off utilities at the main panel if you suspect electrical damage or gas leaks.
- Wear protective footwear and gloves. Broken glass, exposed nails, and contaminated water are common hazards after storms.
- Do not use open flames indoors until gas lines are confirmed safe.
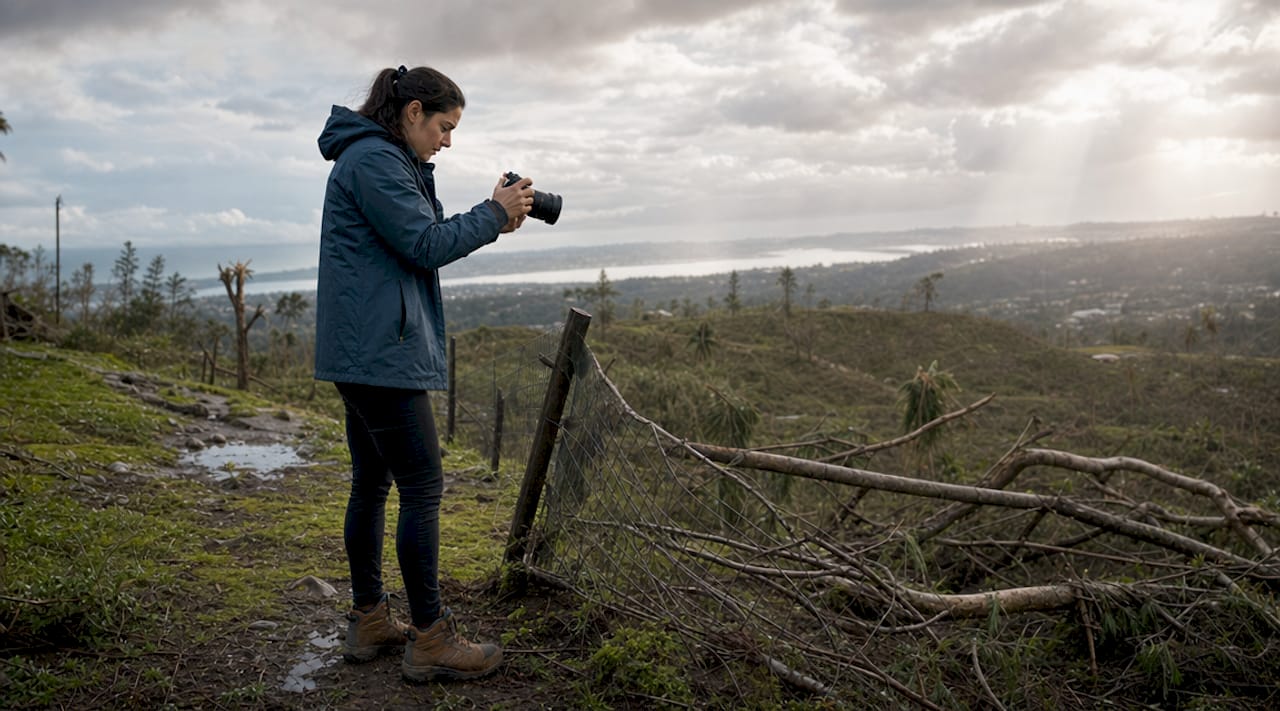
Once you know the space is safe, documentation is your next priority. Photograph and video every damaged area before touching anything. Capture wide shots for context and close-ups for detail. Use your smartphone’s timestamp feature or a dedicated app like Google Photos, which geotags images automatically. Document damaged personal property as well, not just structural elements.
Emergency mitigation services like board-up and tarping are covered expenses under most standard homeowner policies, even before an adjuster inspects the property. Call a licensed contractor to tarp exposed roof sections and board broken windows immediately. Keep every receipt. These costs are reimbursable and protect you from claim reductions tied to additional damage that occurs after the storm.
Pro Tip: Take a short video walkthrough narrating what you see in each room. Spoken descriptions paired with video footage are harder for adjusters to dispute than photos alone.
“Failure to perform duty-to-mitigate tasks like emergency tarping can cause insurance carriers to reduce or deny claims for damage that occurs after the initial storm event.” — Texas Department of Insurance
How to file an insurance claim for storm damage
Filing your insurance claim correctly is as important as the physical repairs themselves. The formal starting point is the First Notice of Loss, commonly called FNOL. File your FNOL within 24 to 48 hours of the storm if possible. Most carriers accept FNOL by phone, online portal, or mobile app. Delays in filing can complicate your timeline and give adjusters grounds to question the cause of damage.
Here is the sequence to follow after filing FNOL:
- Confirm your claim number and adjuster assignment. Adjusters are typically assigned within 3 to 14 days after FNOL. Write down every name and contact number.
- Schedule an independent contractor assessment before the adjuster arrives. A licensed roofing contractor can document damage in detail and produce a written estimate. This gives you a baseline to compare against the adjuster’s scope.
- Attend the adjuster inspection. Walk the property with the adjuster and point out every item your contractor documented. Do not assume they will find everything on their own.
- Review the initial estimate carefully. Check for missing line items, incorrect measurements, or omitted materials. This is where most homeowners lose money.
- File supplements for missed or underpaid items. Nearly 70 to 80% of storm damage claims require supplements for missed or underpaid repair items. Supplements can add thousands of dollars to your recovery.
The supplement process is where professional contractors using Xactimate, the industry-standard estimating software, earn their value. Detailed Xactimate scopes and supplements lead to greater claim success and fairer settlements. If your contractor is not producing a line-item Xactimate estimate, ask why.
Pro Tip: Request your carrier’s claim file, including the adjuster’s field notes and photos, before accepting any settlement. You have the legal right to this documentation in most states.
What does the storm damage repair workflow look like?
The physical repair process follows a predictable sequence, though timelines vary significantly based on scope. Here is how the phases compare:
| Repair scope | Typical timeline | Key activities |
|---|---|---|
| Roof only | 1 to 3 days | Shingle replacement, flashing, underlayment |
| Exterior components | 1 to 3 weeks | Siding, windows, gutters, fascia |
| Interior repairs | 2 to 6 weeks | Drywall, flooring, paint, insulation |
| Whole-home restoration | 6 to 20 weeks | All of the above plus structural work |
Whole-home restoration typically spans 6 to 20 weeks, while roof repairs often take 1 to 3 days once materials are on-site. That gap matters when you are coordinating temporary housing or managing a rental property.
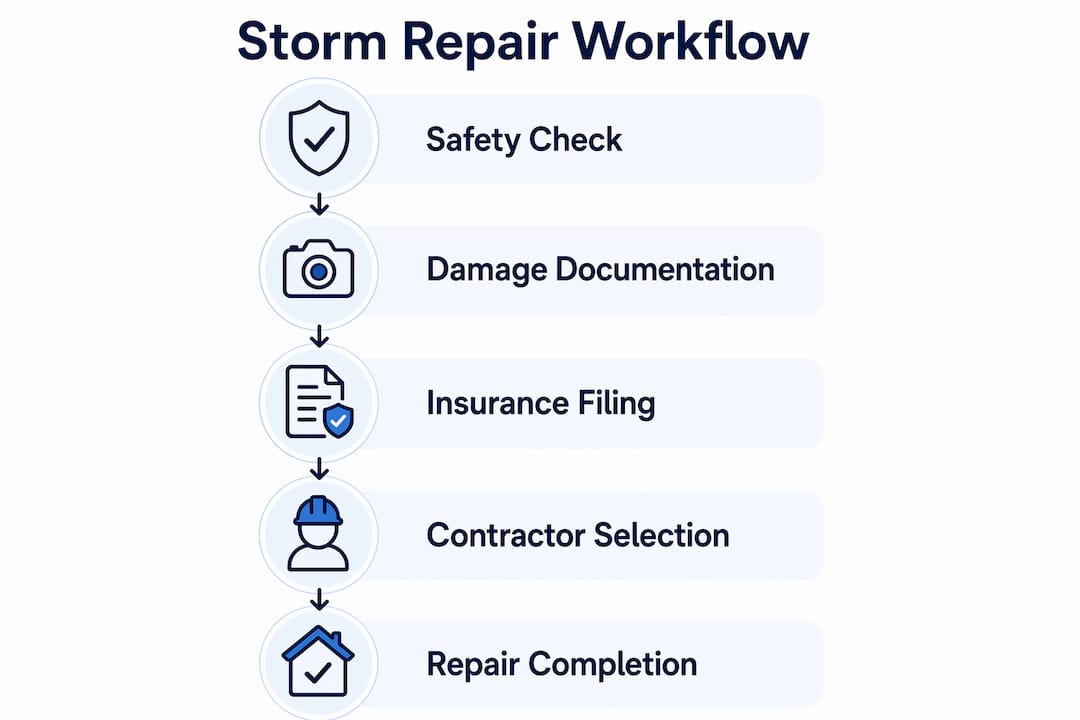
The repair workflow for most residential properties moves through these phases:
- Exterior first. Roof, siding, windows, and gutters are addressed before interior work begins. Water intrusion must be stopped before drywall or flooring repairs make any sense.
- Moisture assessment. Hidden moisture detectable only through calibrated moisture meters and thermal imaging is a leading cause of structural and mold problems after storms. A professional moisture scan before closing up walls is not optional. It is the step that prevents a $2,000 repair from becoming a $20,000 mold remediation.
- Interior repairs. Drywall replacement, insulation, flooring, and paint follow once the structure is dry and secure.
- Final inspection. Most insurance policies hold back a portion of the replacement cost value until repairs are complete and documented. A final inspection with photos and a signed contractor completion certificate releases that holdback payment.
For Central Florida homeowners, the storm damage repair process carries an added urgency. Florida’s humidity accelerates mold growth, meaning a delay of even a few days after water intrusion can create secondary damage that complicates your claim.
How to avoid contractor scams and costly mistakes
Storm events attract unlicensed contractors who move from neighborhood to neighborhood offering fast, cheap repairs. Protecting yourself requires knowing the specific warning signs and legal rules before you sign anything.
- Never sign an Assignment of Benefits agreement without legal review. AOB agreements transfer your claim rights to the contractor, removing your control over the insurance payout and complicating any future disputes.
- Verify contractor licensing. In Florida, you can check any contractor’s license status through the Department of Business and Professional Regulation (DBPR) online portal in under two minutes.
- Avoid contractors who solicit door-to-door immediately after a storm. Legitimate companies have enough work through referrals and existing clients. Aggressive post-storm solicitation is a red flag.
- Never pay the full project cost upfront. A standard payment structure involves a deposit, a progress payment at a defined milestone, and a final payment upon completion.
- Keep proof of your deductible payment. In many jurisdictions, it is illegal for contractors to waive or rebate insurance deductibles. Carriers can require proof that you paid your deductible before releasing final claim funds.
Pro Tip: Ask any contractor for their Certificate of Insurance before work begins. This document shows their general liability and workers’ compensation coverage. If they cannot produce it within 24 hours, walk away.
The financial stakes are real. Missing supplements can leave 20 to 40% of entitled insurance recovery unclaimed. Signing the wrong agreement can hand that money to a contractor with no accountability to you. The storm recovery checklist approach, where you document everything and verify every party, is the only reliable protection.
Key takeaways
Effective storm damage restoration requires immediate safety checks, thorough documentation, disciplined insurance filing, and a sequenced repair workflow completed by licensed contractors.
| Point | Details |
|---|---|
| Act within 72 hours | Early documentation and mitigation directly improve claim strength and restoration timelines. |
| Supplement your claim | 70 to 80% of claims are underpaid initially; supplements recover thousands in missed repair costs. |
| Sequence repairs correctly | Address exterior and moisture issues before interior work to prevent mold and structural damage. |
| Avoid AOB agreements | Signing over claim rights removes your control and can complicate dispute resolution significantly. |
| Verify every contractor | Check DBPR licensing, request certificates of insurance, and never pay the full amount upfront. |
What I’ve learned after years of storm restoration work in Central Florida
The homeowners who recover fastest and most fully are almost never the ones with the least damage. They are the ones who documented everything before the storm. Pre-loss photos of your roof, gutters, siding, and interior are worth more than any post-storm photo you can take, because they eliminate the carrier’s ability to argue that damage was pre-existing. I tell every homeowner I work with: spend 20 minutes once a year photographing your property from every angle and store those images in a cloud folder labeled by date.
The second thing most homeowners underestimate is the supplement process. Carriers issue initial estimates quickly, and those estimates are almost always incomplete. The 13-step claims process used by experienced restoration contractors exists precisely because a first estimate is rarely a final one. If you accept the first number without a contractor reviewing the scope, you are almost certainly leaving money on the table.
One more thing: restoration timelines are not linear. Permit delays, material backorders, and adjuster response times all create gaps. Build that expectation in from day one. A whole-home restoration in Brevard or Volusia County after a major storm can take four to five months when you factor in permitting and supplement negotiations. That is not a failure. That is the reality of doing the job correctly.
— Thomasroofingandrepair
How Thomasroofingandrepair helps you recover after a storm

Thomasroofingandrepair serves homeowners across Brevard, Volusia, and Orange counties with licensed roofing inspections, emergency tarping, and full storm damage repair from the first call through final inspection. The team handles the documentation, the contractor estimates, and the coordination with your insurance adjuster so you are not managing that process alone. Whether your property needs a fast emergency roof repair or a complete exterior restoration, Thomasroofingandrepair brings the same dependable workflow to every job. Request a free estimate through the residential roofing services page and get a licensed professional on your roof within 24 hours of your call.
FAQ
How long does storm damage restoration take?
Roof-only repairs typically take 1 to 3 days once materials arrive, while whole-home restoration spans 6 to 20 weeks depending on scope, permitting, and insurance timelines.
What should I document after storm damage?
Photograph and video every damaged area before any cleanup or repairs begin, capturing wide shots and close-ups. Include damaged personal property, exterior surfaces, and any visible water intrusion inside the home.
Can I file a storm damage insurance claim weeks after the storm?
Most carriers accept claims weeks or even months after a storm, but filing within 24 to 48 hours produces the strongest outcomes. Delays give adjusters grounds to question whether damage is storm-related.
What is an Assignment of Benefits and why should I avoid it?
An Assignment of Benefits (AOB) is a legal agreement that transfers your insurance claim rights to a contractor. Signing one removes your control over the payout and can complicate any dispute with your carrier or the contractor.
Does insurance cover emergency tarping and board-up costs?
Yes. Emergency mitigation services like tarping and board-up are covered expenses under most standard homeowner policies and are reimbursable even before an adjuster inspects the property. Keep all receipts.